Are you stuck trying to figure out why your Studio One tracks won’t play?
You’re not alone! Believe it or not, every day thousands of people experience the same issue and are left scratching their heads.
I can only imagine how frustrating this must be for you. After all, the muses of creativity don’t come to us often, so when they do, it’s essential that our tracks are ready for recording and playback.
But don’t worry, you’ve come to the right place. I’m here to help you get things back to normal. Below, you’ll find a list of 8 simple fixes to get your tracks working and playing once again.
These are:
Keep reading to restore your studio to its former glory!
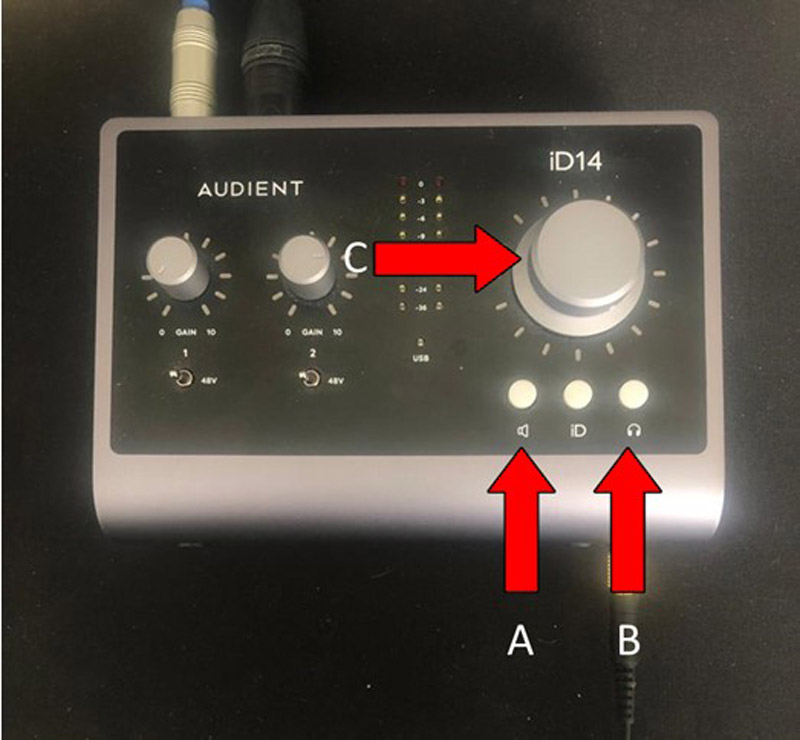
If you’re new to the world of recording, it’s highly likely that you’re missing this.
You wouldn’t believe how many times I forgot about turning my interface’s volume up when I was just starting out. It’s one of those things that seem obvious, but that even the pros in multi-million dollar studios forget now and then.
Depending on what interface you own, you might be able to turn the volume up directly from the hardware, or through your manufacturer’s software on your computer.
Solution: You can always refer to your user manual to see how you can turn the volume up on your interface. If you’re an Audient user like me, here’s how you can go about it:
If your volume was the issue, your tracks should now be audible.
Another thing that can be really easy to miss is a damaged or disconnected cable. This is especially likely if your audio setup has several inputs and outputs, which can easily make cable management a nightmare.
I know that keeping your cables well organized can sound like an unnecessary chore, but trust me, it will make troubleshooting much simpler when you have a clear vision of what goes where.
Solution: There are two main things that could be happening here. Your cables could be damaged or your Studio One settings could be wrong.
If your tracks are playing, but there’s no sound, I’d check for a loose or damaged cable first.
Check your studio monitors/headphones at their connection ports, and then follow the cables back to your interface to make sure everything’s sitting where it should. Assuming nothing seems out of place, try using a different cable.
If you have a spare cable for testing, go ahead and use it to see what happens. Provided that playback is restored, there’s your answer.
In case you don’t have a spare cable lying around for testing, try asking some friends to see if you can borrow theirs briefly.
Now, if you press the space bar but your track won’t play, you’ll likely have to make some software adjustments on your DAW (Digital Audio Workstation, a fancy name for audio production software, like Studio One).
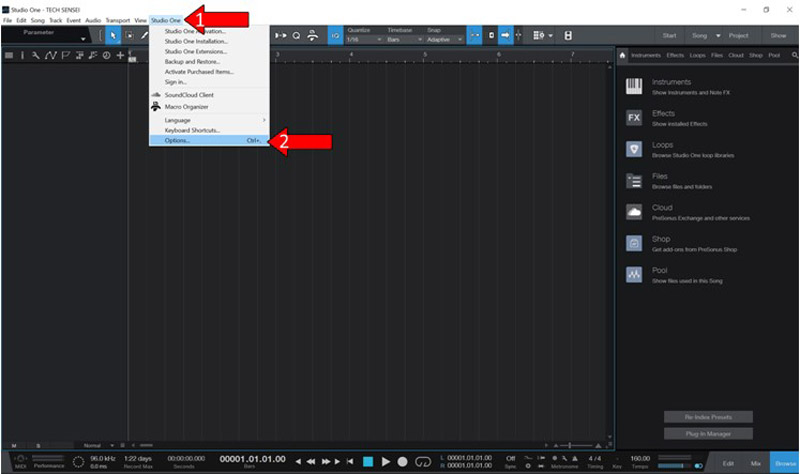
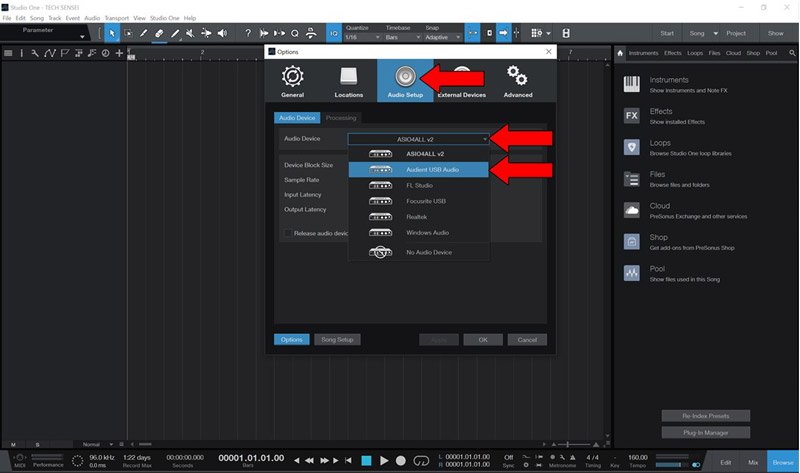
By selecting the right audio option, Studio One should now play your tracks effortlessly.
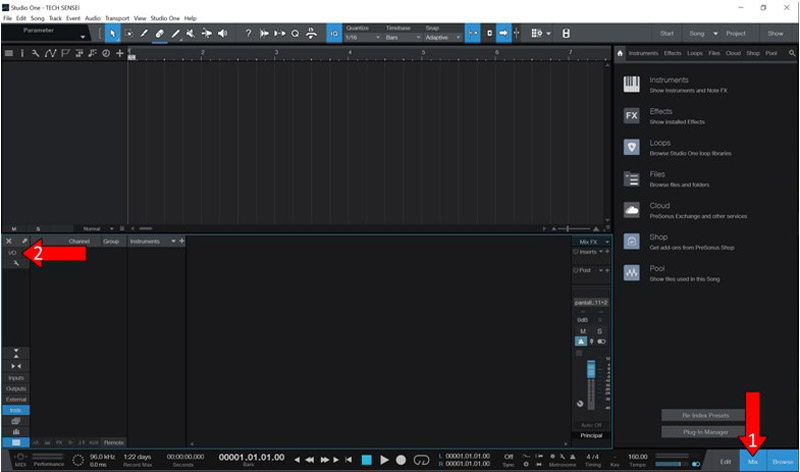
Moving on, let’s make sure that you’re using the right I/O configuration. If you’re new to the world of self-recording and production, let me break it down for you!
I/O means “inputs/outputs” and is basically what maps the Studio One interface to your audio interface’s physical ports. This is where you tell the software which channels you want to use to record and where the audio should be sent for playback.
As you can imagine, the fancier your interface is, the more physical inputs/outputs it has, and the more complex the I/O configuration can be.
For example, a Focusrite 18i20 has 18 inputs and 20 outputs, so if you were to set it up on Studio One, you’d have to spend a couple of hours getting everything right.
A simpler interface, on the other hand, like an Audient ID14 Mkii only has 3 inputs and 4 outputs without expansions, so the I/O setup on Studio One should be a breeze.
Solution: To know which specific outputs to use on your interface, please refer to your user manual, as you’re likely to find several recommendations and a detailed layout there.
Assuming you no longer have it, you can always Google search for “<Your Audio Interface’s Make And Model Go Here> user manual”.
Here’s how you can open the I/O configuration to give you a general idea:

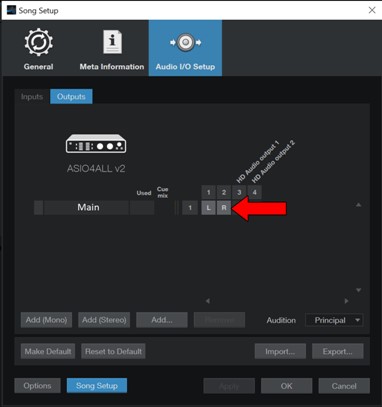
Believe it or not, incorrect I/O setup is one of the main causes of playback and recording issues, so, as annoying as having to read your user manual can be, I strongly recommend it!
Sometimes the simplest answer is the right one.
Studio One is just like any other program on your computer. You might not see them, but whenever it runs, there are thousands of background processes being executed.
Normally, these work as expected and provide us with the functions we value; however, sometimes a corrupted file or bug can cause the program to crash or fail to load some of the code it needs to play your tracks.
When this happens, your best bet is to close the DAW and relaunch it. This works wonders, as it gets rid of any files that might have been acting up, restarting them from scratch.
Important: When you do this, please make sure to keep everything as is. Do not unplug your audio interface, change the sample rate or tweak anything until things are back up and running.
Doing otherwise could result in creating additional problems.
If relaunching the program did not work, we might need to be a little more aggressive.
Sometimes any corrupted files or bugs that might be causing trouble are not fixed by simply closing Studio One. Sometimes, you’ll have to get rid of the DAW altogether by uninstalling it from your computer.
I know this sounds extreme, but don’t worry! While you will have to go through the process of reinstalling the software, your VSTs and projects will not be deleted. Worst case scenario, you’ll have to rescan your plugins after you’re done, but that’s it!
Solution: If you’ve never uninstalled a program from your computer before, here’s how to do it:
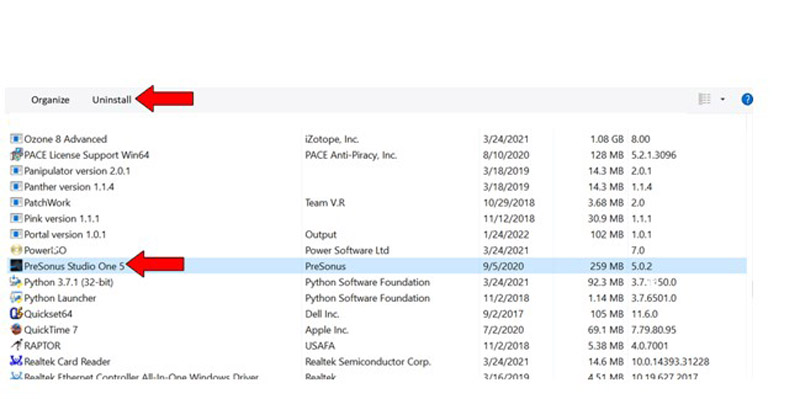
Once you have fully deleted Studio One, please reinstall it like the first time you purchased the software.
If you’re new to the world of audio production, you may not have heard about these yet. Provided that’s the case, don’t worry, I’ll be happy to shed a light on this.
VST stands for “Virtual Studio Technology” and is basically the technical term for plugins (not always, but in most cases). Equalizers, Compressors, Delays, Virtual Instruments, and many more studio tools fall under this category and have revolutionized the way in which we make music.
And while they are truly wonderful, they’re still software, which means that they can fail from time to time.
Whether it’s because your current PC is not powerful enough to run them, or simply because they encountered a bug or corrupted file, in some cases, a faulty VST could be to blame when a Studio One track won’t play.
This is more common than you’d think. Especially with third-party VSTs from sketchy developers.
Solution: There are two ways you can go about this.
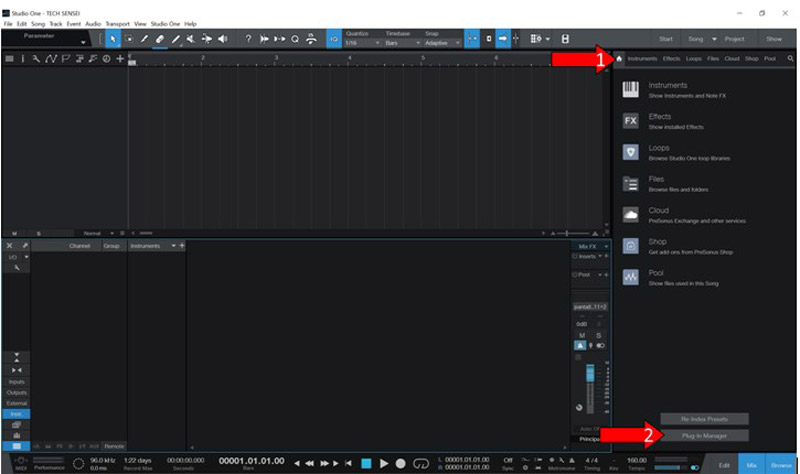
If you can’t live without the VST in question, you can try uninstalling and reinstalling it and see if that works.
Alternatively, if you can survive while using other similar plugins, you remove the suspicious VST from your program list so it’s not scanned on startup and you can forget about it.
Here’s how you can do that:
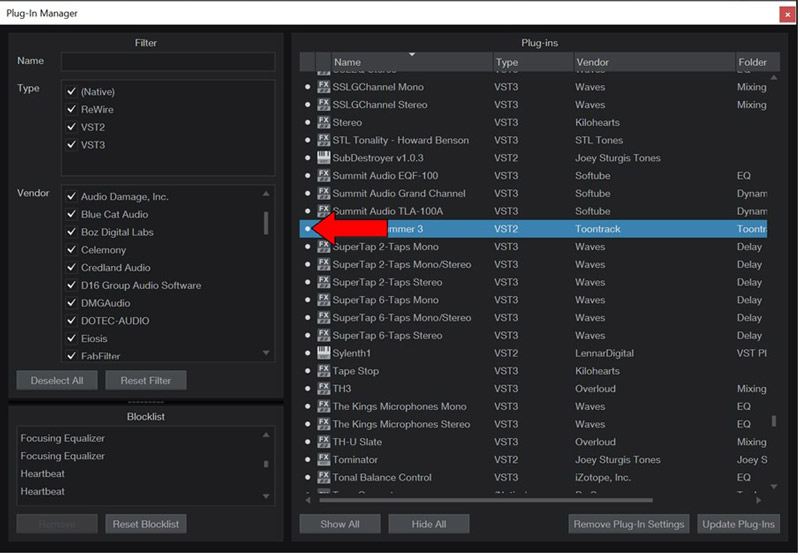
From this point on, that particular plugin will no longer be scanned on startup by Studio One, and it won’t show up on your browser after closing and relaunching.
Please note that this will only work if the track that wasn’t playing had the VST you just deactivated loaded onto it. If you’re having this issue with an audio track with no plugins on it, the issue likely lies elsewhere.
Ever since sample rates were first introduced to audio production enthusiasts, there’s been an ongoing debate on which setting is better.
Some say you can hear the difference in clarity between 44.1 kHz and 96 kHz, while other people will argue that you’re just taking up space and burdening your CPU for no reason.
The sample rate in audio tells us how many times the sounds we’re working on are processed every second. This means that using a sample rate of 96 kHz should provide you with much more detailed results than 44.1 kHz (on paper).
But we’re not here to argue about who’s right and who’s wrong.
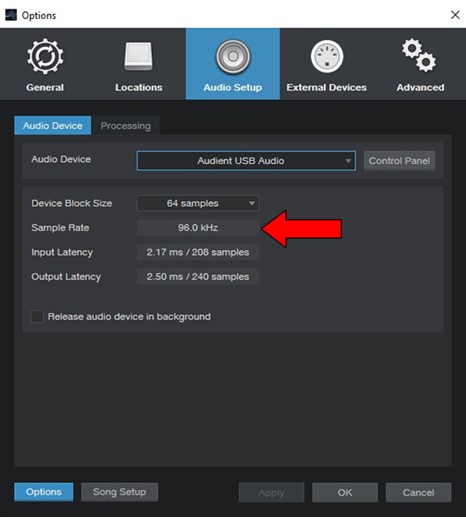
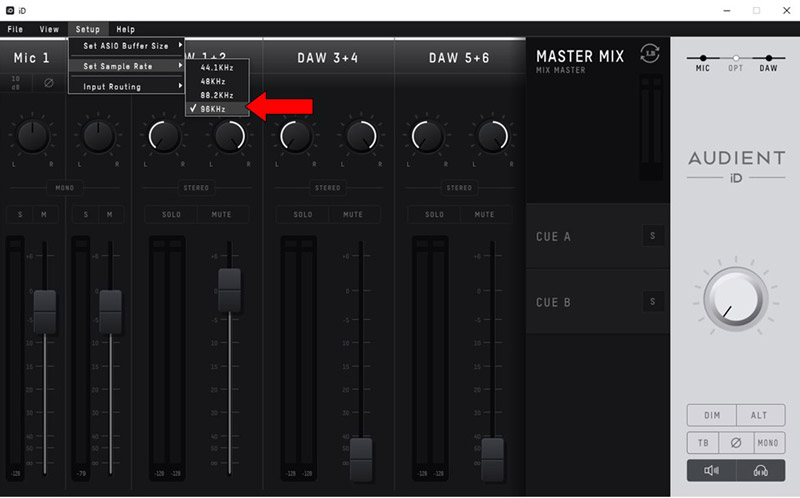
Whatever the case may be, one thing’s for sure. If Studio One and your audio interface are not in the same sample rate, you’re likely going to have problems.
Now, this shouldn’t normally concern you, as most of the time, whenever you start a project in Studio One, your interface will set itself to the same sample rate as the program, but this isn’t always true.
Sometimes, your audio interface could glitch and fail to change along with your DAW. And though this sounds catastrophic, worry not! Fixing it is really simple.
Solution:
Lastly, let’s talk about changing your buffer size.
In a nutshell, this is how much time you allow your computer to analyze the audio you’re working on before it plays it back to you. The higher the buffer size, the more time your PC has to analyze everything, and the lighter the load is on your CPU.
Small buffer sizes are great to avoid latency, also known as input/output delay, which is essential for precision when recording any kind of track.
This is where high-end interfaces, like the Apollo Twin, come in handy, as they have their own CPUs that provide you with zero latency.
But let’s be honest, few people can afford multi-thousand dollar interfaces for audio production, so if like me, you use an entry or mid-level one for your projects, your PC will have to take the load.
Setting a buffer size that’s too small for your computer’s capabilities is really easy to notice, as you’ll start getting pops and cracks while playing your tracks. But if you go even smaller, your PC might stop playing everything altogether and crash.
This could very well be the reason why your Studio One tracks won’t play.
Solution: There are three ways to solve this problem. One that’s free, and two that are not.
If you’re planning on upgrading your PC sometime soon, you could invest in a better CPU that can handle smaller buffer sizes without pops, cracks, or crashes.
Alternatively, you could look into audio interfaces with internal processing power to lighten the load on your CPU.
That being said, given the current worldwide chip situation and hardware prices, you might be tempted to put off this upgrade and opt for something that will cost you nothing except a little bit of time.
If this is the case, you can follow the steps from the previous point to lower your sample rate. Believe it or not, using the same buffer size on a sample rate of 44.1 kHz is much less demanding on your computer than using it on 96 kHz.
Provided that your CPU is still under heavy load after this, you could also try exporting some of your instrument tracks as audio if your song is already finished.
This will free up a ton of processing space on your system.
Here’s how to do it:
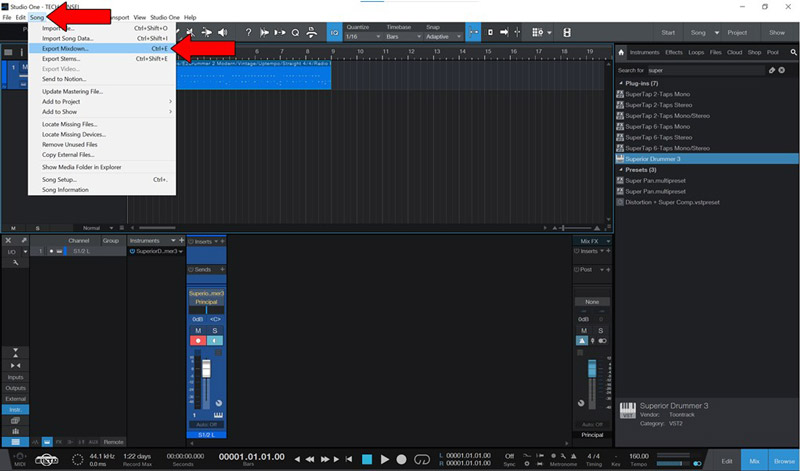
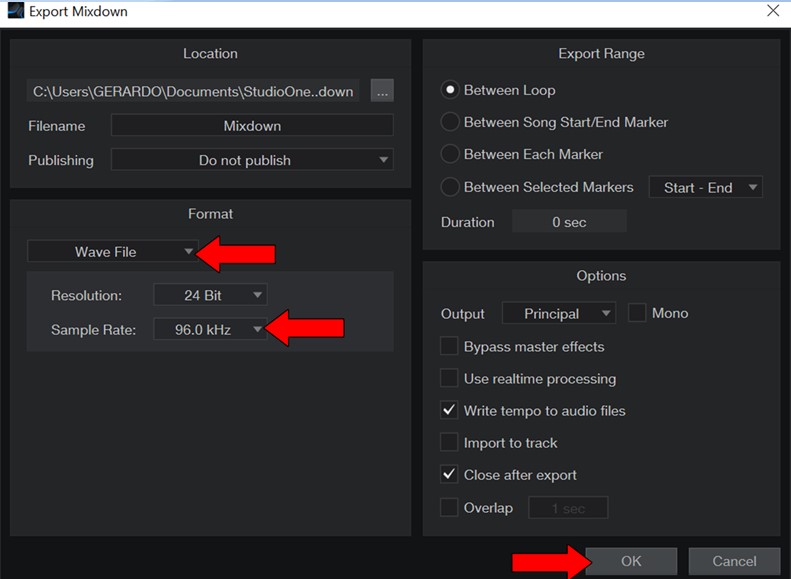
I know this can be tedious to do with every instrument track and VST you have loaded, but I promise you it will decrease your CPU usage significantly and allow you to lower your buffer size without audio issues.
Having your Studio One tracks not play can be a nightmare. Especially if you’re recording another artist and the clock is running.
What a disaster!
Luckily, as I hope you’ve learned in this piece, addressing most of the causes behind this issue is fairly simple and rarely ever time-consuming. In most cases, simple actions, like matching your sample rate, double-checking that your I/O configuration is set up properly, and setting the buffer size wisely, should do the trick.
Thank you so much for sticking with me all the way to the end. If you found this article helpful, you’ll be glad to know that we upload new content weekly. Make sure to check out all our other incredible resources below to become a Tech Detective yourself!
Best of luck to you.

Detective Anderson is a grizzled veteran of policing the internet’s cyber-streets. After decades of experience busting illegal floppy disk rings and underground dial-up connections, Anderson has now been placed in charge of the more modern Tech Detective team.