Are you losing it because you can’t hear anything in Studio One?
Get in line! Every day, thousands of producers and musicians encounter the same problem, and believe it or not, many of them are not beginners.
I can only imagine how frustrated you must be right now. Nothing can kill the creative process as quickly as getting complete radio silence from your DAW.
But don’t worry, you’ve come to the right place for answers. I’m here to guide you and help you solve this issue.
Below, you’ll find a list of 8 possible fixes you can try to get your audio back to normal. I’m sure one of them will hit the nail on the head.
These are:
Keep reading to start creating masterpieces once more!
The first thing I want us to take a look at is your cable management.
This may be more or less of an issue depending on your audio setup. If you have an audio interface with several inputs and outputs and make the most of them, you likely have a jungle of cables lying around.
Once you set everything up, it’s really rare that you ever have to move things around.
But sometimes even the slightest pulling motion can disconnect your speakers/headphones from your audio interface and create total silence.
And what’s even worse, there’s also a chance that nothing has come loose, but one or more of your cables are damaged.
Solution: You’re probably going to hate what I’m about to say, but if you suspect this to be the source of this issue, you’ll have to check all your connections and maybe even try a set of new cables on your speakers to rule out damage.
This should be simple enough if you own an Audient ID14, or a Focusrite 2i2. But if you are the proud owner of an 18i20 or an Apollo x8… oh boy, you better clear your schedule!
Now, I know not everyone has spare cables lying around just for testing, which is why I’d recommend asking your friends or family if you can borrow theirs for a little while.
Provided that you get sound with new cables, you’ll have to go shopping.
Yet another reason why you can’t hear anything in Studio One, is that you have not set your audio interface’s volume levels correctly.
This happens a lot, and not only to beginners but to seasoned users as well. I’ve been producing music for over 5 years, and I still forget to turn the volume knob on my interface much more often than I care to admit.
Depending on your interface’s make and model, you might be able to turn the volume up directly on it. If there are no buttons to move around, that’s fine too, you can always make any adjustments on your computer.
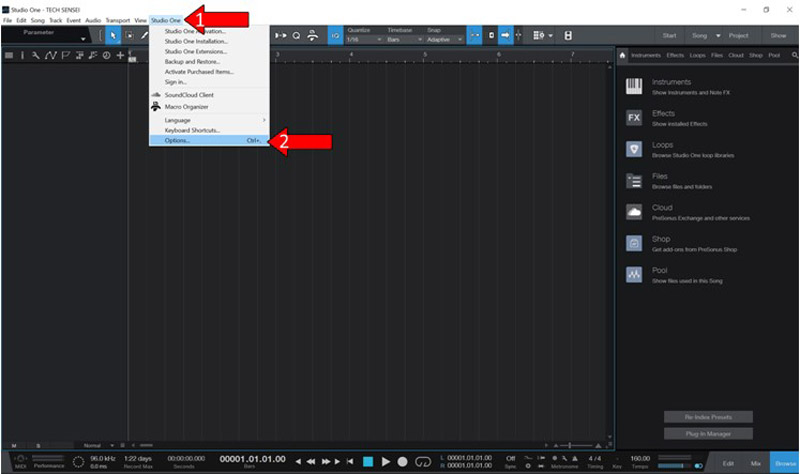
Solution: I have an Audient ID14 Mkii. Here’s how I turn the volume up on it to paint you a clearer picture:
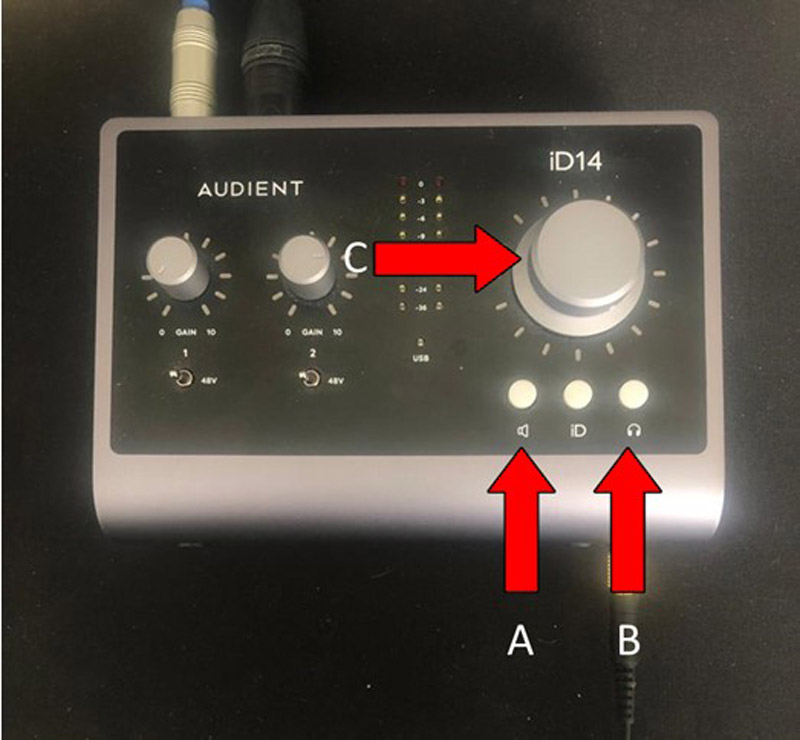
There are hundreds of different audio interfaces and manufacturers out there, so if you want to know how to do this on your model, please refer to your user manual or go to Google and search for “How to turn up the volume on my <Your Interface’s Make And Model Go Here>”.
I know what you’re thinking, “There’s no way on Earth that I could have missed something this obvious”.
And while I’d normally agree with you, remember that it’s always the least important things that we tend to overlook more often.
Who knows? Maybe you accidentally pressed the “M” key on your keyboard, or maybe it’s a software glitch. Whatever the case may be, double-checking that your Master channel is not muted, can’t hurt.
Solution: If you’re a newcomer to music production and have no idea what this is, let me briefly explain.
The Master channel is where ALL your tracks go. Studio One (and every other DAW, for that matter), automatically route all your tracks to this channel as they’re created.
You can change this later and reroute them to a Bus or an FX Send, for example (we’ll cover that some other time), but ultimately, all your audio ends there.
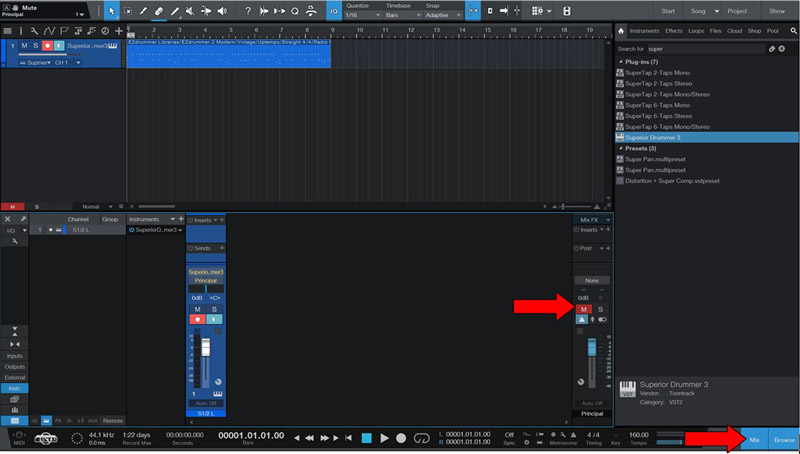
Here’s how you can make sure that your Master channel is not muted:
Remember a while back when I told you that, if your interface had many inputs and outputs, you could have a hard time troubleshooting?
Well, this is what I meant.
If you’ve never set up an audio interface before, let me briefly explain a couple of things.
I/O stands for Inputs/Outputs and it’s basically the path you tell Studio One to send and receive audio through. If you have this set incorrectly, the audio from your songs will not be sent to the right speakers or headphones, thus creating the illusion of something else being wrong with the DAW.
When you have a simple interface, routing is very simple. But when you have one that offers +10 inputs and outputs, getting it right can be very tricky.
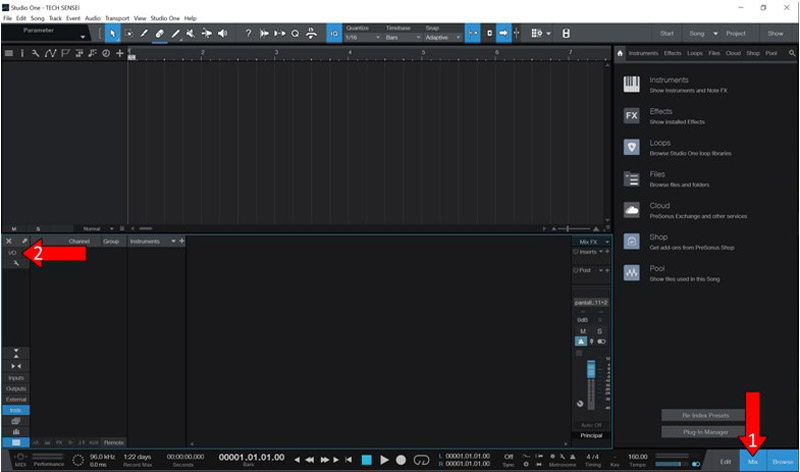
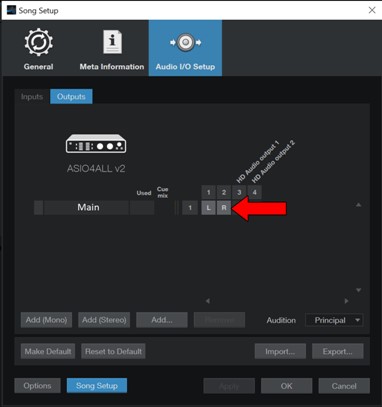
Solution:

Believe it or not, fixing this issue could be as simple as closing and relaunching Studio One.
Why should that work? Because it acts as a forced restart.
You see, whenever we use our favorite software, there are thousands of background processes running simultaneously. Most of the time these work normally and provide us with the functions we value on them.
However, sometimes a bug or a corrupted file can get in the way and affect how Studio One works.
By closing and relaunching the DAW, you’re getting rid of any processes that might be having trouble, restarting them from scratch. And the best part is that this fix works for about 90% of technical difficulties out there, so don’t be afraid to try it out.
Oh! And make sure to save your song before doing it.
Yet another possible reason why you can’t hear anything in Studio One is that you need to reinstall it.
Sometimes closing and relaunching the software is not enough and you need to be a little more aggressive. A lot of people put off doing this because they think they’re going to lose all their VSTs and saved projects, but this is not the case.
Worst case scenario, you’ll have to rescan your plugins after reinstalling Studio One, but that’s it.
Solution: Here’s how you can uninstall Studio One on your PC.
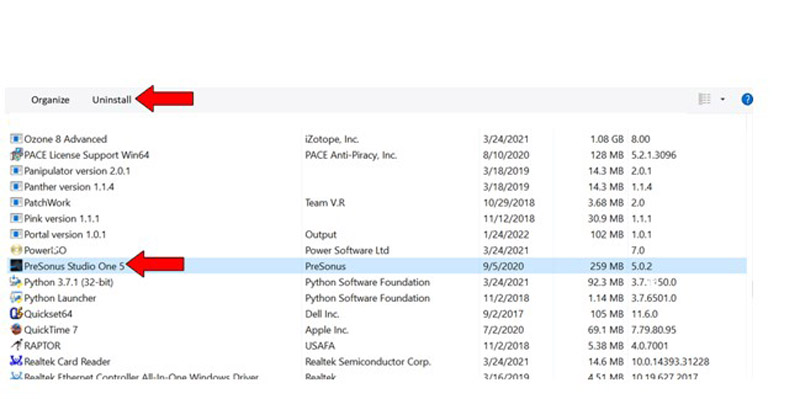
Once you have completed this process, repeat the steps you took the first time you got the software to reinstall it.
Never heard of them before? Don’t worry, I’m happy to shed some light on the concept.
VST stands for “Virtual Studio Technology”, which is the fancy name for the programs you use within Studio One to alter your audio. EQs, Compressors, Limiters, Delays, Reverbs, Virtual Drums, and many, many more plugins fall under this category.
VSTs are known for being versatile, but also CPU-heavy, and extremely reliant on proper file installation.
Believe it or not, if you delete a single file on your favorite VST folder, the whole program will stop working and produce no sound. I know how this doesn’t immediately sound like a problem. I mean, all you have to do is be careful not to delete anything, right?
Well… not quite.
Sometimes your antivirus can mistake one of your favorite VST files for a virus and automatically delete it. And this is just the tip of the iceberg, as high CPU loads can also stop VSTs from working normally.
This could very well be the reason why you can’t hear anything in Studio One (that is, if you’re only using VSTs to make music. If you’re not getting sound from recorded audio tracks either, the issue likely lies elsewhere).
Solution: Try uninstalling and reinstalling the VST you’re getting no sound from and see if that works.
Here’s how you can do that:
If there was a file missing, it should now be available and you should have sound again.
Lastly, if nothing else has worked so far, there’s a really good chance that your audio interface’s sample rate and that within Studio One are different.
Normally, this should be a concern, as Studio One should adjust your new project settings to the sample rate on your interface automatically; however, this is not always the case.
Sometimes, either due to a glitch or any other difficulty, your sample rates might not match. And while that sounds really concerning, there’s still one thing to be clarified. What on Earth is “Sample Rate”?
Great question!
The sample rate determines how many times your computer analyzes and processes the audio waves on your project every second. Some people argue that, the higher you go, the better your overall audio quality will be.
But that comes at a cost. More processing equals more CPU load and more stress on your PC.
Most of the time, this should not be a problem, but if you’re working on a large project with several tracks and decide to set your sample rate really high (96 kHz or 192 kHz, for example), you can quickly start noticing pops and cracks on playback.
And it gets worse. If you keep pushing your CPU, your DAW might crash altogether or stop playing audio, which would explain why you can’t hear anything in Studio One.
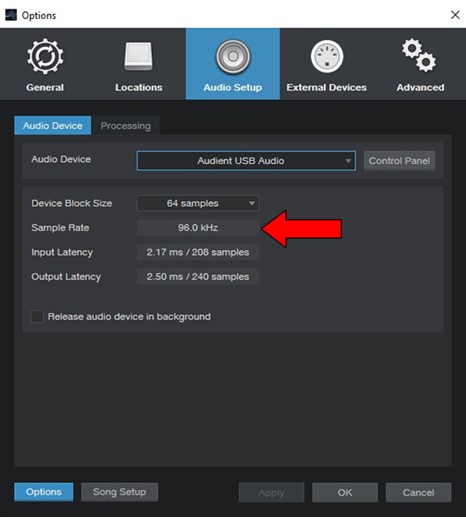
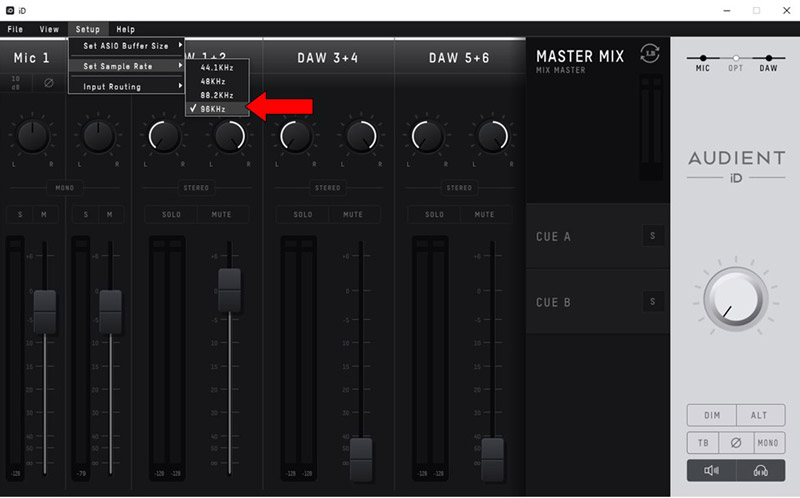
Solution: Here’s how you can change the sample rate both inside Studio One and directly on your interface. Matching them and choosing a lower one should solve most of your issues.
Not hearing anything in Studio One can be one of the most frustrating things that can happen to you. After all, whether you’re self-producing your new album or working with a fellow artist, good performance is essential.
What a mess!
Luckily, as I hope you’ve learned in this piece, addressing most of the causes behind this inconvenience is fairly simple and quick.
In most cases, simple actions, like matching your sample rates, and getting your I/O configuration set up right, should do the trick.
Thank you so much for sticking with me all the way to the end. If you found this article helpful, you’ll be glad to know that we upload new content weekly. Please be sure to check out all our other wonderful resources below to become a Tech Detective yourself!
Best of luck to you.
Detective Anderson is a grizzled veteran of policing the internet’s cyber-streets. After decades of experience busting illegal floppy disk rings and underground dial-up connections, Anderson has now been placed in charge of the more modern Tech Detective team.