Are you looking for the best Studio One plugins to unlock your potential?
You’re not alone! Ever since DAWs were invented, musicians and producers have been looking for the best tools to make their songs sound professional.
I know it can be overwhelming to have so many options and not know which one you should pick. But don’t worry, you’ve come to the right place for answers.
Below, you’ll find a list of some of the best plugins included with Studio One. These should clarify your options and help you focus on making music again.
The 10 best Studio One plugins to unlock your potential are:
Keep reading to become an expert producer!
A lot of people will tell you that, all you need to mix a song from 0-90% is an EQ and a Compressor, everything else is bells and whistles.
And you know what? They’re right.
After all, mixing is nothing but manipulating frequencies and controlling audio spikes, so these tools should be more than enough. When it comes to compressors, there’s a whole book of options you can choose from depending on your budget.
Multi-million dollar studios have racks filled with 1176 analog units costing a whopping $3,000 brand-new! But do you really need to spend that much money to sound good?
Absolutely not!
For most people, something like the Compressor plugin included with Studio One is more than enough to control the audio dynamics in their songs. All you need is to know how to adjust the knobs and settings to get the sound you want.
Here’s a quick guide on how a basic Compressor works:
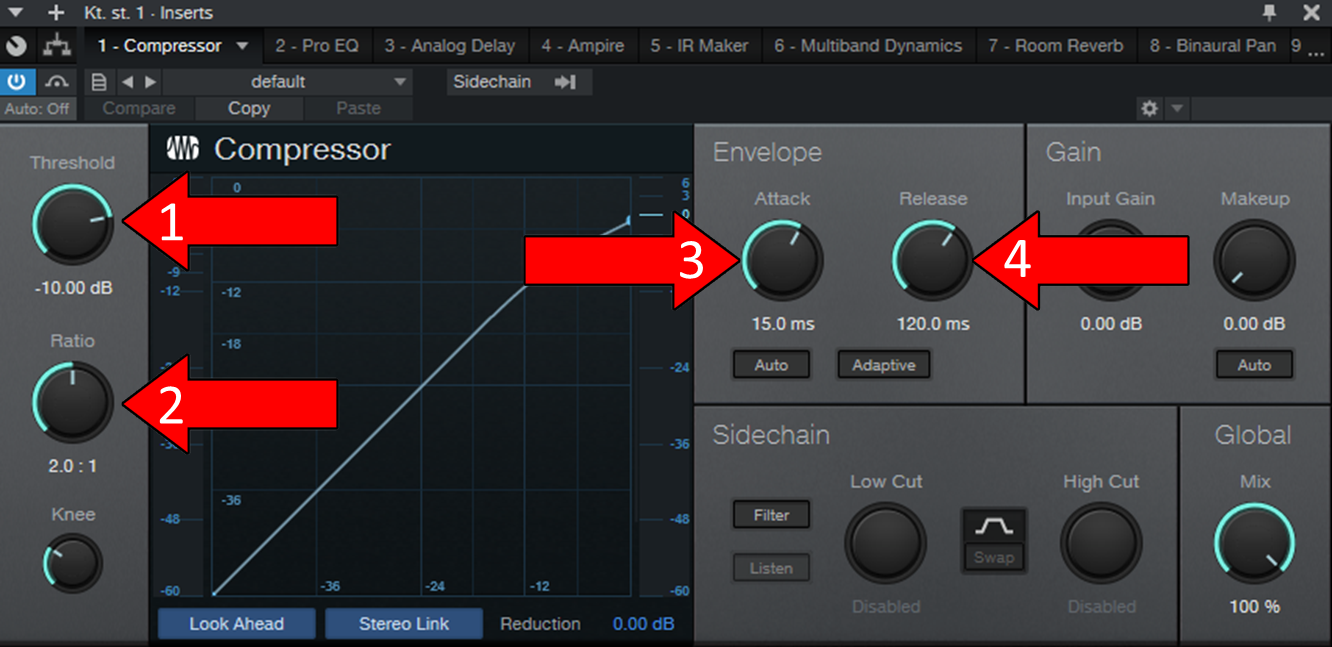
As a general rule, you want rhythm sections, like guitars to have a medium-fast attack time and a medium-slow release time. Percussion instruments, such as snares, are best compressed with slower attack and faster release times.
Now, let’s talk about EQ, which stands for “Equalizer”. This is a tool to visually analyze audio frequencies and manipulate them.
As you may know, every piece of audio you record is made up of frequencies, and these are normally divided into Lows, Low-Mids, Mids, Mid-Highs, and Highs.
Bass guitars, for example, have a bigger presence in the Lows than they do in the Highs, whereas violins and female vocals are much more noticeable in the Mid-Highs and Highs.
To make a song sound good, all the elements on it must work together. It would be a dream come true if this happened naturally after recording, but sadly, this is not the case.
This is where EQ comes in handy.
This plugin allows us to see the frequencies more clearly and cut or boost them where necessary. Most of the time, EQs are useful to prevent overlapping, which is very common when mixing a kick drum and a bass guitar, for example.
Lucky for you, there’s already a wonderful EQ built into Studio One called Pro EQ2! Here’s a quick look at it:
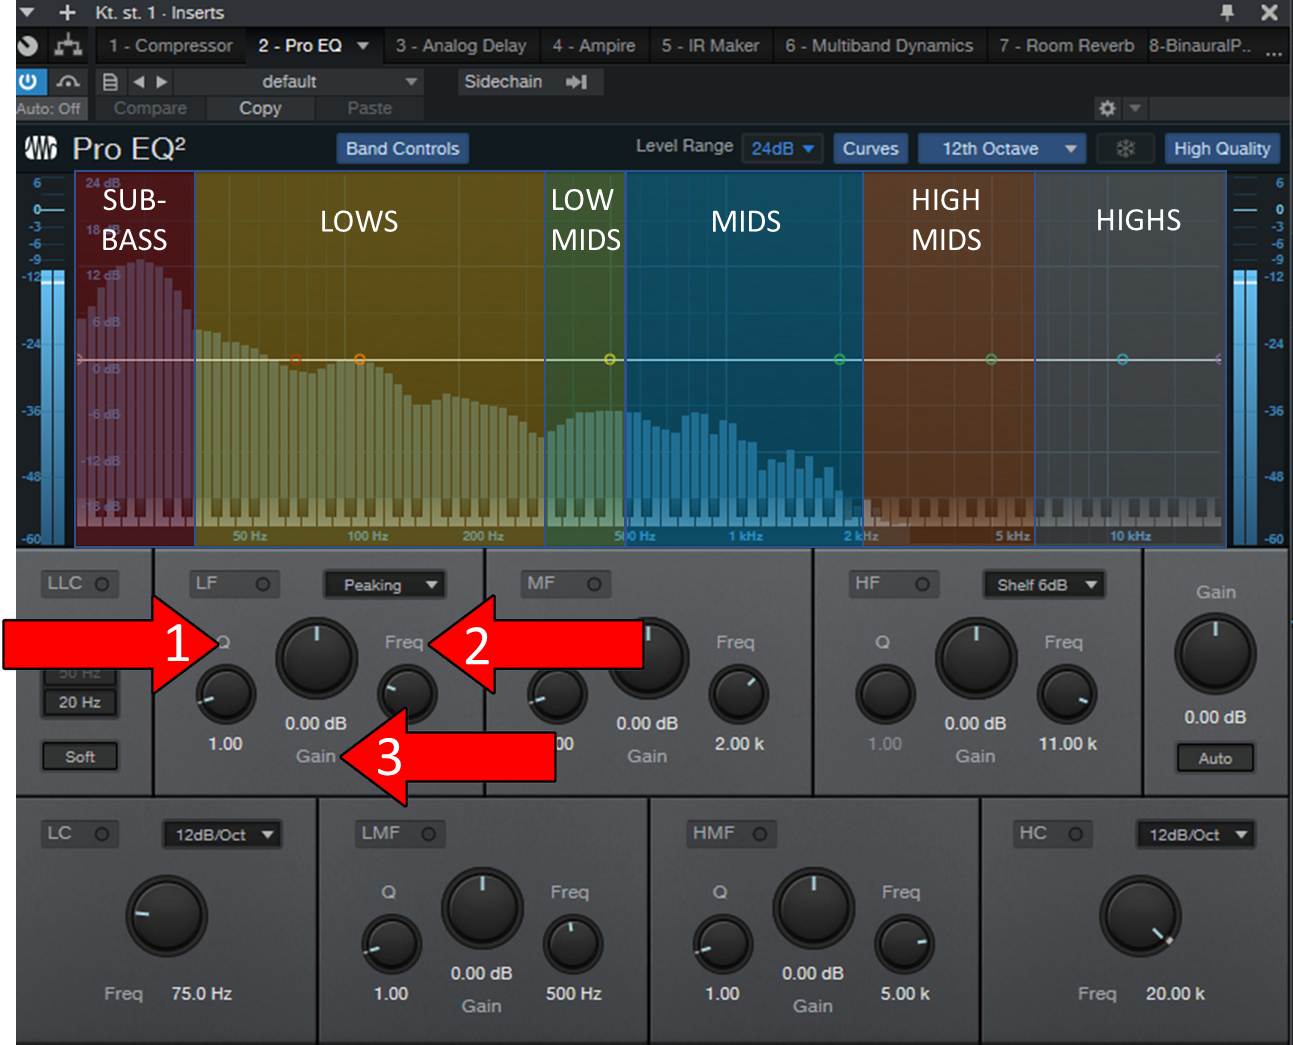
In this graph, I’m working on a bass guitar, which is why most of the frequencies are spiking on the left (the low frequencies). The more you keep going right, the higher the frequencies will become.
Audio frequencies are normally measured in Hz (Hertz) and kHz (kilohertz, or 1,000 Hertz). Higher frequencies vibrate much faster through the air, so they have more Hertz than their lower counterparts.
In Studio One’s Pro EQ2, you can control all the frequencies in this graph, except for the Sub-bass, but don’t worry! Unless you’re working on something very specific, anything below 20-30 Hz is inaudible to humans.
If you look at the image above, you’ll notice three arrows.
The “Q” knob (1) determines how wide or narrow the frequency cut or boost you’re making will be. The “Freq” knob (2) lets you choose what frequency you want to change. The “Gain” knob (3) allows you to control how heavily you’ll lower or increase the volume of the frequency range you have selected.
There are several online courses that can teach you all you need to know to use an EQ to your advantage. Make sure to check them out to unlock your potential!
Having covered the two most essential plugins in audio production, let’s take a look at one of the most popular effects in the industry.
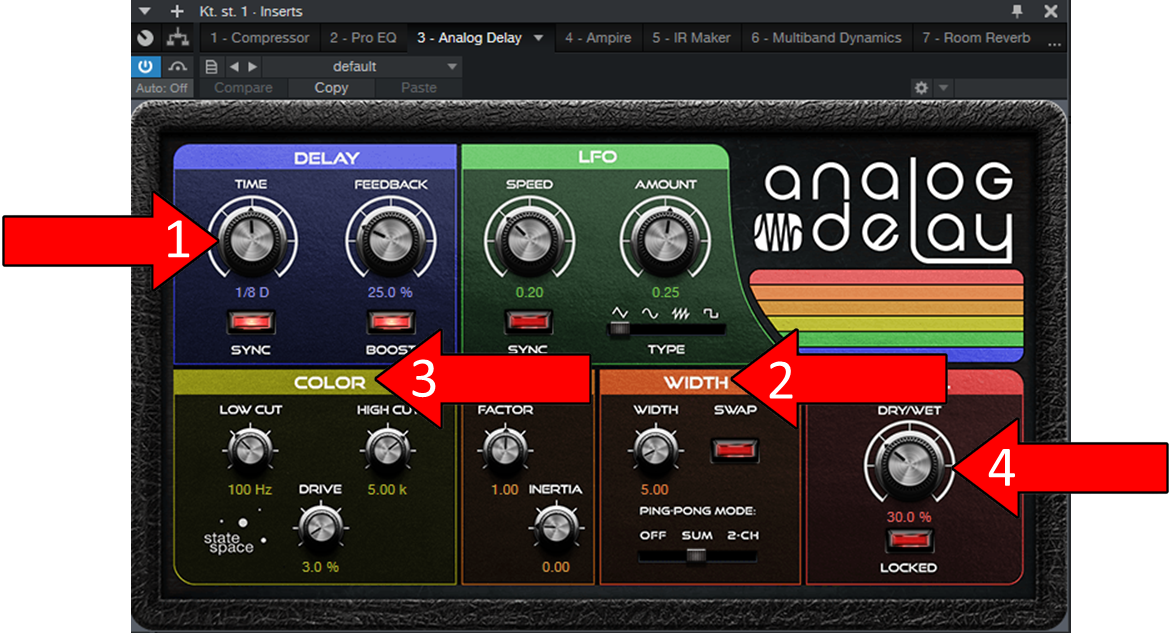
Just as its name suggests, delay is a tool that copies your audio and plays it back to you with a certain time difference. This can be used for several purposes, but it’s normally used in main vocals to give them a sense of depth and dimension that dry recordings simply don’t have.
Back in the day, you would have had to pay a fortune to get your hands on one of these. But luckily, the people in charge of developing Studio One had the great initiative to include one right out of the box!
Here’s how it works:
If you’re a guitar player, this will definitely help you unlock your potential.
Amp Sims, or “Amp Simulators” have been around for more than two decades, but it’s been the last decade where they’ve seen their popularity increase greatly.
These days, there are hundreds of different companies and options out there for musicians to choose from. But most of them are really expensive, so buying one is not something everyone can afford.
Luckily, Studio One already includes its own version of an Amp Simulator.
This nifty plugin is available in versions 4.6 and up and it’s a great alternative to all the fancy third-party competitors out there.

If you’ve never owned a real amp or an Amp Sim before, here’s a quick guide on how to tweak your settings:
The “Preamp” and “Master” knobs are used to increase or decrease the volume of your incoming and outgoing signal respectively. If you’re already happy with the tone and volume, leave them as they are.
This is one of those plugins that only a handful of musicians and producers will need, as it’s on the technical side of audio production.
IRs (Impulse Responses) are exact copies of an amplifier. Imagine you’re taking a picture of your favorite amplifier’s tone and settings and then using them on your computer. This technology is currently the most accurate and cheap way to get thousands of different amp sounds in a single computer or device.
Some advanced studio equipment, such as the “Kemper Profiler”, takes advantage of IRs to provide their users with sounds from $2,000+ physical amplifiers in a matter of seconds.
And while this sounds wonderful, the hefty $1,800 price tag on these profilers makes them a commodity not everyone can afford. Luckily, Studio One has released its own take on Impulse Responses, called “IR Maker” which allows you to capture any tone and amp you want!
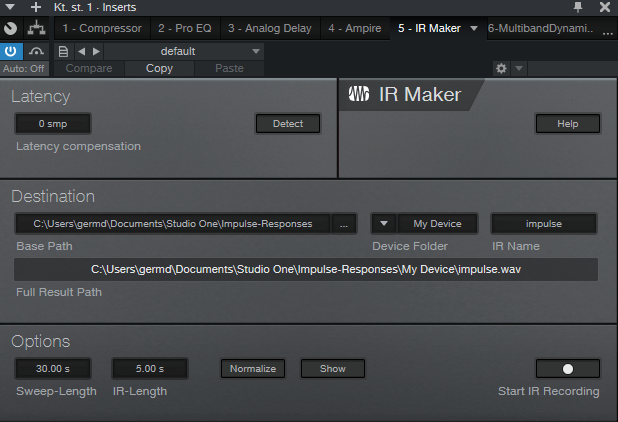
I’d be remiss not to mention that the “IR Maker” is only included with Studio One’s Professional version which goes for about $399.95. If this isn’t something you’re interested in, you might be better off with the “Artist” version of the DAW.
If you’re trying to decide between Studio One and other DAWs, we have some useful comparisons you might like.
If you’ve been producing for a while, you probably know that the problem with regular compressors is that sometimes you just want to attack a specific frequency range.
Take some distorted guitars, for example. In many situations, they may sound incredible, except for a rumbling sound in the low frequencies. A regular compressor would affect the entire sound range and you don’t want that.
Here’s where Multiband Compressors come in handy.
Studio One has a great stock plugin called “Multiband Dynamics” that allows you to select a specific frequency range to compress while being able to leave everything else untouched.
You can also use different levels of compression and settings for different frequencies.
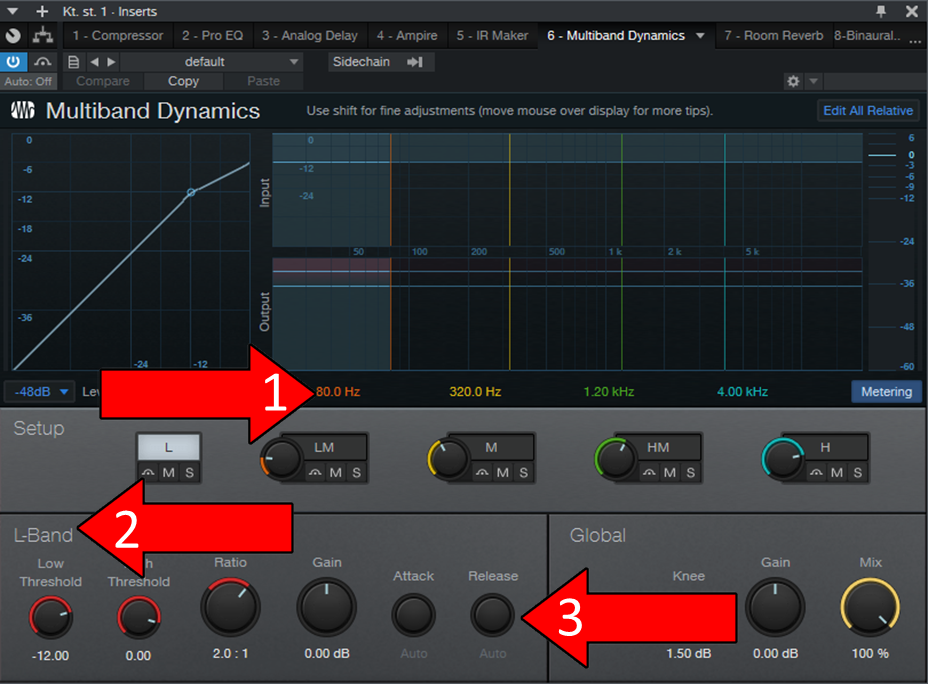
You’ll be hard-pressed to need more control options after using the “Multiband Dynamics” plugin.
What’s the one thing about 90% of all commercial hits have in common?
That’s right, they all have vocals with tons of reverb!
Dry vocals are great for certain situations, like voiceovers, audiobooks, podcasts, and conferences. But when it comes to recording songs in the studio, it’s all about the reverb.
I mean, can you honestly tell me you don’t like that nice echo you get when singing in a large area?
Reverb not only helps your vocals feel larger and more three-dimensional but also blend much better with the rest of your mix. Some genres use it more aggressively than others, but trust me, the effect is almost always there.
These days, most DAWs come with a preinstalled version of their stock reverb, but to be honest, some are… lacking, to say the least.
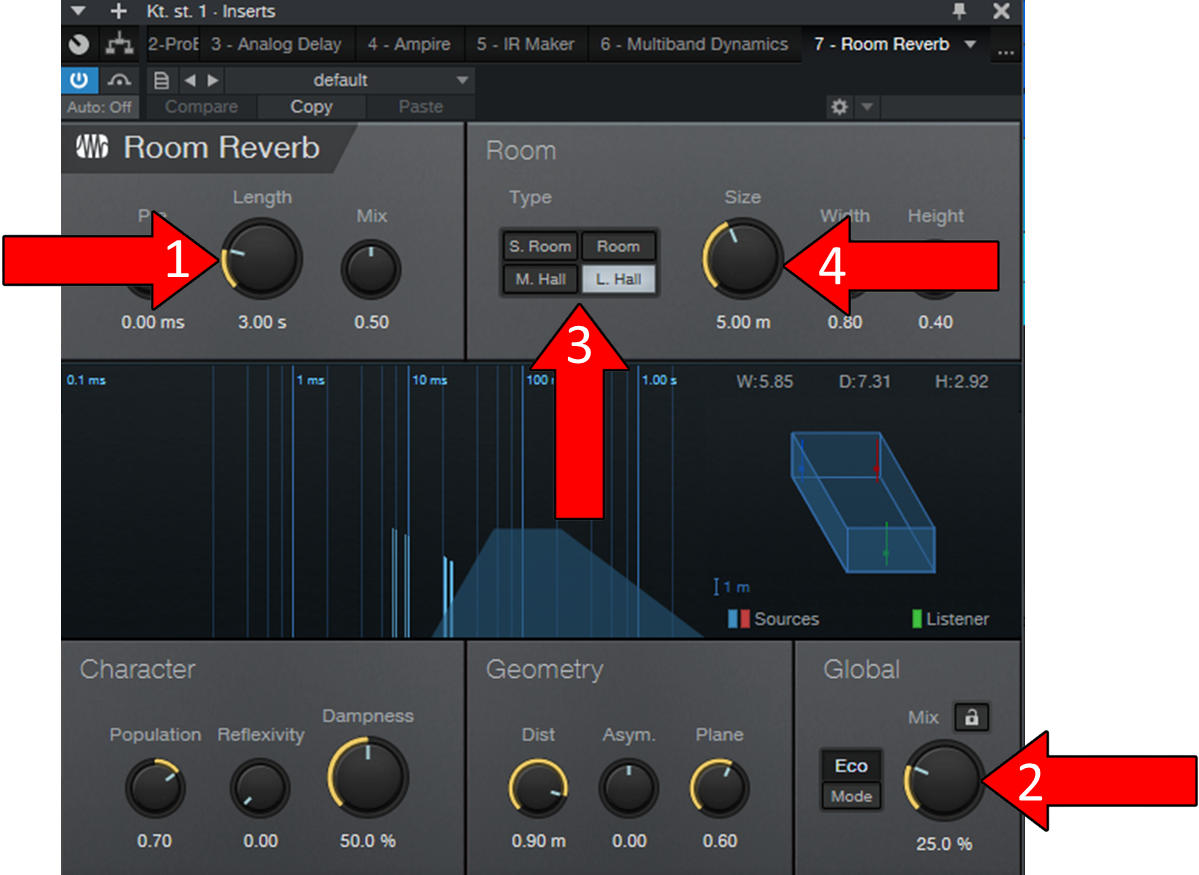
Luckily, Studio One’s Room Reverb does not belong on that list. This stock plugin offers a wide range of options and a high level of customization that should provide you with the necessary tools to get that reverb effect you’re looking for.
Creating an interesting beat can be a challenge even for the most experienced producers.
Between the snare, the kick, the toms, and the hi-hats, there are too many options out there to make a firm and quick decision about what to use. And what’s worse, even when you’ve already made up your mind about that, you still have to come up with something that sounds natural.
If only there was a tool to make everything easier…
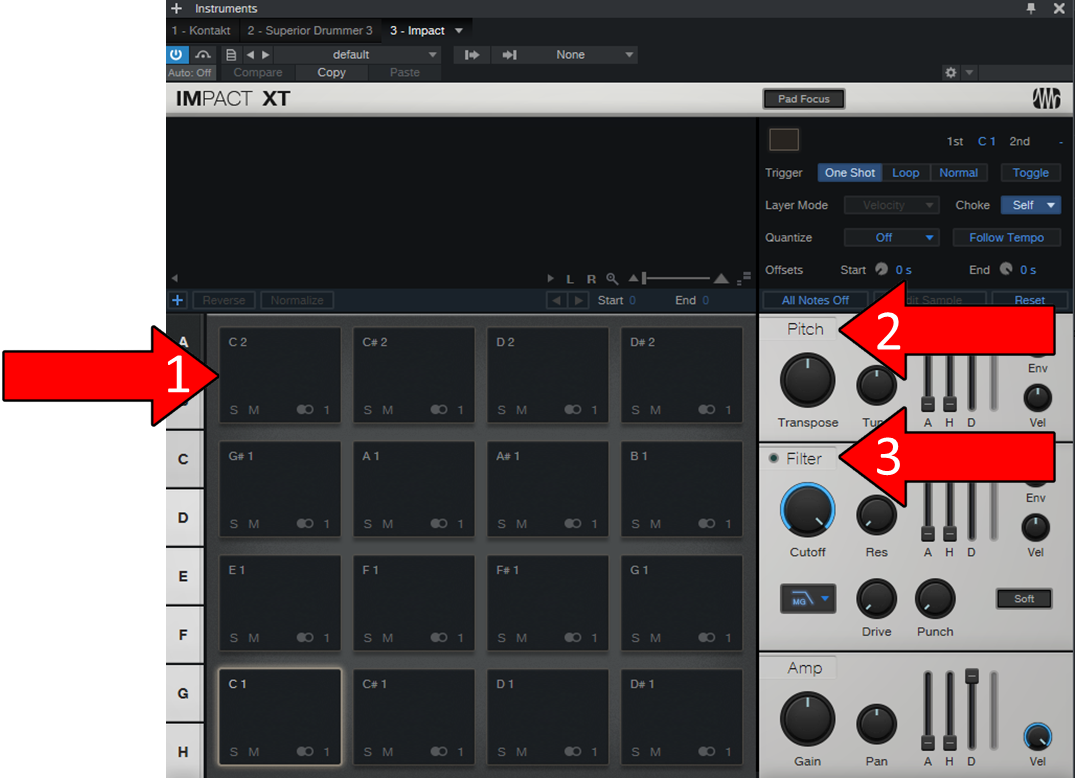
Well, there is! Impact XT is a Studio one stock instrument that can make the beat-making process much more streamlined and intuitive.
By using this tool, you’ll be able to unlock your potential and create beats in a fraction of the time it took you before.
Have you ever listened to one of your songs and thought, “Huh… This sounds too narrow”?
Well, there are many reasons why that might happen, but one of the easiest ways to fix it is by widening the sounds. There are many plugins out there that can do this, but some of them are really expensive and far from intuitive.
Lucky for you, Studio One has its own stock stereo widener called “Binaural Pan” which only has two knobs to make things simpler.
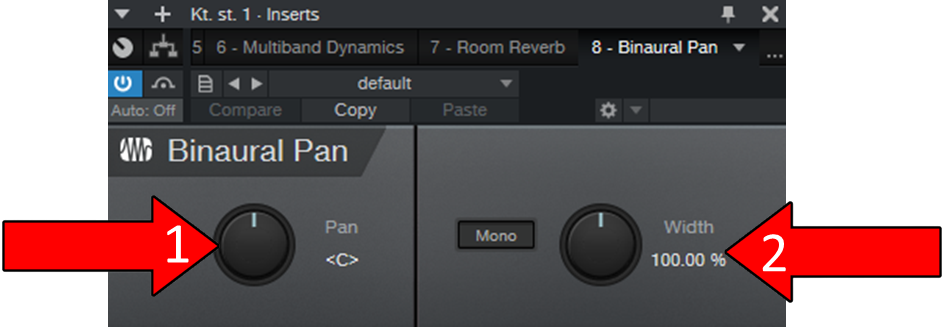
I’d be remiss not to mention that with this plugin you can easily go overboard and mess up your mono compatibility, which is basically how well your song plays on single-speaker devices.
Try not to go beyond 115% in the “Width” knob.
Last, but definitely not least, let’s talk about Studio One’s Expander.
This is a stock Limiter built into the DAW that can help you gain control over some sounds that might be spiking in your mix.
This plugin works similarly to a compressor, as most of its controls are the same. The main difference between one and the other is that Limiters are much more aggressive, as they don’t just reduce the volume, but rather completely cut anything that goes above their set Threshold.
This can be really useful for controlling snare hits and aggressive guitars, as they can often affect how balanced a mix sounds.
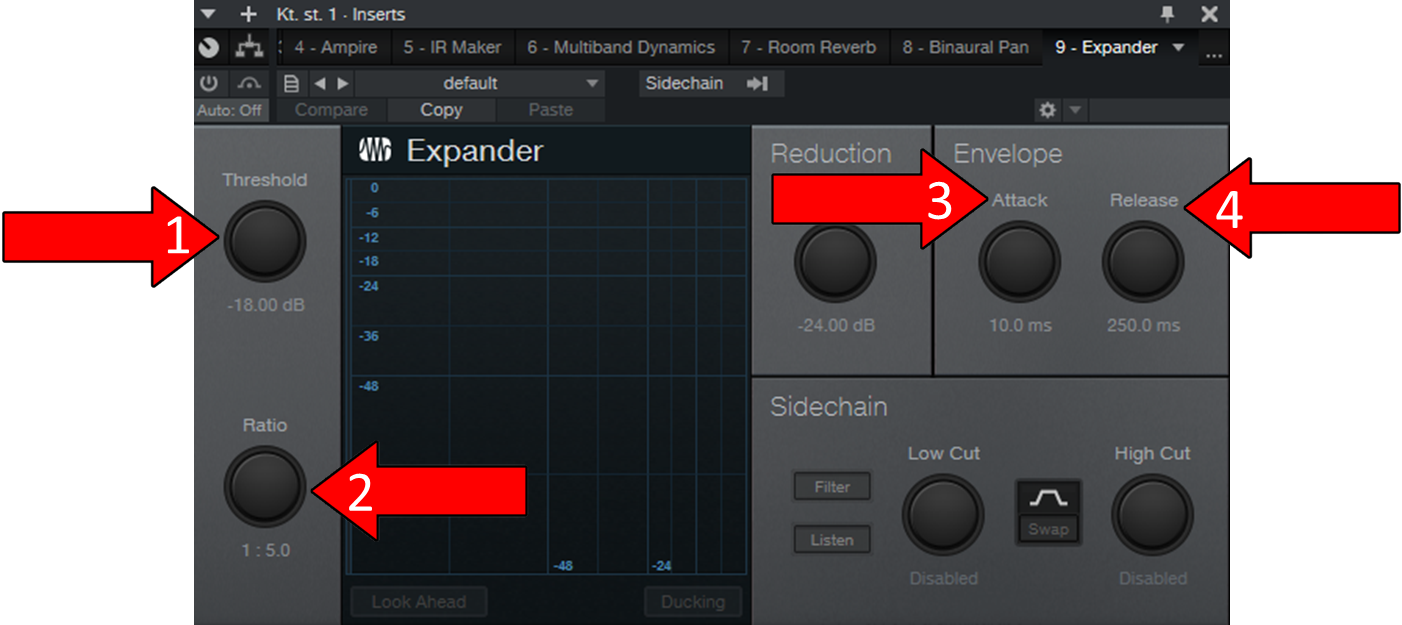
As I said before, the Threshold, Ratio, Attack, and Release knobs work the same as in a Compressor, so, if you need to check that again, please refer to point #1.
These days, there are a thousand different options for plugins, DAWs, and instruments. And while you’d think this would be a good thing, it can often be stressful and confusing.
I hope this piece has helped you better understand how each of the best Studio One plugins work and how they can help unlock your potential.
At the end of the day, one thing’s for sure. You don’t have to break the bank to make great music. Studio One already has all the tools you need to get the results you’re after in most cases.
Thank you so much for sticking with me all the way to the end. If you found this article helpful, you’ll be glad to know that we upload new content weekly. Please be sure to check out all our other wonderful resources below and become a Tech Detective yourself!
I wish you all the best.


Detective ‘Gerry’ Molina is one of the most prolific detectives on our TechDetective team. He’s known for his ability to crack down on multitudes of tech crimes on behalf of you – the citizens of the internet. Molina is often the first point of contact for many cases, working to help free victims from the tyranny of tech issues.