Are you stuck trying to figure out why Studio One is not recording anything?
You’re not alone! Every day, many musicians and producers face this same issue and are left nothing short of confused and angry.
I can only imagine how frustrating this must be for you. After all, nothing can be as uninspiring as having a great idea on your mind and not being able to print it into a track.
But don’t worry, you’ve come to the right place for answers. I’m here to help you figure things out.
Below, you’ll find a list of 8 simple things you can check to get everything back to normal. I’m sure one of them will get the job done.
These are:
Read on to learn how to start recording masterpieces again!
The first thing I want us to take a look at is your cables.
I know how well built and sturdy they look, but believe it or not, as time passes, they can become damaged or disconnected. This is especially easy to miss if you own an interface with several inputs and outputs, as it’s probably cable galore in your studio.
Before looking at anything else, it is of the utmost importance that we rule this out as a possibility.
Solution: You’re probably not going to like hearing this, but you’ll likely have to check every single port and connection on your studio to make sure it’s all sitting where it should.
If you’ve already done that and Studio One is still not recording anything, we might have to consider damaged cables or ports.
In that scenario, here’s what I’d recommend:
This will help you determine which cable/port might be malfunctioning, making pinpointing the culprit much simpler.
If you’re a newcomer to music production and have no idea what this means, that’s perfectly fine. I’ll be more than happy to explain it to you.
I/O configuration is basically the path you tell Studio One to send and receive audio through. For example, let’s assume you have both studio headphones and speakers. You normally use the latter, but since it’s late at night, you don’t want to bother anyone at home.
In that case, you’d go to your I/O configuration and disable the output to your speakers, so that the sound coming from your audio interface only goes to your headphones.
Does that make sense? Great!
The problem is that sometimes (especially when your interface has multiple inputs and outputs), getting the I/O configuration and routing right can be challenging. This could not only result in Studio One not recording anything, but also in what would appear like total radio silence.
Solution: To solve this you’ll need to check your user manual and find the port names and general layout of your audio interface. If you no longer have it, you can Google search “<Your Audio Interface’s Make And Model Go Here> user manual”.
Once you have a clear understanding of what goes where you can tweak the I/O configuration within Studio One by following these simple steps:

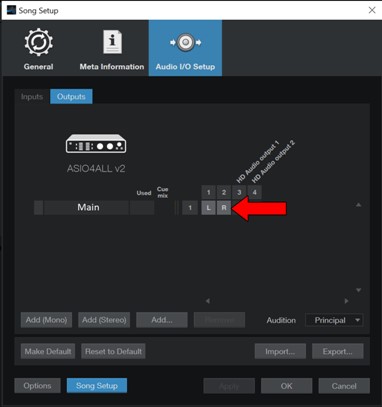
Once you’ve successfully set your inputs to the ports you’re sending your audio signal to, Studio One should record normally.
I know, this sounds like the special ability of a superhero on TV, but sadly, it’s something much less fantastic.
You may not be aware of this, but there are 3 main types of microphones: dynamic, ribbon, and condenser. The latter need what is called “Phantom Power”, which is basically an additional supply of electricity to make them work.
Back in the day, you would have to buy a separate device to get Phantom Power. But these days, it usually comes within audio interfaces in all price ranges.
The problem is that, if your Phantom Power is failing or your audio interface does not have it, you might be tricked into thinking that Studio One is working poorly, when in reality, the issue is isolated to your microphone.
Solution: The best way to tell whether your audio interface has Phantom Power is by reading your user manual. If you no longer have it, please follow the steps from the previous section to find it online.
Alternatively, you can look for any buttons, switches, or knobs that have a “48V” mark (as seen in the image below). Assuming that you find one, use it to activate your Phantom Power.
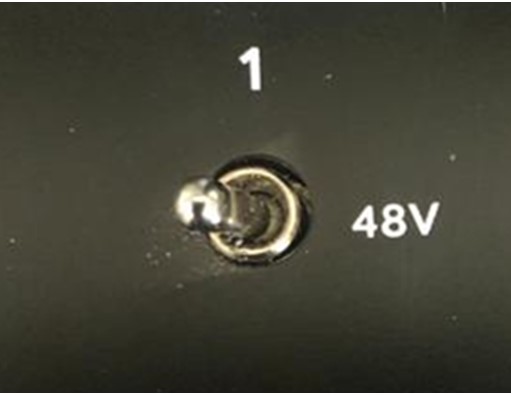
Make sure to only connect your condenser microphone to a port with Phantom Power activated, as plugging in anything else might cause a lot of damage.
I know, right? Who knew audio interfaces had to be updated?
Well.. they do, and it’s actually really important.
As you may know, with every new release, software developers try to include as many useful features and fix as many errors as possible. By failing to keep your interface’s software updated, you’re creating the perfect environment for a technical failure.
Outdated audio interface software can cause audio pops and cracks, playback difficulties, poor hardware control, and, of course… the inability to record within Studio One.
Now, normally your audio interface should search periodically for newer versions of its software and install them automatically. However, sometimes network interruptions, background process crashes, or even strict antivirus settings can get in the way.
In that case, you’ll have to manually get the latest version of your interface’s software.
Solution: I know this may sound challenging, but it’s actually really simple.
Here’s what you have to do:
Wait for the process to be completed.
Yet another possible reason why Studio One is not recording anything is that you have no available storage space on your PC.
With every passing day, files, browsers, and games get larger and larger in size. A decade ago, 500 GB of storage would last a lifetime, but these days, it’s barely enough to install Windows and a couple of documents.
And although recording music in Studio One does not take up as much space as rendering video in 4K, it can be problematic when there’s nowhere to store your recent creations.
Solution: The amount of time you have available for recording will vary greatly depending on what sample rate you use and how much storage you have available on your SSD (Solid State Disk) or HDD (Hard Drive Disk) to begin with.
Studio One has a section on its interface where you can see how long you can record before you run out of space.
In my case, I have 90 GB available on this computer, which translates to 1.21 days of recording time in 44.1 kHz.
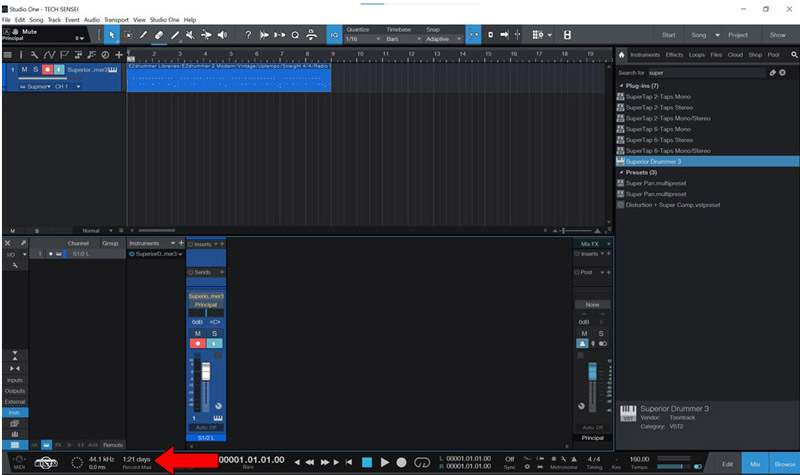
Launch the software and look for the “Record Max” (see picture above) section on your DAW. If it’s close to 0, there’s a really good chance that Studio One is not recording anything because there’s no space to save your audio.
In this case, I’d recommend uninstalling programs you no longer use to free up some space. I’ll cover that in point #7, so read on to find out how to do it!
Believe it or not, there’s a really good chance that all you need to do to get Studio One recording again is close and relaunch it.
Why should that work? Because it acts as a forced restart.
You see, whenever we use our favorite software, there are thousands of background processes being run simultaneously. Most of the time, they work normally and provide us with the functions we value on them.
However, in certain cases, one or more of these processes can crash and affect how the DAW works.
By closing and relaunching Studio One, you’ll be getting rid of any bugs or corrupted files that might be acting up, restarting them from scratch. And the best part is that this fix works for about 90% of technical difficulties out there, so don’t be afraid to try it out.
Just make sure you’ve saved your masterpiece before you do!
If closing and relaunching the software did not work, you might need to be a little more aggressive.
Sometimes damaged files or bugs are stubborn and won’t go away by simply restarting the DAW. This is not common, but it’s been known to happen now and then.
A lot of people put off doing this because they’re afraid they’ll lose all their saved songs or the plugins they use every day. But let me assure you that this will not happen. Worst case scenario, you’ll have to rescan your favorite plugins after reinstalling Studio One, but that’s it.
Solution: If you’ve never uninstalled a program from your computer, fret not! It’s very easy.
Here’s how you can uninstall Studio One on your PC.
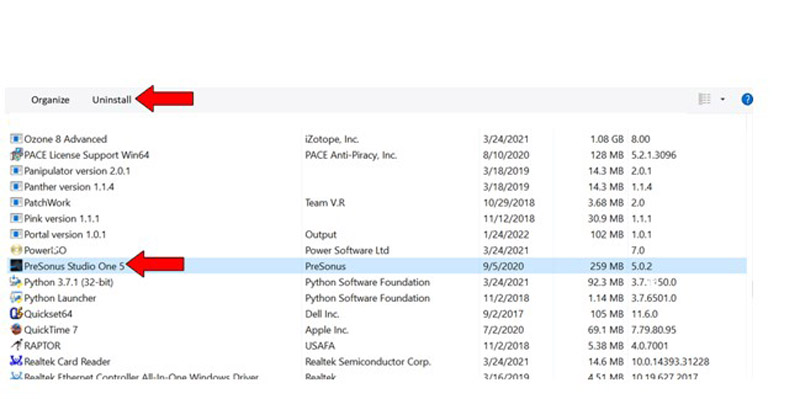
After this process has been completed, you can follow the same steps you took the first time you downloaded Studio One to reinstall it.
Last but definitely not least, let’s take a look at your antivirus settings.
I think we can both agree on the fact that these are great at keeping us safe by protecting us from suspicious files, trackers, ransomware, and phishing. But what if I told you that your favorite antivirus could also be the reason why Studio One is not recording anything?
How so?
Well, the answer lies in the actual recording process. You see, every time you arm a track for recording on Studio One, you’re asking your PC permission to write information onto your storage.
Normally, your computer should allow this without any further issues; however, if your antivirus settings are too strict, Studio One will be denied permission, thus rendering you unable to record.
Solution: There are tens of different antivirus software out there, so if I were to guide you through the process of lifting restrictions on each one, we’d be here all day.
And while I don’t mind it, I’m sure you’ve got enough on your plate already!
Instead, I’d advise going to Google and searching for “How to make an exception for a program on <Your Antivirus’ Name And Version Go Here>”. You should be able to find detailed instructions for your specific case.
Now, before creating an exception for Studio One, I’d like you to try and disable your antivirus temporarily to make sure this is, in fact, the issue.
If you can record on Studio One when your antivirus is disabled, there’s your answer.
Having Studio One not recording anything can be any producer’s worst nightmare, especially if you’re trying to work with a fellow artist and the clock is running.
What a mess!
Luckily, as I hope you have learned in this piece, addressing most of the causes behind this inconvenience is fairly simple and rarely ever time-consuming.
In most cases, simple actions, like tweaking your antivirus settings, and making sure that you have enough storage space available on your PC for recording, should do the trick.
Thank you so much for sticking with me all the way to the end. If you found this article helpful, you’ll be glad to know that we upload new content every week. Please be sure to check out all our other incredible resources below and become a Tech Detective yourself!
Best of luck to you.
Detective Anderson is a grizzled veteran of policing the internet’s cyber-streets. After decades of experience busting illegal floppy disk rings and underground dial-up connections, Anderson has now been placed in charge of the more modern Tech Detective team.