Does your Fire Stick seem to hate your HDMI port?
Let’s look into making them friends again! Believe it or not, this issue is more common than you’d think.
There are several reasons that might be causing it, and while that’s annoying, you’re in luck. In this article, you’ll learn how to leave this situation in the past.
Try these 6 fixes to stop your Fire Stick from changing TV inputs by itself: Try using a different HDMI port, turn off the“HDMI CEC” feature, and adjust your settings. You can also try removing your batteries, restarting, or updating your device.
Keep reading to fix the issue!
If you’re trying to stop your Fire Stick from changing the TV inputs, why should using a different HDMI port help?
Simple. There may be a problem with the HDMI port you’re using.
You see, there are different HDMI versions and most modern TVs have different ports that go with them. This way, you’ll be able to connect different devices at the same time and improve your experience.
But, if the HDMI port you’re using is damaged, your TV may change the input automatically.
Follow these simple steps to check if that’s the case:
If the issue was solved after completing the steps above, the answer is clear. The HDMI port you were using was the problem.
But, if this fix didn’t do the trick, don’t worry! The following just might.
If you’re not familiarized with the term “HDMI CEC” yet, don’t worry! Most people aren’t. Its meaning is far from obvious, but in order to guide you through this section, it’s crucial that you understand it.
HDMI Consumer Electronics Control, known as HDMI CEC, is a feature that most modern TVs have. It allows you to control different devices connected to your TV through an HDMI port using a remote.
This feature allows devices to change your TV’s input. For example, if you turn on your Fire Stick while using a gaming console (or vice-versa) your TV may automatically switch the input for you.
Although HDMI CEC has fantastic advantages, it may be the reason why your Fire Stick keeps changing the TV inputs by itself.
Luckily, you can turn off this feature on your Fire Stick. Follow this quick guide to do it:
Fire Stick:
If this didn’t work, try disabling the HDMI CEC feature directly on your TV. Follow these steps to do it:
Please note that your TV may have a different name for “HDMI CEC”.
Android TV:
Samsung TV:
LG TV:
Sony Smart TV:
If you couldn’t find your TV on the list above, don’t worry! Go to Google and search for “How to turn off “HDMI CEC” on <Your Device’s Name Goes Here>”.
If your Fire Stick keeps changing the TV inputs, you might want to keep reading!
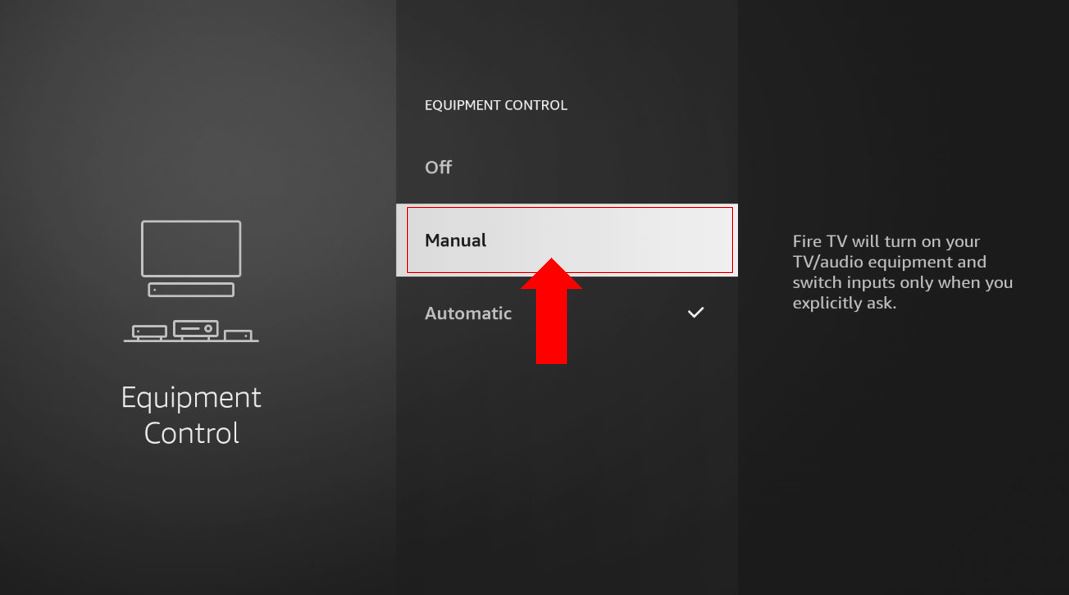
Hundreds of users found that adjusting the “Equipment Control” settings on their Fire Stick solved the issue.
Follow these simple steps to do it:
Then, let’s make sure Fire Stick is set to the HDMI port you’re using. To do it:
Once you’ve done that, please launch an app on your Fire Stick to see if the issue went away.
Believe it or not, your TV’s remote might be to blame!
If one of the buttons on your remote is stuck or damaged, your TV may automatically change inputs.
To check if that’s the issue, launch your Fire Stick and try removing the batteries of your TV’s remote (not your Fire Stick remote).
If your Fire Stick is no longer changing inputs, then your TV’s remote was to blame! Try replacing it with a new one.
On numerous occasions, bugs, glitches, or corrupted files can cause different performance issues. As simple as it seems, restarting your TV and Fire Stick may solve the issue.
Follow these simple steps to do it:
To restart your TV:
To restart your Fire TV:
You can also press the Select and Play/Pause button on your Fire Stick remote for ten seconds.

Tip: This fix may also solve different performance issues, such as a frozen screen, playback errors, and much more.
Finally, let’s make sure your Fire Stick is running on its latest software version. Amazon often releases new Fire OS versions to offer new features and fix different technical issues.
Normally, updates will be automatically installed on your device, but this process can be easily interrupted due to a bad Internet connection, crashed background processes, or strict privacy settings.
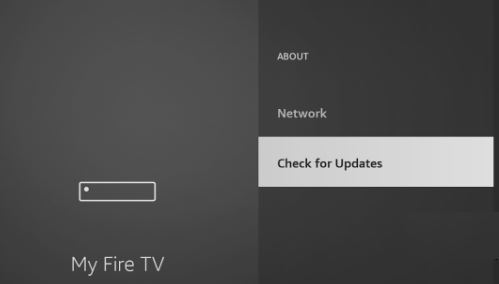
Luckily, you can manually update your Fire Stick. Follow these simple instructions to do it:
Not being able to use your Fire Stick because it keeps changing the TV inputs can be really annoying, especially when you’ve waited all day to get home and watch your favorite TV show.
Hopefully, now that we’ve covered everything, you’ll be able to get rid of this problem in no time.
Remember, simple actions like using a different HDMI port, turning off the “HDMI CEC” feature, adjusting your “Equipment Control” settings, or restarting and updating your device can fix the issue.
Thank you so much for taking the time to read this article. If you found it helpful, please make sure to read our other related content below.
Here at Tech Detective, we’re passionate about bringing quick and easy solutions to everyday problems.
Have a great day!


Detective ‘Monse’ Cancino has been cracking down on tech issues for years. Starting out as a local cop, she’s quickly risen to the full rank of Tech Detective.
Cancino is our resident iPhone specialist. She’s often cracking cases related to iOS errors, streaming malfunctions, and locking up buffering bandits.