Are you stuck trying to stay signed in on Apple Music?
Listening to music should be one of the most relaxing and fun things to do. However, there’s nothing more frustrating than being interrupted because Apple Music keeps logging you out, especially when you’re paying a monthly subscription.
Hundreds of users have encountered the same issue when using Apple Music on their computer and are no strangers to your current struggle.
Believe me, I won’t judge you if cancelling your subscription has crossed your mind.
But before you give up, try these 6 fixes to stay signed in on Apple Music:
Keep reading to leave this annoying problem in the past!
Sometimes, the key to staying signed in to your Apple Music account is to update the app.
Running an older version of the Apple Music app (iTunes) on your computer could explain why you’re not being able to stay signed in to your account.
Apple offers fixes to different problems in every version of iTunes they release, so the issue of being constantly logged out from your account might’ve been solved in the app’s latest version.
Normally, apps will update automatically on your device; however, network issues can interrupt the process.
But don’t worry! You can still manually update Apple Music on your computer with these simple steps:
For Windows PC:
For Mac:
If what you’re trying to prevent is being randomly signed out of Apple Music, why should signing out and back in manually help?
Simple! On certain occasions, computers fail to recognize that you’ve got an Apple Music membership. By signing out and then signing back into your account, you’ll force the system into recognizing it.
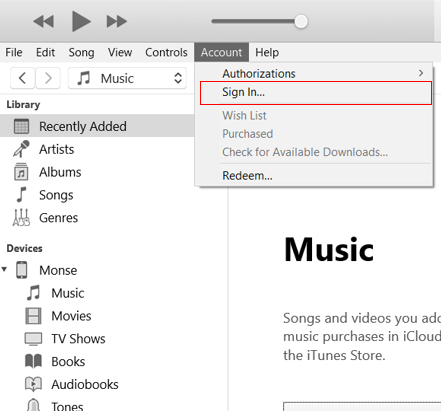
Follow these simple steps to log out of your Apple Music account:
Once you’ve completed the previous steps, I recommend restarting your computer. This can help clear its memory and quickly refresh iTunes.
Follow these steps to restart your computer easily:
For Windows PC:
For Mac:
Once your computer starts up again, open your iTunes and follow the same steps you did to sign out, but this time press “Sign in”.
Then, enter your Apple ID username and password and try playing any song.
If the tips above didn’t do the trick, clearing your iTunes Cache might.
If you’re wondering what “cache” means, I got you! The simplest way to understand it is by thinking of it as a scrapbook. This is where the app stores important information, such as lyrics, fonts, images, etc.
Every time you play your Apple Music songs, iTunes uses the Cache to store them so that you don’t have to wait until these load every time you launch the app.
And while this has fantastic advantages, you could also be trading off some storage space. Clearing it once in a while will help you get rid of elements that may cause performance issues in the future.
Follow these instructions to get rid of the iTunes corrupt cache file:
If this method didn’t work, try clearing your cache directly from your computer’s folder with these steps:
For Windows PC:
Alternatively, you can also use this shortcut to simplify things: C:\Users\USERNAME\AppData\Local\Apple Computer\iTunes\.
If your computer’s username name is John, then the shortcut would be: C:\Users\John\AppData\Local\Apple Computer\iTunes\
Please note that clearing your cache folder won’t delete any of your songs.
I know, it may seem odd that listening to the radio might keep you signed in. But tons of users have reported that this simple action has helped them stay logged into their Apple Music accounts.
How come? Because doing this forces iTunes to check your account’s credentials and stop it from signing you out.
To listen to the radio, you’ll just have to:

If this fix didn’t work, don’t worry! Keep reading to learn about other solutions.
Sometimes uninstalling and reinstalling a program can fix any bugs, errors, and other performance issues.
I know, this might be a hassle because the whole point of installing a program for the first time is not having to repeat the process. However, this quick action may help your iTunes to start recognizing when you’re signed in to your Apple Music account and stop it from logging you out.
Follow this simple guide to uninstall iTunes:
For Windows PC:
For Mac:
The steps above should’ve helped you uninstall the app on your computer. To reinstall it, simply go to the Windows Store (or App Store for Mac).
Although it’s highly unlikely that you’ll lose your Apple Music library after reinstalling the app, I recommend creating a back-up of your songs on a regular basis.
A lot of users have reported that the error “The song cannot be played because you are not signed in to Apple Music” may pop up while listening to downloaded music.
I know how frustrating and annoying this can be because the whole point of downloading your favorite songs is to be able to listen to them uninterrupted.
Hopefully, these tips will help you stay signed in to your account and return to your jamming session in no time!
Follow these instructions to remove your downloaded songs:
Don’t worry about losing your songs, you can always re-download them by clicking on the iCloud icon that will appear once you’ve completed the steps above.
Listening to your favorite songs and beloved artists is one of the greatest things you can do on the daily, but being unable to fully enjoy it because Apple Music keeps signing you out is a nightmare!
Luckily, you can avoid being randomly logged out with the 6 fixes shown in this article. Normally, updating iTunes, clearing your cache file, or reinstalling the program should do the trick.
Thanks for taking the time to read this article, I really appreciate everyone that checks out our content. If you found this helpful, make sure to read our other related articles below.


Detective ‘Monse’ Cancino has been cracking down on tech issues for years. Starting out as a local cop, she’s quickly risen to the full rank of Tech Detective.
Cancino is our resident iPhone specialist. She’s often cracking cases related to iOS errors, streaming malfunctions, and locking up buffering bandits.