Are you bending over backwards trying to figure out why Studio One keeps freezing or crashing on you?
Welcome to the club! You would not believe how many people encounter this same issue every day and are left baffled and angry.
I can only imagine how frustrating this must be for you. Especially considering how quickly something like this can make inspiration vanish into thin air.
But don’t worry, you’ve come to the right place for answers. I’m here to help you figure everything out.
Below, you’ll find a list of 7 simple fixes you can try to get things back to normal. I’m sure one of them will hit the nail on the head.
These are:
Read on to learn how to stop the freezing altogether!
The first thing I want us to check is that Studio One has access to the Internet.
I know how it may seem counterintuitive to think that a recording software would need a stable connection to launch properly. But there’s actually a good reason for that.
You see, whenever Studio one launches, it needs to check for any available updates or changes in your license and it does so by connecting to the internet and reaching out to PreSonus’ servers. When it can’t establish a secure connection, it stops loading and immediately shuts down.
This could very well be the reason why Studio One keeps freezing or crashing on you. And while this sounds like a big problem, relax! It really isn’t.
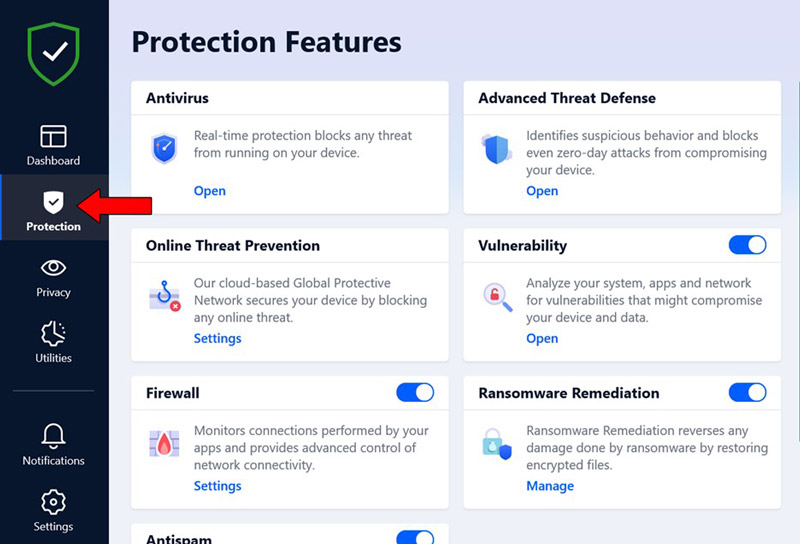
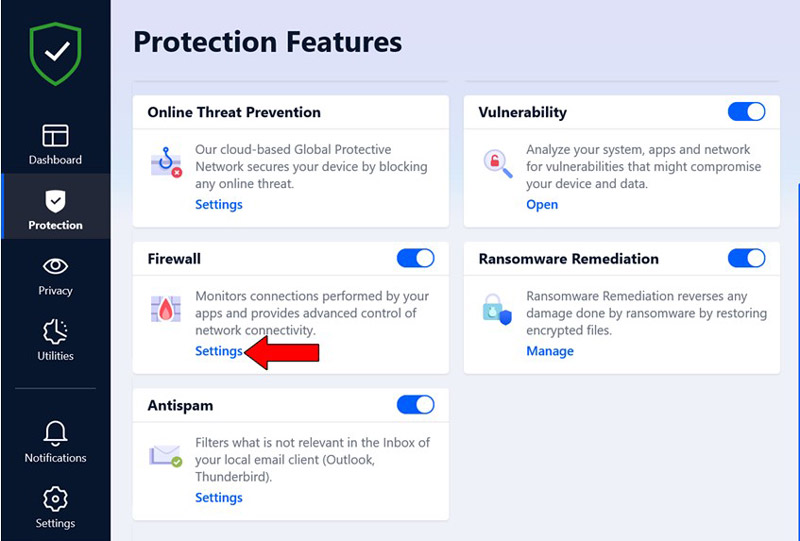
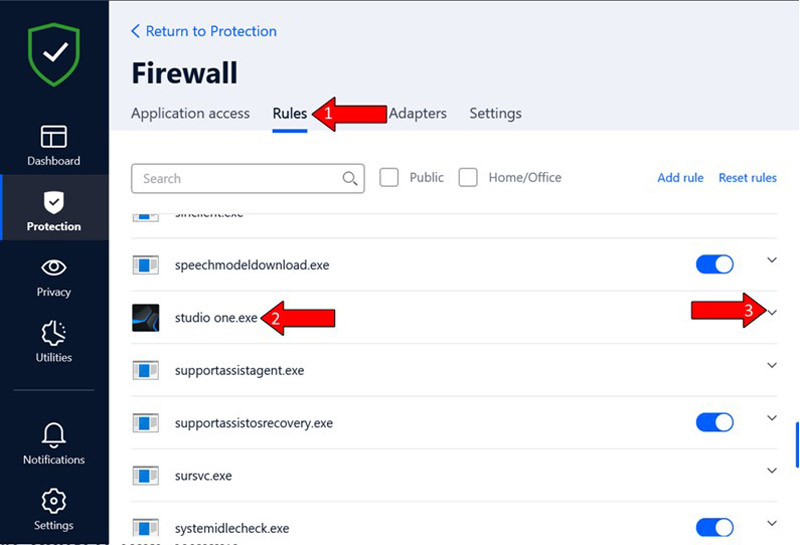
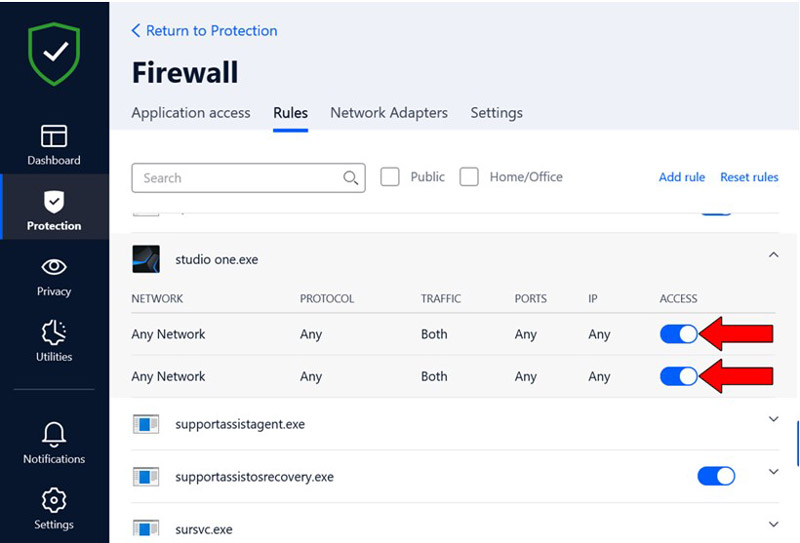
Solution: More often than not, when this happens it’s mainly due to overly strict antivirus settings.
Most of the popular antivirus companies out there have the option to make exceptions for certain programs so that they can both receive and send information over your home network.
By allowing Studio One to communicate with its servers, the freezing and crashing should stop.
Now, there are tens of different antivirus companies out there, so if I were to guide you through the process of lifting restrictions on each one, we’d be here all day.
And while I don’t mind it, I’m sure you’ve got other things to take care of!
Instead, I’d advise going to Google and searching for “How to create exceptions for apps on <Your Antivirus’ Name Goes Here>”. You should be able to find several resources with detailed instructions for your specific case.
I’ll use Bitdefender to paint you a picture of the process:
If the previous point did not work, you might want to try converting your VST tracks into audio.
As you may know, VST stands for “Virtual Studio Technology” and it’s the technical name for most of your Studio One tools, both proprietary and external. Equalizers, Compressors, Saturators, Amp Simulators, and many, many more programs fall under this category.
Most of the time, VSTs make our lives much easier and revolutionize the way in which we make music. However, as wonderful as they are, they also tend to use a lot of CPU and RAM power on your PC.
This normally isn’t an issue if you’ve only got a couple of them running. But if you’re producing electronic music or mixing heavily, the load can add up pretty quickly and cause Studio One to keep freezing or crashing.
Solution: If your PC is not up for an upgrade anytime soon, your best bet will be to convert any VST track you’re using into something your computer can handle more easily.
Here’s how to do it:
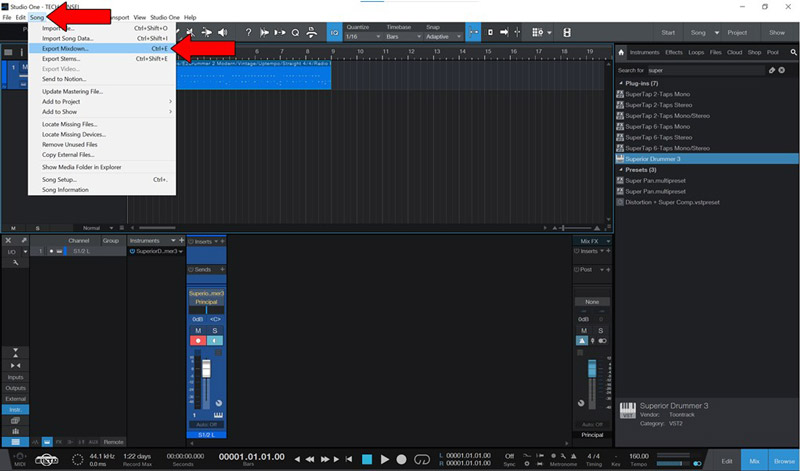
Please note that you should only do this once your song has been completed, as doing otherwise will make your life really complicated.
Once you have converted your VST track and imported the audio to your project, you can go ahead and delete or disable the VST. I promise you’ll instantly notice a jump in performance.
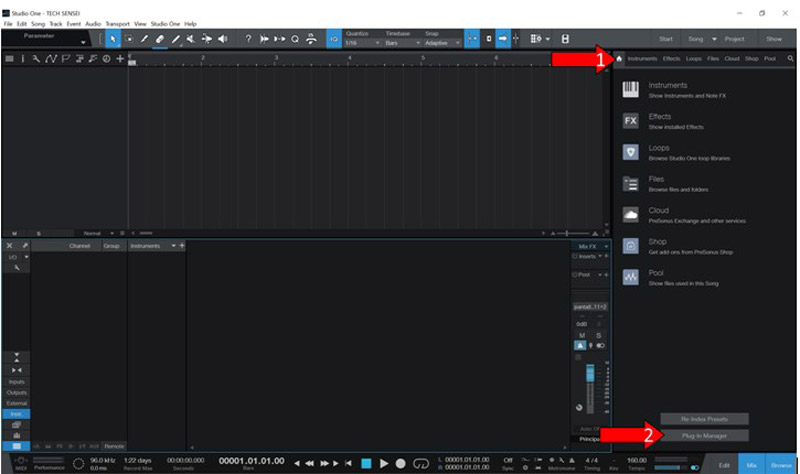
Yet another reason why Studio One might keep freezing or crashing on you is that one of your plugins is damaged.
This could happen for various reasons but one of the most common ones is accidental file deletion, either by you or your antivirus.
We don’t often think about our VST plugin installation folder, but that doesn’t mean it’s not there! Every time you get a new program, you get asked to choose a destination folder to place all the files it needs to run on Studio One.
If you accidentally got rid of said folder, your VST will crash upon loading, and your DAW will soon follow.
Depending on how essential a particular plugin is to your workflow, there are two roads you can take.
Solution:
Method 1:
Assuming you can live without the plugin in question, you can simply launch Studio One, create a new project and disable it so it’s not scanned on startup.
Here’s how you can do that:
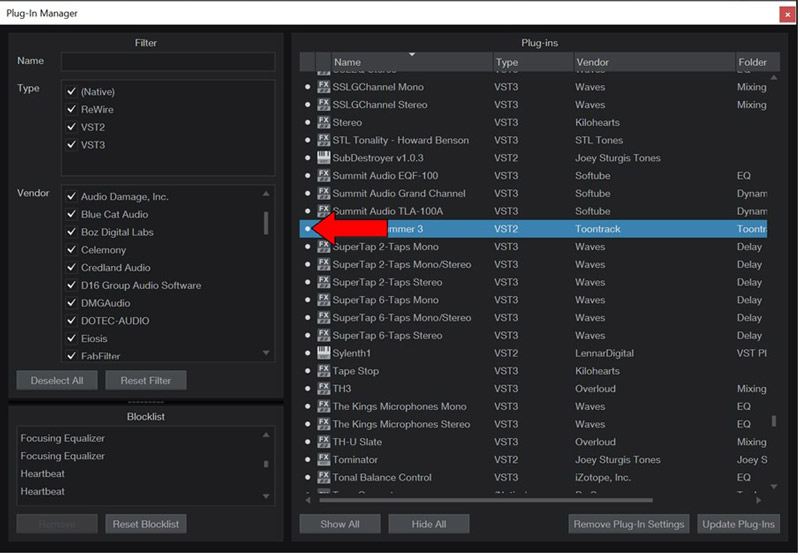
Method 2 :
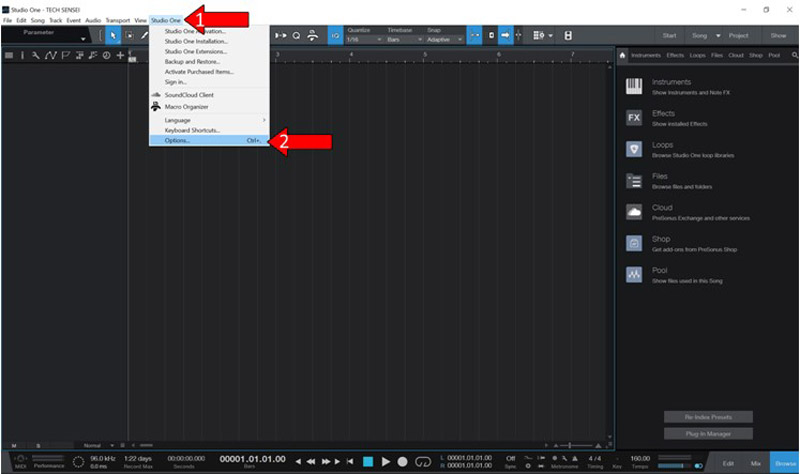
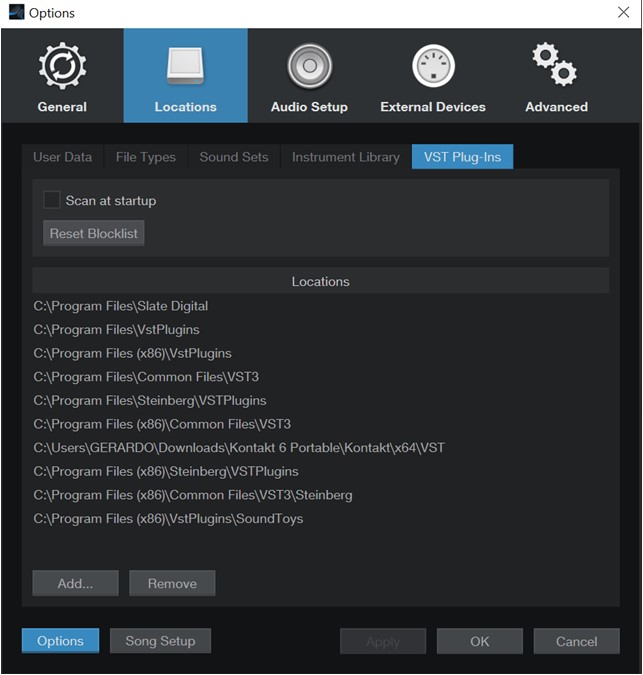
Provided that you still get constant crashes and freezing, you should try removing all your plugin folders from the “VST Location” section.
Here’s how to go about it:
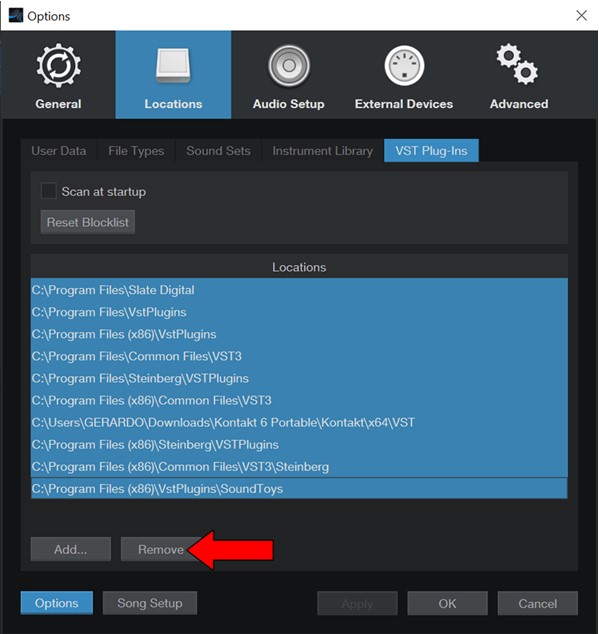
The next time you launch Studio One, no third-party plugins will be loaded, and you should now be able to access your projects.
To add your VST locations again, follow the process found above, but select “Add” instead of “Remove” in the last step to add the locations you wrote down. I would recommend adding them one by one to pinpoint the troublemaking folder.
A very common misconception is that you can fill up your PC’s storage without facing any consequences.
And while that’d be great, it’s simply not true.
Your computer needs a certain amount of available space at all times to work properly and store temporary information. This is especially true when it comes to SSDs (Solid State Drives), which need about 15-20% free space to operate and meet their expected lifespan.
If your PC’s memory is filled to the brim, Studio One won’t be able to load properly and freeze or crash.
And that’s just the tip of the iceberg.
If you don’t have enough RAM installed, you might not only face constant freezing and crashing, but also terrible performance while recording.
It’s always a good idea to take your computer’s components into consideration.
Solution: The best way to clear storage space on your computer is by uninstalling programs you no longer use. If you’ve never done this before, that’s ok! It’s really simple.
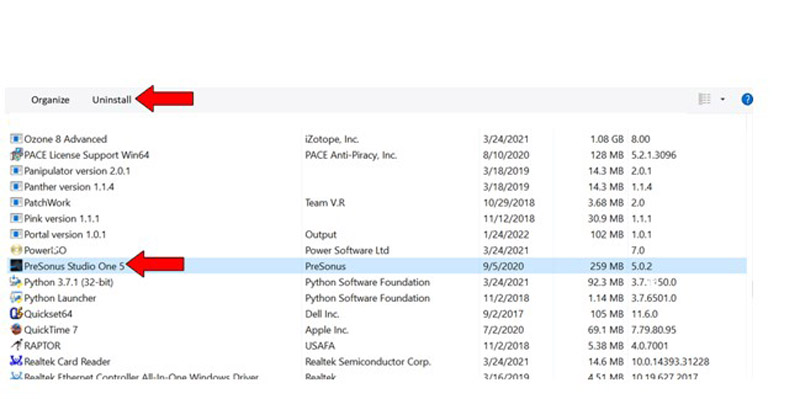
Try to focus on programs that are larger in size, as it will make this process much quicker.
If you have no idea what this is, that’s perfectly fine. I’m more than happy to explain it to you.
In a nutshell, buffer size is the amount of time you allow your computer to analyze the audio you’re recording or playing before it’s actually written on the DAW or played back to you.
Think of it as throwing a ball at a wall, and the buffer size is how far you’re from it.
A longer distance would take the ball longer to return to you, but you would not get as tired. As you walk closer to the wall, the ball returns much quicker to you, and you need to work harder to keep up with it.
Now imagine the buffer size is… well, the buffer size, and your PC is you.
The smaller the buffer size, the more your computer’s components will have to work to analyze your audio and send it back to you as quickly as possible.
Normally, this shouldn’t be an issue. After all, computers are built to do precisely that; however, if you exceed your PC’s limits, it will do anything it can to reduce the load.
This could very well be the reason why Studio One keeps freezing or crashing on you.
Solution: There are two ways to work around this. One that’s free, and one that’s expensive.
If you’re planning on upgrading your audio interface anytime soon, you might want to take a look at one that has its own processors, such as the Apollo Twin. By having your audio interface process your audio, you’ll be able to increase your buffer size with zero audio delays.
That being said, buying a $1,000+ audio interface is not always an option, so instead, you could try increasing your buffer size.
Sure, you’ll get delayed audio, but I’m sure you can find a sweet spot where your PC is not working as hard, and the delay is minimal.
Here’s how to change the buffer size within Studio One:
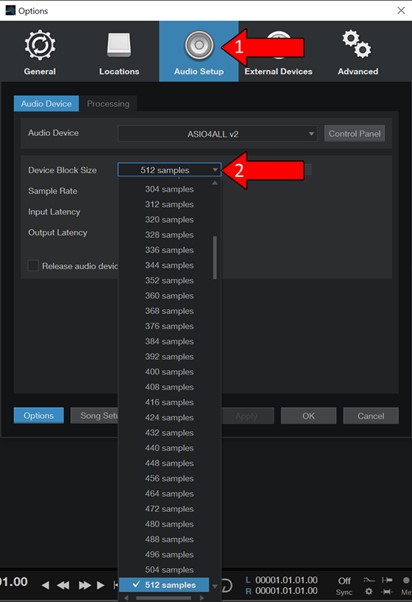
Relaunch the DAW, choose a slightly higher buffer size than what you wrote down, and test the delay. Best case scenario, it won’t be that bad and Studio One will be stable from now on.
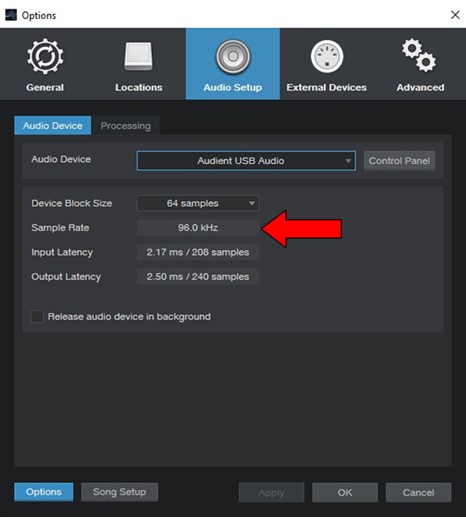
Moving on, let’s talk about your sample rate.
There’s been an ongoing debate for decades about whether or not using a higher sample rate actually impacts sound quality. Some people say that more processing means better results, but is this really the case?
Maybe… but we’re not here to discuss that!
Let’s talk about why using a high sample rate could be causing your Studio One to keep freezing or crashing on you.
As you may know, the higher the sample rate you choose, the more load your CPU has to handle. This may not sound like a big deal, but remember that everything has a limit.
If you constantly go over what your system can handle, not only will you decrease its lifespan significantly, but also create the perfect environment for several technical difficulties to appear.
Solution: For most cases, working at a sample rate of 44.1 kHz is ideal, especially if you agree with the people who say that going higher is useless.
I’ve worked at 96 kHz and I can honestly tell you that I heard no noticeable differences between that and something lower, so relax!
If you don’t know how to change your sample rate within Studio One, here’s a quick guide on it:
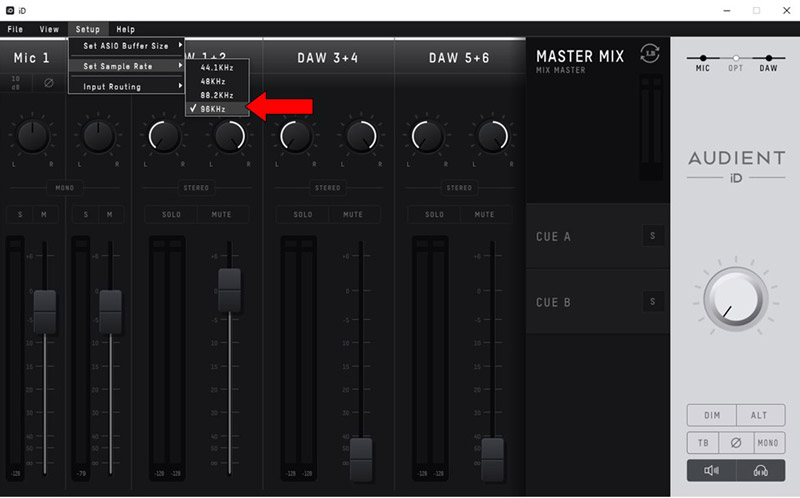
It’s really important that you make sure that whatever sample rate you choose on Studio One, matches your audio interface, as having them set differently can cause more problems than it will solve.
Lastly, let’s talk about the elephant in the room.
If none of the solutions above have worked for you, it might be time to upgrade your PC. In this day and age, even the most advanced computer becomes obsolete after a couple of months, so if you have not changed your computer’s components in a while, this might be the sign to do so.
Solution: Now, I understand that this represents a significant investment, and upgrading your components is not always an option, so if you prefer, as a cheaper alternative, you could try and use an older version of Studio One and your favorite plugins.
I got my start with Studio One 4 and its proprietary plugins, and I can honestly tell you that, if you learn how to use them, there’s no real difference between the newer software versions and what I used to use.
You don’t need third-party software or the latest DAW to create masterpieces!
Having Studio One keep freezing or crashing on you can be a modern-day nightmare. Especially when you’ve got a melody stuck in your head and you don’t want to forget it.
Luckily, as I hope you’ve learned in this piece, addressing most of the causes behind this issue is simple and quick. More often than not, simple actions, like double-checking your cables, and using a lower sample rate, should do the trick.
Thank you so much for sticking with me all the way to the end. If you found this article helpful, you’ll be glad to know that we upload new content weekly. Please be sure to check out all our other incredible resources below to become a Tech Detective yourself!
I wish you all the best

Detective Anderson is a grizzled veteran of policing the internet’s cyber-streets. After decades of experience busting illegal floppy disk rings and underground dial-up connections, Anderson has now been placed in charge of the more modern Tech Detective team.