Are you stuck trying to figure out why PreSonus Studio One is not finding your interface?
You’re not alone! Every day, thousands of musicians and producers find themselves in the same situation and are left baffled.
I know this can be really annoying, especially when you’re ready to start working on your new album.
But don’t worry, you’ve come to the right place for answers.
Below, you’ll find a list of some useful steps that can help you get rid of this problem. I’m sure one of them will do the job.
The 5 steps you can take to help PreSonus Studio One find your interface are:
Keep reading to forget all about this issue!
The first thing I want us to take a look at is your cables.
I know how it can be counterintuitive to think that they can become damaged over time, as they look sturdy and well built.
And while they certainly are, they’re not indestructible.
These days, most audio interfaces come equipped with all sorts of blinking lights and LEDs, so it should be fairly easy to spot if they’re not working. However, some older models might not be as easy to diagnose.
Solution: The best way to tell whether your current cable is causing this problem is by using a different one temporarily.
Now, I know not everyone has a spare testing cable just lying around, but maybe if you have a friend or a family member who also makes music, you could ask to borrow theirs for a little while.
Alternatively, you can also buy a new cable on any online marketplace for cheap. Granted, this represents an additional expense, but it might be the solution to all this.
Believe it or not, using an older software version of your audio interface’s drivers could also be the reason why Presonus Studio One is not finding it.
As you may know, with every new release, software developers try to add as many features and fix as many problems as they can. And while this sounds great, it also means some older versions stop being supported.
This can be especially problematic if you update Studio One to the latest version available while keeping your interface outdated.
Normally, newer driver versions of your audio interface should be searched for and installed automatically. However, sometimes network interruptions, background process crashes, or even strict antivirus settings could get in the way.
In that scenario, you’ll have to do some manual downloading.
Solution: Here’s what you have to do:
Wait for the process to be completed.
Sometimes the simplest answer is the right one.
There’s a really good chance that all you need to do to get Presonus Studio One to find your interface is close and relaunch the program.
Why does that work? Because it acts as a forced restart.
You see, whenever we use our favorite software, there are thousands of background processes running simultaneously. Most of the time, they work normally and provide us with the functions we value on them.
However, on certain occasions, a corrupted file or a bug can start acting up and affect several features. One of them being the DAW’s ability to find your interface.
By closing and relaunching the software, you’re getting rid of anything that might be causing trouble, restarting important configurations and files from scratch.
And the best part is that this fix works for about 90% of technical difficulties out there, so don’t be afraid to try it out. Just remember to save the masterpiece you’re working on first!
If nothing has worked so far, we might need to start being a little more aggressive.
Sometimes corrupted files or bugs can be stubborn, so closing and relaunching the program won’t be enough. In some cases, you might have to completely remove Studio One from your computer and reinstall it.
A lot of people put this off because they think they’re going to lose all their song projects or preferred plugins, but there’s really nothing to worry about. Worst case scenario, you’ll have to rescan your favorite VSTs once you reinstall Studio One, but that’s about it.
Solution: Here’s how you can uninstall Studio One on your PC.
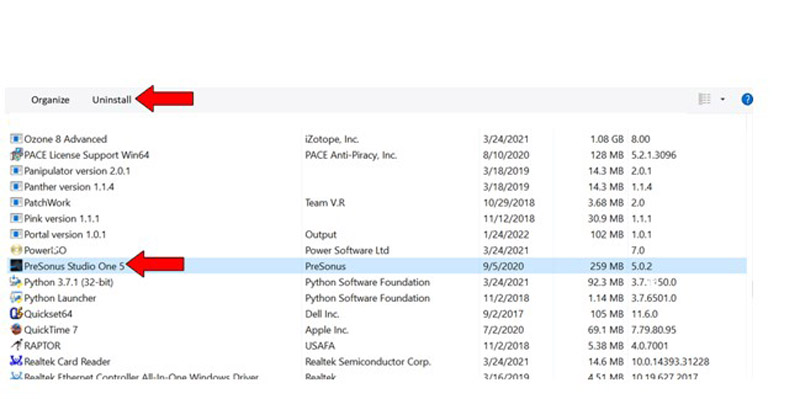
Once the uninstallation process has been completed, follow the same steps you took the first time you got Studio One to reinstall it.
This one can be really easy to miss, especially considering how visually alike modern connections are.
You wouldn’t believe how many people have a hard time telling Thunderbolt and USB-C apart. I mean, the connection port is exactly the same, and one fits the other, so they can’t be too different, right?
Well… not quite.
In many scenarios, Thunderbolt greatly outperforms USB-C, as its data transfer speeds are almost double that of its USB counterpart.
Several audio interfaces these days, like the Apollo Twin, use a Thunderbolt 3 connection and cannot work when plugged into a USB-C port as the transfer speeds are not high enough.
If nothing has worked so far, this could very well be the reason why PreSonus Studio One is not finding your interface.
Solution: There are two ways in which you can tell whether your interface uses Thunderbolt or USB-C.
The first one is by reading your user manual. If you no longer have it, you can go to Google and search for “<Your Audio Interface’s Make And Model Go Here> user manual ”. You should be able to find an online version of it on your manufacturer’s webpage.
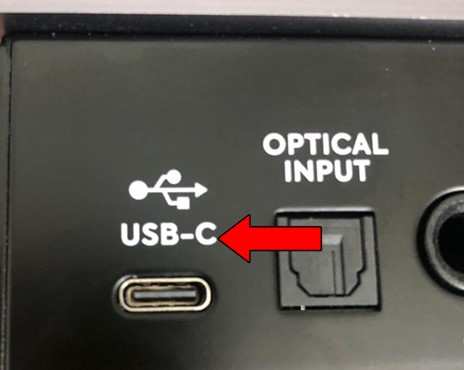
The second one is by looking directly at your interface’s ports. Normally, interfaces that use Thunderbolt have a little lightning icon next to their connections. If you don’t see that anywhere or see a “USB-C” legend written next to where the cable goes (see picture below), then you likely own a USB-C model.
When Presonus Studio One is not finding your interface, things can quickly become annoying. Especially when you’re working with a fellow artist and the clock is running.
What a disaster!
Luckily, as I hope you’ve learned in this piece, addressing most of the causes behind this inconvenience is simple and quick. More often than not, simple actions, like keeping your audio interface updated, and making sure that you’re not trying to connect a Thunderbolt device to a USB-C port, should do the trick.
Thank you so much for sticking with me all the way to the end. If you found this article helpful, you’ll be glad to know that we upload new content weekly. Please be sure to check out all our other incredible resources below to become a Tech Detective yourself!
I wish you all the best.
Detective Anderson is a grizzled veteran of policing the internet’s cyber-streets. After decades of experience busting illegal floppy disk rings and underground dial-up connections, Anderson has now been placed in charge of the more modern Tech Detective team.