
Are you stuck trying to stop Apple Maps from saying “No Results Found”?
Don’t worry, I know how annoying it can be to have this happen, especially when you need to get to a place quickly.
But the good news is that with the help of this article, you’ll be able to get rid of this issue today.
If Apple Maps keeps saying “No Results Found”, please delete your bookmarks, disable iCloud, or reset your settings. You can also try refreshing your location, updating your device, or using an alternative.
Keep reading to learn more about these fixes!
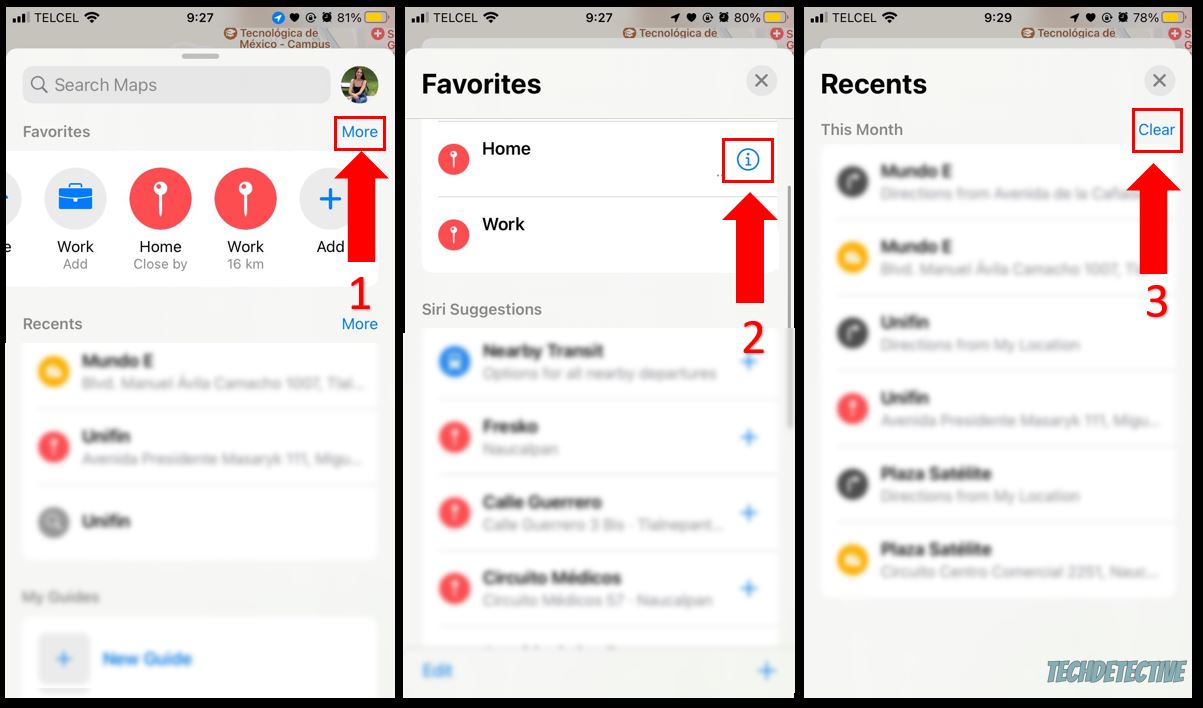
You wouldn’t believe how many people have complained about not being able to use Apple Maps because it keeps saying “No Results Found”.
Luckily, most of them were able to solve the problem by deleting their bookmarks and adding them again.
I know this may sound like a tedious thing to do, but believe me, it works.
Follow these simple instructions to do it:
iPhone and iPad:
Mac:
Once you’ve completed the steps above, add your favorite addresses again on your iPhone, iPad, or Mac.
Then, please fully close Apple Maps and relaunch it.
If Apple Maps keeps saying “No Results Found”, chances are there’s a problem with your iCloud that is interfering with how the app works.
To solve this issue, I recommend disabling iCloud for Apple Maps. Many people found that doing this helped.
Bear in mind that if you turn off iCloud, your information, such as favorite addresses, will no longer be backed up on your device.
Follow this quick guide to disable iCloud for Apple Maps:
iPhone and iPad:

Mac:
Once you’ve completed the steps above, try restarting your device and relaunching Apple Maps to see if the issue was solved.
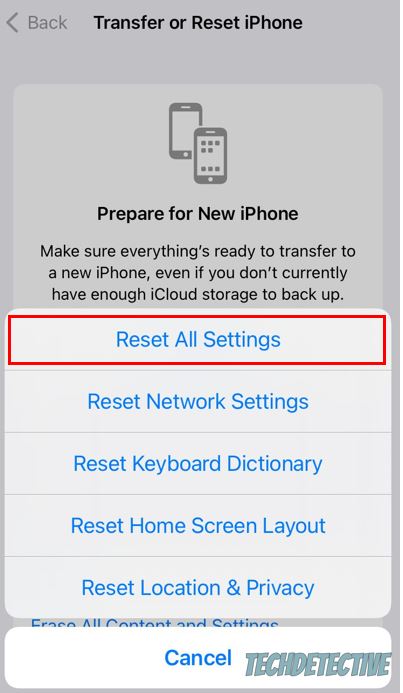
If disabling your iCloud and deleting your bookmarks didn’t do the trick, it’s time for us to reset your Settings to their defaults.
By doing this, you may get rid of any corrupted data that was responsible for Apple Maps saying “No Results Found”.
Follow these simple steps to do it:
iPhone and iPad:
Unfortunately, if Apple Maps encountered an issue while trying to determine your precise location, a “No Results Found” message will appear.
Luckily, the easiest way to solve this is by refreshing your location. To do it, you’ll just need to:
iPhone and iPad:
Mac:
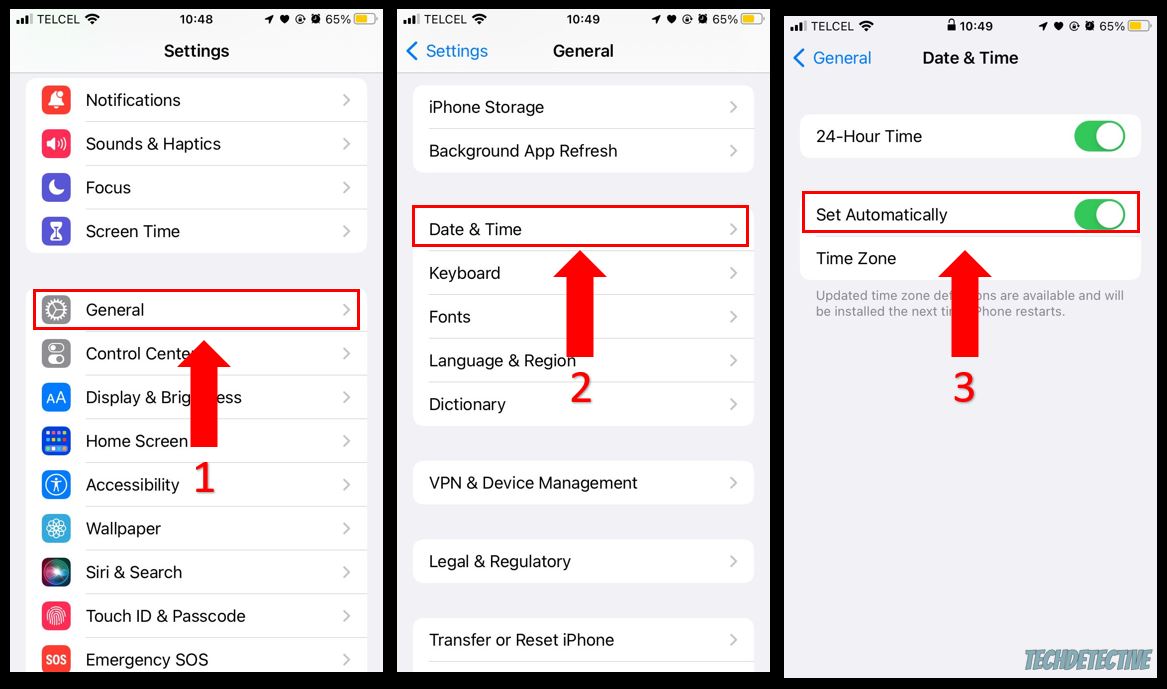
Once you’ve completed the steps above, please make sure your device has a clear view of the sky. Otherwise, GPS accuracy may fail, and you won’t be able to get rid of the issue.
If possible, stay away from mountains, bridges, and tall buildings.
Moreover, setting your date and time to “Automatic” will also improve GPS accuracy and may help you get rid of the “No Results Found” message.
To do it, you’ll need to:
iPhone and iPad:
Mac:
If refreshing your location didn’t do the trick, chances are you missed an update.
Normally, this is something you shouldn’t worry about because if there’s an available update, your device may automatically install it.
But, this is not set in stone. Sometimes having a faulty network, strict privacy settings, or a low battery percentage can prevent this from happening.
Having outdated software could explain why Apple Maps keeps saying “No Results Found”.
But, don’t worry. You can manually install any available updates and get rid of the bugs that were causing the issue.
Follow this quick guide to do it:
iPhone and iPad:
Mac:
Once you’ve updated your system, please open Apple Maps to see if the error message was solved.
If Apple Maps keeps saying “No Results Found” after trying all the fixes above, I recommend searching for the directions in different ways.
You see, the platform allows you to enter the zip code, area, intersection, GPS coordinates, or landmark to get directions.
But, if that doesn’t work, and you’re in a hurry, try using a different device or downloading a different navigation app, such as Waze or Google Maps.
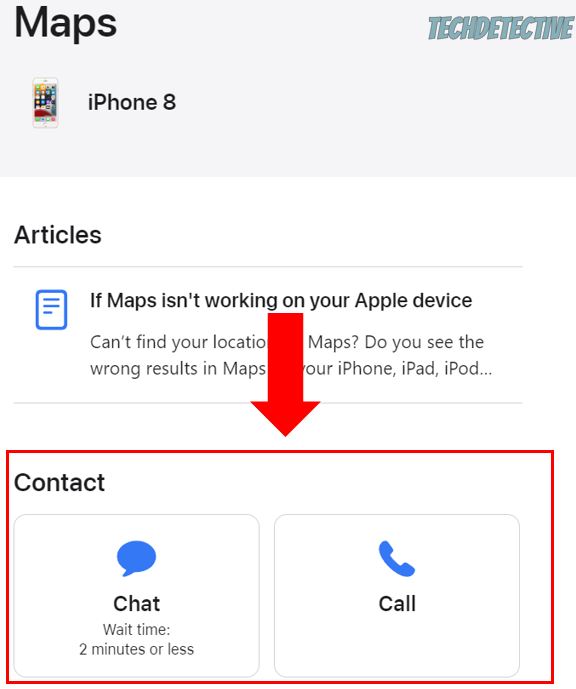
The fixes above should’ve helped you solve the problem, but if it persists, chances are there’s a major error that only Apple’s support team can fix.
I know that contacting them is probably the last thing you wanted to do, but don’t worry. They usually answer their customers’ concerns quickly.
Follow this quick guide to contact them:
Once you’re on the line with Apple’s support team, I recommend telling them that you’ve already deleted your bookmarks, disabled iCloud, and refreshed your location. Bear in mind that they may ask for more information.
That about covers it! Hopefully, with the help of the fixes above, you’ll be able to stop Apple Maps from saying “No Results Found”.
If you take anything away, please let it be that the best way to solve this issue is by deleting your bookmarks, disabling your iCloud, and resetting your settings. Moreover, updating your device, refreshing your location, and contacting Apple’s support team should also do the trick.
Thank you so much for taking the time to read this article. If you ever experience a different issue while trying to use Apple Maps or other navigation apps, don’t forget to check out our site. You’ll find multiple articles that will help you fix it.
Good luck!


Detective ‘Monse’ Cancino has been cracking down on tech issues for years. Starting out as a local cop, she’s quickly risen to the full rank of Tech Detective.
Cancino is our resident iPhone specialist. She’s often cracking cases related to iOS errors, streaming malfunctions, and locking up buffering bandits.