Are you stuck with a black screen on Disney Plus?
You’re not alone! Believe it or not, thousands of people face this inconvenience daily and are left confused by the situation.
I can only imagine how frustrating having this happen must be for you. After all, the monthly subscription you’re paying is not cheap, and the least you’d expect is decent service.
But don’t worry, I’m here to help you figure things out.
Below, you’ll find a list including 9 easy fixes you can try to get everything back to normal. I’m sure one of them will do the trick.
These are:
Continue reading to forget about the awful black screen for good!
Before looking at any connections or technical difficulties, I want us to make sure that your HDMI cable is unscathed.
As you probably know, this is the cable that sends the signal from your favorite streaming devices to your TV.
Unless you stream via AirDrop or Bluetooth, of course, but that’s a different story.
Most of the time, your HDMI should not give you trouble, but if you keep it tangled or pressed at a sharp angle between the back of your TV and the wall, it could wear out and break in a matter of months.
Now, an HDMI cable that is broken altogether would not display anything on your TV, but if the damage is only partial, you could be experiencing intermittent flickering and black screens.
Solution: If you have another cable for testing lying around, feel free to use it. Provided that Disney Plus is no longer stuck on a black screen with the replacement, the answer’s clear.
Throw away the old one and keep using the new cable.
Moving on, let’s make sure that your Internet connection is not compromised.
Service interruptions have decreased dramatically over the last decade, but they still happen now and then. A fact I’m sure you’re already aware of.
The tricky part about diagnosing a bad signal is that sometimes you won’t be completely cut off from the Internet. On certain occasions, you might still be able to do some light browsing or chatting while being stuck on a black screen on Disney Plus.
How so? Because each activity has different requirements.
Texting your friends a funny joke via WhatsApp will never be as demanding on your network as streaming your favorite content at Full HD or 4K resolutions.
Solution: Give your provider a call and ask them if they’re having coverage issues in your area. If they tell you everything’s fine on their end, you’ll likely have to reset your modem and see if that works.
Never done it before? That’s ok! It’s all really simple, here’s what you have to do:
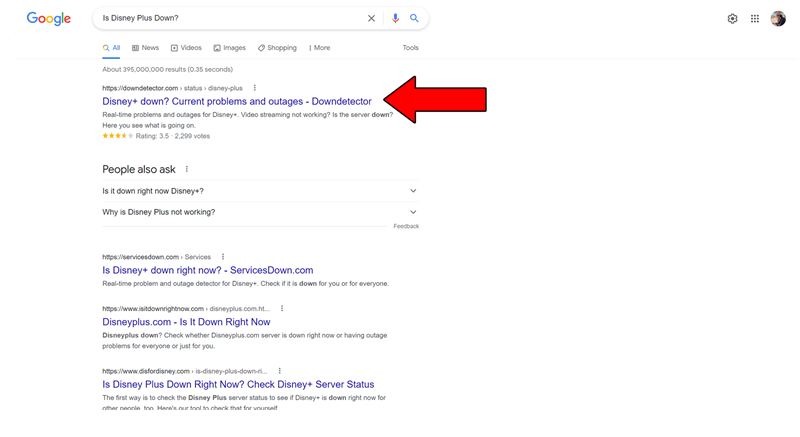
Next, I want us to check the status of the platform’s servers.
As you may know, these are responsible for storing important information and providing millions of Disney Plus subscribers with the service they’re paying for.
Given how essential they are, streaming companies have put a lot of work into designing them to be as resistant as possible. And while I’m not telling you that you should expect server downtime every 5 minutes, I’d be lying if I said that they’ve managed to make them failproof.
In fact, apparently unimportant things, such as a coding bug, a bad hard drive, or even minor hacking can greatly impact the platform’s performance and compromise its features.
The telltale signs of these events are slow loading times, login difficulties, endless buffering, and… you guessed it; being stuck on a black screen.
Solution: I’m going to show you a very easy way to check the real-time status of your favorite platforms’ servers.
Ready? Try this!

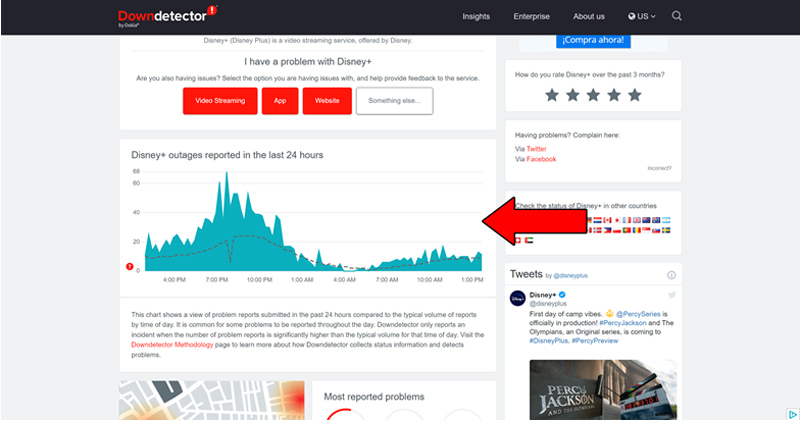
The taller the spikes, the more likely you are to be experiencing issues
Unfortunately, if the platform’s servers are, in fact, down, there’s little to nothing you can do.
That being said, I wouldn’t worry too much about it. The IT department at Disney Plus is highly efficient, and to our knowledge, there’s never been an instance where the service wasn’t fully restored within 24 hours.
Sometimes the simplest answer is the right one.
You may not know this, but every show and movie within Disney Plus has its own ID and space on the platform’s servers. This is why sometimes you might be having trouble streaming one show while being able to seamlessly enjoy another.
At this point, it’s not a bad idea to make sure the title you’re trying to watch is not compromised.
Solution: Navigate back and forth between shows and see if that does the trick. More often than not, this should refresh any corrupted files preventing your favorite content from playing and get rid of the annoying black screen.
What are those, you ask? That’s a great question! Let me briefly explain.
Your app’s cache is where a lot of important information is stored. In it, you’re likely to find images, video, audio, preset configurations, and sometimes even login credentials.
By keeping this data handy, Disney Plus can load much quicker on startup and provide you with an enjoyable experience.
Cookies, on the other hand, are developer tools used to make your browsing more efficient and increase the accuracy of targeted ads. They’re the reason why you’re suddenly bombarded on social media with ads for music lessons right after Google searching the best Maplewood neck guitar for beginners.
And while most of the time keeping both untouched will do more good than harm, these tools have also become known for occasionally interfering with some streaming platforms.
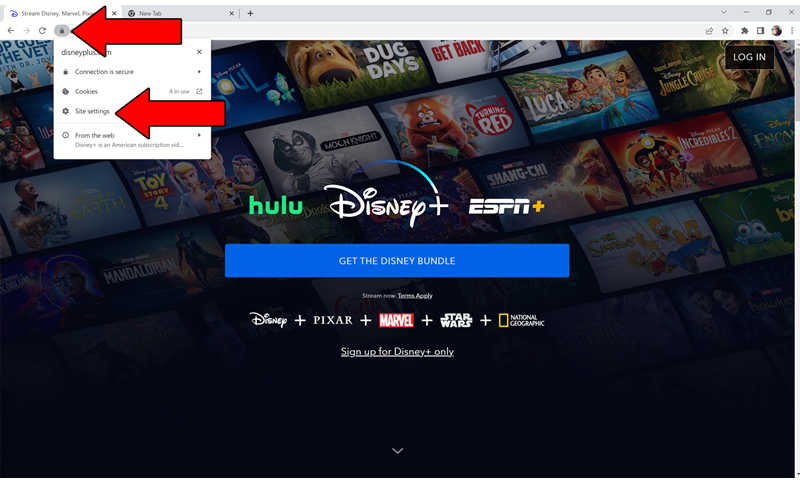
If you suspect these to be the reason why Disney Plus is stuck on a black screen, your best bet is to delete them both.
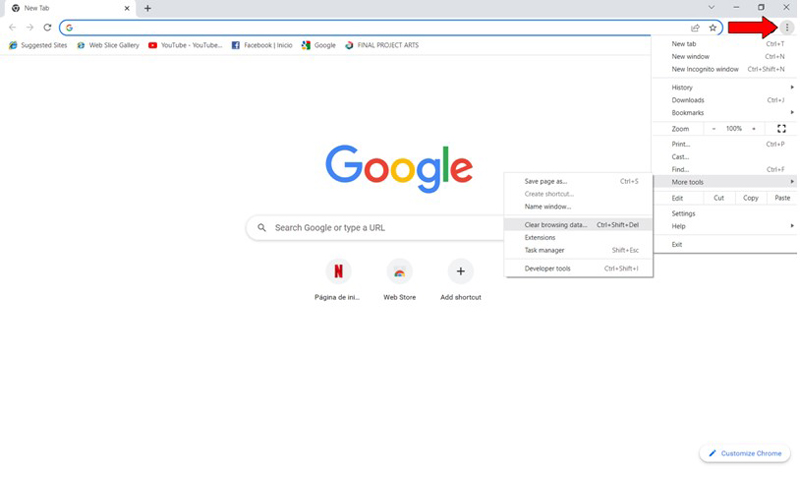
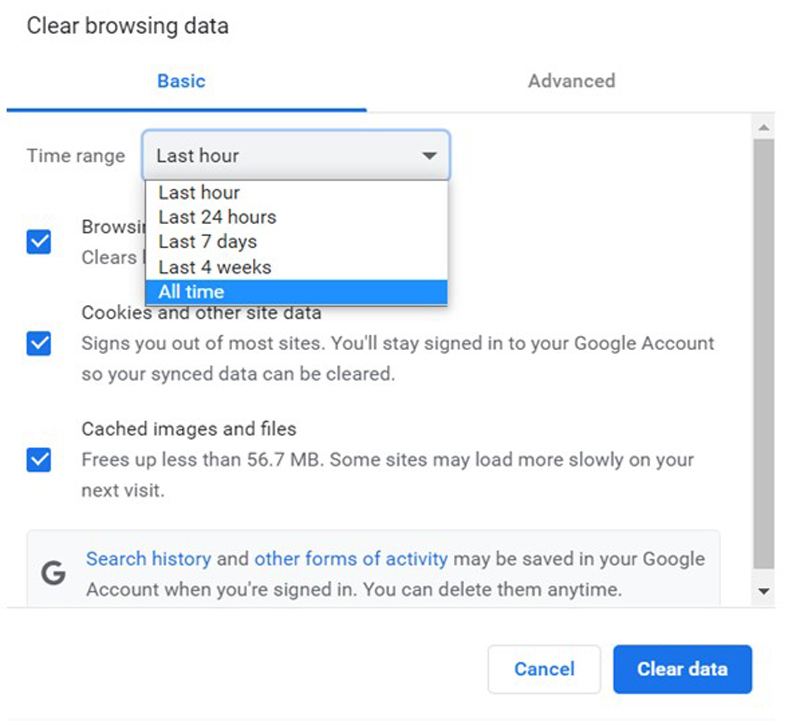
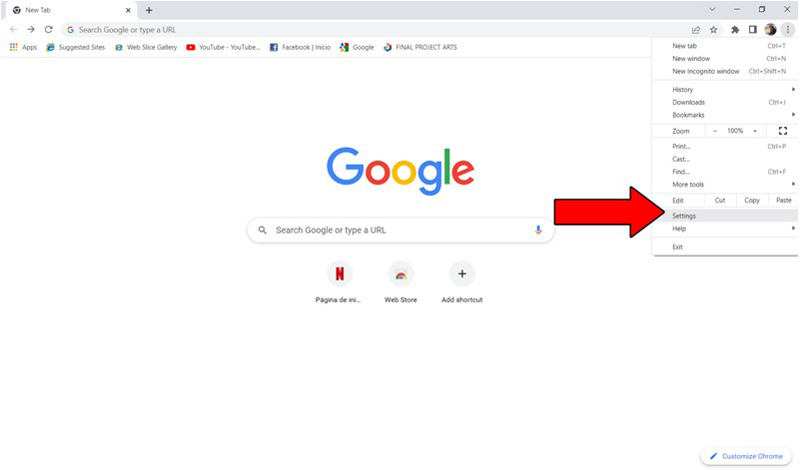
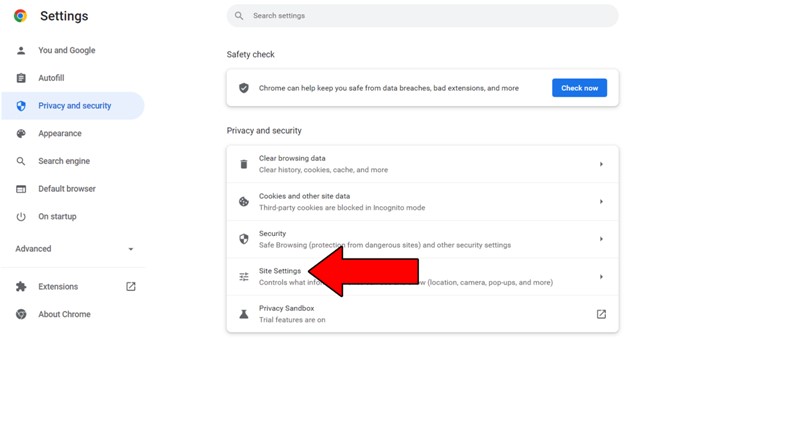
Solution: I know this sounds challenging, but it’s actually quite simple. Here’s how to do it on Google Chrome and Android devices to give you a general idea of the process:
On Google Chrome:
On Android devices:
It would be a good idea to write these steps down, as knowing how to frequently clear your cache and cookies is a good practice that will save you a lot of trouble down the line.
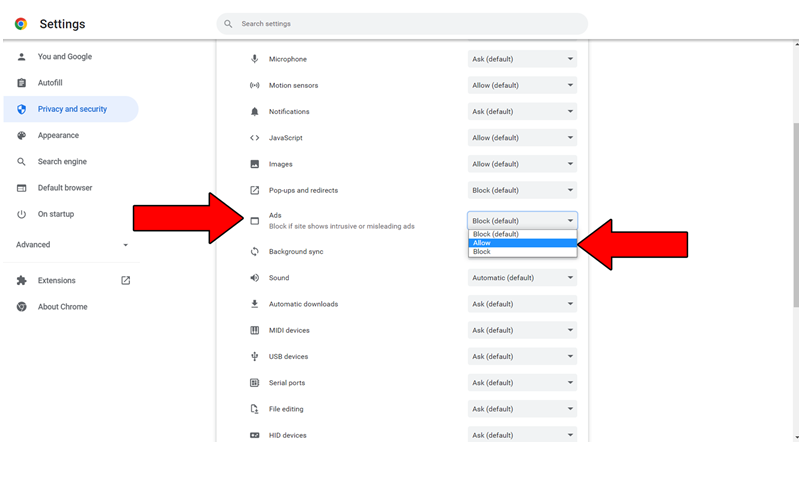
We’re making good progress, but we’re not quite there yet. Next, I want us to look at your Chrome extensions.
It would seem like, with every passing day, websites become more and more cluttered with pop-up ads. I can’t remember the last time I visited a webpage without unwillingly learning about all the available discounts on online marketplaces.
Can you? Didn’t think so…
This is extremely annoying, and for several years, it seemed like the new normal. But luckily, we now have Adblocker extensions.
These are great at preventing pop-up ads from… well, popping up, making your browsing experience more enjoyable. However, in some cases, they could also be the reason why Disney Plus is stuck on a black screen.
Solution: Believe it or not, there’s a way in which we can keep you protected from pop-up ads, while also preventing Adblocker from interfering with Disney Plus. But before we do that, I want to be 100% sure that the extension is to blame.
Here’s how you can test that:


If disabling Adblockers got rid of the black screen, we can now move on to creating an exception for Disney Plus. Doing this will keep the extension disabled for the platform, but enabled for every other website.
The best of both worlds.
You might think that keeping your favorite apps outdated is not a big deal. And while it’s not a capital offense, it can definitely be the source of technical difficulties down the line.
You see, with every new release, app developers try to keep as much compatibility as they can, but it’s not always possible. Using an older version of the streaming platform on a fully updated streaming system could explain why Disney Plus is stuck on a black screen.
This should not normally be a concern, as most updates are configured to be installed automatically. However, network interruptions, background process crashes, or strict device privacy settings could get in the way of this and leave the pending downloads stuck in Limbo.
In that scenario, you’ll have to manually install the latest software version of the service.
Solution: With so many streaming devices out there, it would take me hours to walk you through the process of updating your apps within each one.
And don’t get me wrong, I don’t mind it, but I’m sure you’ve got a very busy day!
Instead, I’d advise going on Google and searching for “How to update apps on <Your Device’s Name Goes Here>”. You should be able to find a set of detailed instructions for your particular case.
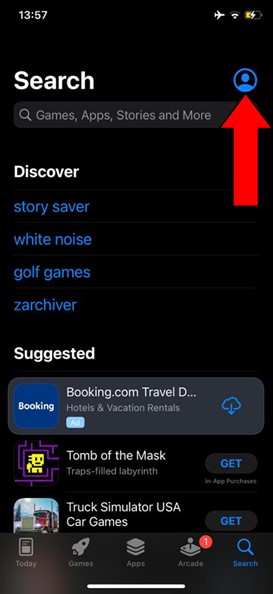
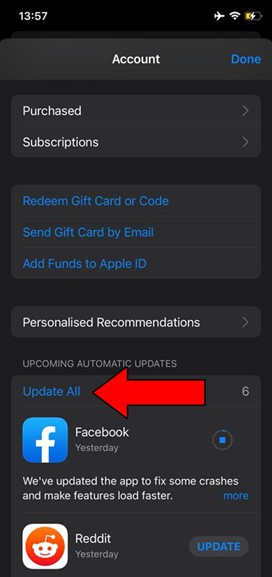
That being said, I don’t want you to leave this section empty-handed, so here’s how to update Disney Plus on iOS, Android and Roku:
For iOS devices:
For Android devices:
You may be prompted with a notification asking for your permission to proceed with the updates. If so, simply accept and be patient.
We’re almost done, but we’ve got to keep pushing forward.
While keeping your Disney Plus app fully updated will greatly improve your situation, what will truly drive this whole thing home will be to also keep your streaming system in the same condition.
Just as it happens with the app, you shouldn’t normally have to worry about this, as any new software version should be installed automatically.
But as you’ve learned, this isn’t always the case.
Solution: Since there are tens of streaming devices out there, your best bet is to go to Google and search for “How to update <Your Device’s Name Goes Here>”.
Here’s how to update an Amazon Fire Stick to give you a general idea of the process:
Lastly, let’s talk about your VPN.
If you don’t know what this is, don’t worry! I’d love to give you a quick walkthrough.
VPN stands for “virtual private network” and is mainly used for private, secure web browsing, as well as for accessing restricted streaming content from other countries. VPNs have become increasingly popular over the years, as they open up a world of possibilities for their users.
…which makes the fact that streaming companies hate them, a real shame.
Many platforms out there have been outspoken about their dislike for these, and have even temporarily banned subscribers who use them.
If you weren’t familiarized with VPNs before reading this, you’re probably good. But if you’ve been using them to stream international content for a while, I’m sorry to tell you that this might very well be the reason why Disney Plus is stuck on a black screen.
Solution: Hey, I get it! Sometimes, what’s available in our countries of origin is terrible, and the need for accessing international shows arises.
But if you absolutely must stream Disney Plus while using a VPN, I’d suggest paying a premium subscription from a provider that offers obfuscated servers, as these will make your traffic much harder to detect.
The best way to tell if you need to change your VPN service is by disabling your current one and streaming without it for a couple of days. If you no longer encounter the dreaded black screen on Disney Plus, there’s your answer.
To have Disney Plus be stuck on a black screen can be extremely frustrating. After all, you’re paying a hefty sum every month for something you’re not even able to fully enjoy.
What a disaster!
Luckily, as I hope you’ve learned in this piece, addressing most of the causes behind this situation is fairly simple and quick. In most cases, simple actions, like making sure that your HDMI cable is not damaged, and double-checking that your systems are fully updated, should do the trick.
Thank you so much for sticking with me all the way to the end. If you found this article helpful, you’ll be glad to know that we upload new content weekly. Make sure to check out all our other wonderful resources below and become a Tech Detective yourself!
Best of luck to you.
Detective Anderson is a grizzled veteran of policing the internet’s cyber-streets. After decades of experience busting illegal floppy disk rings and underground dial-up connections, Anderson has now been placed in charge of the more modern Tech Detective team.