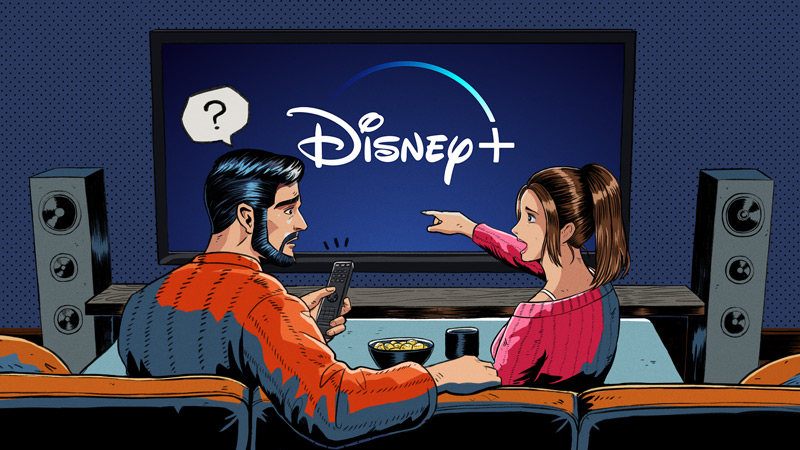
Are you losing it because Disney Plus is not available in your region?
You’re not alone! Every day, thousands of people encounter this same issue and are left confused as to how they can fix it.
I can only imagine how frustrating this must be for you, especially if you could stream content on the platform before and it suddenly stopped working.
But don’t worry, you have come to the right place for answers. I’m here to help you get things back to normal.
Below, you’ll find a list of 7 simple tricks you can try to stop this from happening. I’m sure one of them will do the trick.
These are:
Read on to start streaming and stop stressing!
If you’re actually streaming from a country where the platform is not available, the easiest way to solve the problem is by getting a VPN.
If you don’t know what this is, that’s perfectly fine. Let me explain.
VPN stands for “Virtual Private Network” and it’s software that allows us to browse the web securely and privately, as well as access international content. By using one of these, you can watch shows and movies that are not available where you live.
When you connect to a VPN server, all your Internet traffic is passed through a virtual tunnel that not only makes it impossible for websites to track you but also changes your IP Address (your network’s ID).
You can think of this as a disguise for your connection.
Now, it’s important to bear in mind that not all VPNs are created equal. You might find free software and trials from trusted companies, but usually, these are very slow and do not offer many features.
Moreover, streaming companies, like Disney Plus, HBO Max, Netflix, Amazon Prime Video, Hulu, and many more, can even block your account if they suspect you’re connected to a VPN. To prevent this, make sure to pay a premium subscription from a company that offers obfuscated servers.
These will make it much harder for Disney Plus to detect your VPN traffic while allowing you to access the platform from outside the supported regions.
Solution: There are several options you can choose from. You’re one Google search away from finding the best VPNs for streaming in Disney Plus.
You may not know this, but every piece of content within Disney Plus has its own ID and allocated space on its servers. This is why sometimes you might have trouble streaming a particular title, but be able to seamlessly enjoy another.
By organizing its content this way, the platform can prevent an isolated incident from becoming a general failure.
And while this countermeasure normally works wonders, it could also be the reason why Disney Plus keeps saying it’s not available in your region.
Why? Because you might be tricked into thinking that the entire service is failing, even when it all may be reduced to one show/movie.
Solution: Try switching back and forth between different shows and see what happens. If you can stream other shows and movies uninterrupted, the issue likely lies with what you were originally trying to watch.
Next, let’s check your connection.
Granted, Internet service drops have decreased dramatically over the last few years, but they still happen now and then.
The tricky part about diagnosing a bad connection is that sometimes, even when you have one, you won’t be completely cut off from the Internet. Sometimes you might still be able to do some light browsing or chatting while also having Disney Plus tell you that it’s not available in your region.
This is especially likely to be the cause of the problem if you were able to stream content on the platform before.
As a general rule, Disney Plus recommends a minimum Internet speed of 5 Mbps for streaming in Full HD resolution (1080p) and a whopping 25 Mbps for 4K.
A weak signal could explain why the platform is having trouble verifying your location and prompting you with this annoying message, even when you’re in a region where availability is not a concern.
Solution: Normally, for households with large families, I recommend having a plan that’s about 5-6 faster than your favorite platform’s minimum requirements per resolution.
For example, if you want to stream Disney Plus in 4K, you’ll need a plan that offers a minimum of 150 Mbps.
If you live alone, you might be able to get away with something slower.
Provided that your current plan is already fast enough to meet your needs, try giving your provider a call and ask them if they’re having coverage issues in your area. If they tell you everything’s fine on their side of the fence, you should try resetting your modem and see if that works.
Assuming that you’ve never done it before, here’s how you can go about it:
Now, I want us to make sure that the platform’s servers are not having problems.
As you may know, these are responsible for storing important information and providing millions of Disney Plus subscribers with the service they expect for the price they pay month after month.
Given how essential they are to the company’s everyday operations, the people in charge have put a lot of elbow grease into designing them to be as resistant as possible.
And while I’m not saying that they’ll break just for looking at them, I’d be lying if I told you that they’ve managed to make them failproof.
In fact, things that seem unimportant, such as a bad hard drive, a coding bug, or even minor hacking can greatly impact the platform’s performance and affect its features.
This would not only explain why you’re suddenly being told that Disney Plus is not available in your region, but also make sense of the slow loading times, endless buffering, out-of-sync audio/video/subtitles, and other issues you’ve likely been experiencing lately.
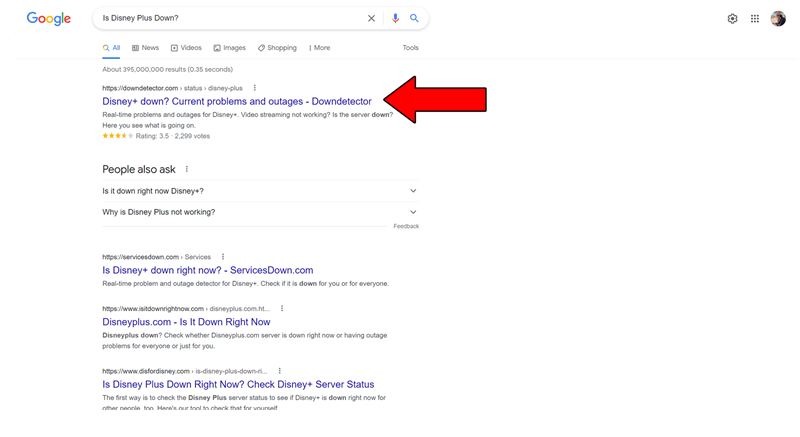
Solution: The best way to tell whether this is the problem is by checking the real-time status of the platform’s servers.
Fortunately, doing this is really simple and quick. Here’s what you need to do:

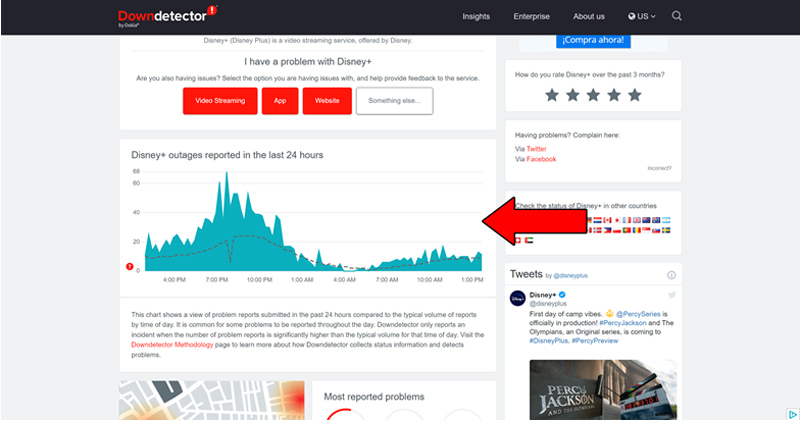
The taller the spikes, the more likely you are to be experiencing issues
If you see the equivalent of Mt. Everest forming in the graph above, it’s an almost absolute certainty that the platform is currently having problems.
I wouldn’t lose any sleep over it, though. The people in the IT department over at Disney Plus are highly capable, and to my knowledge, there’s never been an instance where the service wasn’t fully restored within a day.
I know how keeping your favorite apps outdated doesn’t sound like a big deal. And while it’s not a federal crime, it can certainly be the source of several technical difficulties as time passes.
You see, with every new release, app developers try to keep as much backward compatibility as they can, but it’s not always possible. Using an older version of the platform’s software on a fully updated streaming device could explain why Disney Plus is saying that it’s not available in your region.
Normally, automatic updating should make this no concern of yours. However, sometimes network interruptions, background process crashes, or even strict device privacy settings can get in the way and leave the pending downloads stuck in Limbo.
In that scenario, you’ll have to install the latest software version of the app manually.
Solution: With so many streaming devices out there, it would take me hours to guide you through the process of updating Disney Plus within each one.
And while I don’t mind it, I’m sure you’ve got enough on your plate already!
Instead, I’d advise going to Google and searching for “How to update apps on <Your Device’s Name Goes Here>”. You should be able to find several resources with detailed steps for your particular case.
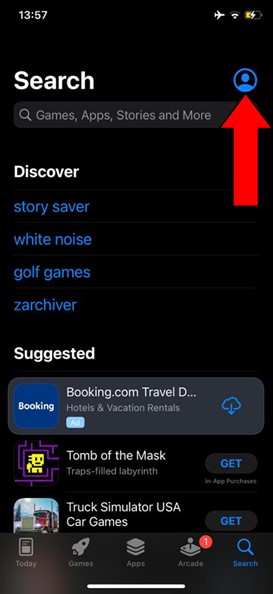
That being said, since I don’t want you to leave this section empty-handed, here’s how to do it on iOS and Android devices, as well as on Roku.
For iOS devices:
For Android devices:
You may be prompted with a notification asking for your permission to proceed with the updates. If so, simply accept and be patient.
While keeping your favorite apps fully updated will greatly improve your situation, what will truly drive this whole thing home will be to also keep your streaming devices in the same condition.
Not unlike with the app, this should be done automatically, but if it isn’t, you’ll have to interfere again.
Solution: As I said before, with so many streaming devices out there, if I were to walk you through the process of updating each one, you’d be here all day.
To make the most out of your time, please go to Google and search for “How to update my <Your Device’s Make and Model Go Here>”.
Here’s how to update an Amazon Fire Stick to give you a general idea of the process:
Last but definitely not least, let’s talk about your cache and cookies. If you have no idea what these are, that’s perfectly fine. A lot of people don’t.
But now that you’re here, I’d love to shed some light on the concepts, starting with the cache.
This is where your favorite apps store important information. In it, you’ll likely you’ll find audio, video, preset configurations, and sometimes even login credentials. By keeping this data handy, Disney Plus can load much quicker on startup and provide you with an enjoyable experience.
Cookies, on the other hand, are tools used to make your browsing more efficient and increase the accuracy of targeted ads.
They’re the reason why you’re suddenly bombarded on social media with ads for cupcake molds right after looking up the recipe for the perfect Strawberry Shortcake.
Most of the time, leaving them both untouched will do more good than harm.However, sometimes a corrupted file or a bug inside them might start acting up and make them work improperly.
This could be the reason why Disney Plus suddenly says it’s not available in your region.
In that case, your best bet will be to clear them.
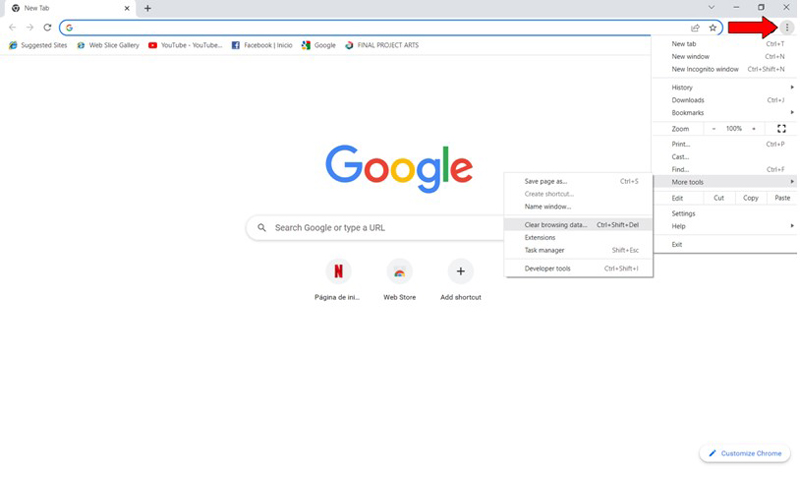
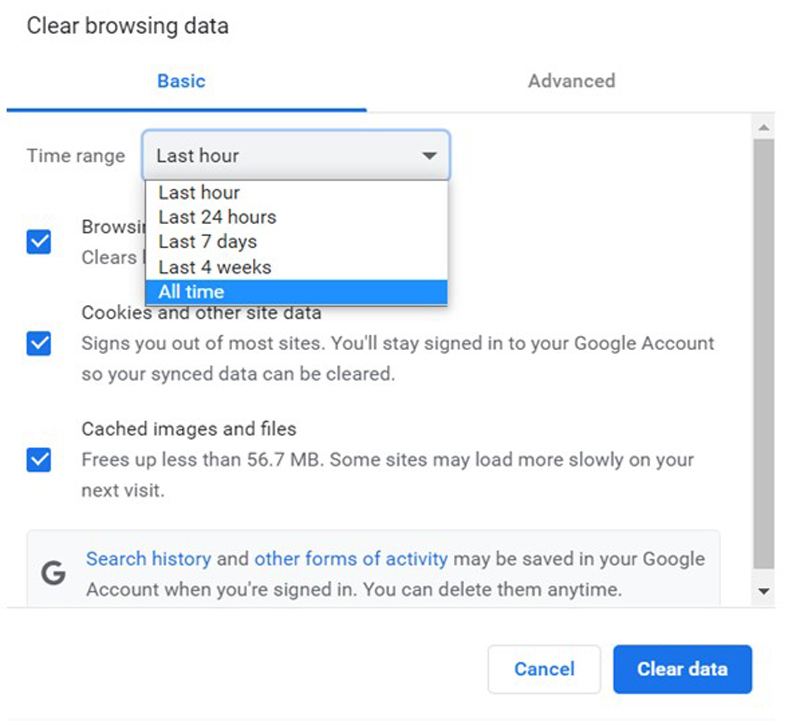
Solution: You should be able to delete your cookies and cache in every major browser and operating system out there. For this example, I’ll use Google Chrome and an Android OS.
On Google Chrome:
On Android devices:
This is completely optional, but you might want to write these steps down, as knowing how to frequently clear your cache and cookies is a good practice that will save you a lot of trouble down the line.
Having Disney Plus unavailable in your region can be frustrating. Especially if you had access before and are now struggling to enjoy your favorite content.
What a disaster!
Luckily, as I hope you’ve learned in this piece, whether you’re a seasoned subscriber or a newcomer to the platform, fixing this inconvenience is rarely ever difficult.
In most cases, simple actions, like getting a premium VPN, and double-checking that the platform’s servers are not failing, should do the trick.
Thank you so much for sticking with me all the way to the end. If you found this article helpful, you’ll be glad to know that we upload new content weekly. Please be sure to check out all our other incredible resources below to become a Tech Detective yourself!
I wish you all the best.
Detective Anderson is a grizzled veteran of policing the internet’s cyber-streets. After decades of experience busting illegal floppy disk rings and underground dial-up connections, Anderson has now been placed in charge of the more modern Tech Detective team.