
Are you stuck trying to get Disney Plus working with your VPN?
I’m honestly not surprised! Believe it or not, thousands of people experience this issue daily and are left confused as to why it’s happening.
I can only imagine how frustrating this must be for you. Especially considering that you’re paying a monthly price for a premium service you’re definitely not getting.
But don’t worry, you’ve come to the right place. I’m going to help you get things back to normal.
Below, you’ll find a list of 6 simple fixes you can try to successfully access international content. I’m sure one of them will do the trick.
These are:
Keep reading to stop stressing and start streaming!
I want to start off by addressing the elephant in the room.
This might be hard to hear, but Disney Plus will never work with your VPN unless you’ve got a premium subscription.
Many VPN providers out there offer free versions of their platforms, and while these are great for light browsing and small tasks, they fall short when it comes to using your full Internet speed and providing you with the features you need for streaming properly.
Disney Plus has a minimum Internet speed requirement of 5 Mbps for streaming in Full HD resolution, and a whopping 25 Mbps for 4K. While no VPN can use 100% of your plan’s speed, premium subscriptions can use your connection significantly better than their free counterparts.
Moreover, most premium VPN subscriptions offer obfuscated servers, which are essential to getting any streaming platform to work with them, as they hide your VPN traffic and prevent you from being blocked by the most popular services out there.
Solution: I know the idea of free apps and software is attractive, but in this case, there’s simply no way around it.
But hey, chin up! Most premium VPN subscriptions go for as low as $60 per year.
If you’re already a premium subscriber to any VPN service out there, you’ve probably seen an option to change servers in the interface.
This feature’s main purpose is to automatically direct all incoming users to different servers as they log in to prevent saturation and connection issues. And while most providers do this automatically, you can also change servers manually.
If Disney Plus is not working with your VPN, you might want to try changing to a different, less crowded server and see if that works.
Solution: Every VPN interface is different. If you want detailed instructions on how to switch servers on your particular provider, I’d advise going on Google and searching for “How to switch servers on <Your VPN Provider’s Name Goes Here”.
What’s that, you ask? What a great question!
DNS stands for “Domain Name System”, and is basically a translator between human and computer language. Computers and networks do not talk the each other in the same way that we humans do.
When you go to your favorite website, like www.disneyplus.com, your computer does not see words and letters but rather binary code and other coding languages. By using DNS, your system can understand what you’re typing and follow your commands.
For the most part, DNS is beneficial and essential to our everyday lives. However, on certain occasions, a bug or a background process crash can cause your computer and your network to stop understanding each other.
In this case, your best bet is to flush your DNS to restart things from scratch.
Solution: I know this sounds complicated, but let me assure you that it’s a very simple process.
Here’s what you have to do:
On Windows:

ipconfig/flushdns
ipconfig/registerdns
ipconfig/release
ipconfig/renew
netsh winsock reset
This should flush your DNS and allow your computer and network to start understanding each other again.
If you read this and thought, “What on Earth is that?”, I don’t blame you!
Unless you work in an IT department or studied a Major in Computer Science, there’s really no reason why you should have been familiarized with the concept up until now.
But now that you’re here, I’d love to tell you a little bit about it, and what it does.
The IPv6 protocol is the newer version of IPv4, which, in a nutshell, is part of what allows your devices to communicate with each other and the network they’re connected to.
It’s similar to the DNS protocol mentioned above.
Most of the time, IPv6 will work wonders and provide you with a stable connection. However, given that it’s a “newer” protocol, it might not yet be supported by all streaming devices and VPN services.
Solution: Disabling IPv6 on your favorite streaming devices may sound complicated, but it should be fairly simple.
Given how many possibilities there are out there, your best bet is to go to Google and search for “How to disable IPv6 on my <Your Device’s Name Goes Here>”. You should be able to find detailed instructions for your specific case.
That being said, I don’t want you to leave this section empty-handed, so here’s how you can do it on an Nvidia Shield:
After doing this, your device should now start using IPv4, which is much friendlier with older streaming devices and might get Disney Plus working with your VPN.
There’s a very good chance that you’ve heard both of these terms at least once but have no clue what they are. If so, fret not! Most people are not familiarized with them.
But now that you’re reading this, let me briefly explain them to you. Let’s start with the cache.
This is where your favorite apps store important information. In it, you’re likely to find audio, video, preset configurations, and sometimes even login credentials. By keeping this data handy, Disney Plus can load much quicker on startup and provide you with an enjoyable experience.
Cookies, on the other hand, are developer tools used to make your browsing more efficient and increase the accuracy of targeted ads.
They’re the reason why you’re suddenly bombarded on social media with ads for music lessons right after looking up the best Maplewood neck guitar for beginners.
For the most part, both your cookies and cache do more good than harm. However, on certain instances, they could also be the reason why Disney Plus is not working with your VPN.
In this case, you’ll want to delete them.
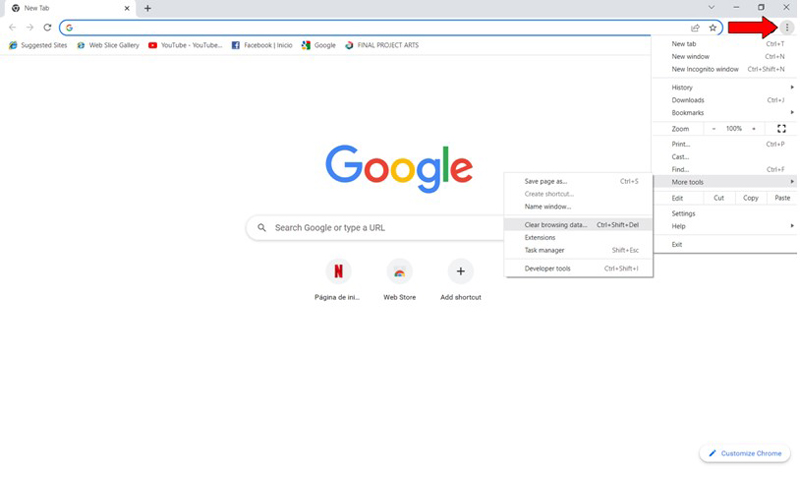
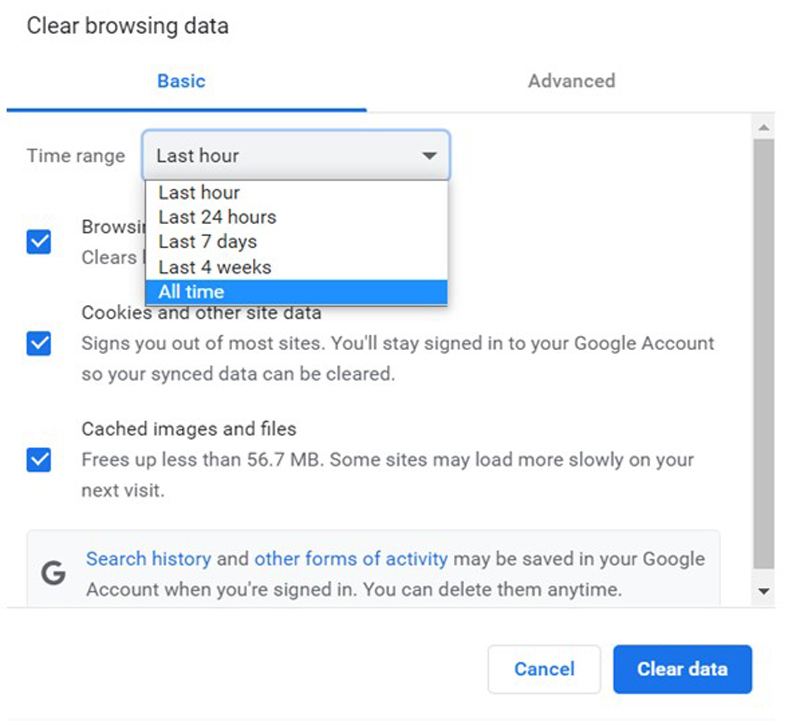
Solution: You should be able to get rid of your cookies and cache quite easily on any browser and operating system. For this example, I’ll use Google Chrome, and an Android device to give you a general idea of the process.
Here’s what you need to do:
On Google Chrome:
On Android devices:
This is completely optional, but you might want to write these steps down, as knowing how to frequently clear your cache and cookies is a good practice that will save you a lot of trouble down the line.
Lastly, let’s make sure that your connection is not compromised.
Internet service drops have decreased dramatically over the last decade, but they still happen now and then. A fact I’m sure you’re already aware of.
The tricky part about diagnosing a bad connection is that sometimes when you have one, you won’t be completely cut off from the Internet. In certain cases, you might still be able to do some light browsing or chatting while having issues with Disney Plus and your VPN.
How come? Because each activity has different requirements.
Texting your friends about your day via WhatsApp will never be as network-demanding as streaming your favorite content on Full HD or 4K resolution.
Especially when using VPNs, since they tend to have a hard time using your plan’s full speed.
No matter how well Disney Plus and your favorite VPN get along, if your Internet connection is weak or non-existent, you’ll have several difficulties streaming content on the platform.
Solution: Give your provider a call and ask them if they’re having coverage issues in your area. If they tell you everything’s fine on their end, you’ll likely have to reset your modem and see if that works.
If you’ve never done it before, that’s ok! It’s very simple. Here’s what you have to do:
Having Disney Plus not working with your VPN can be a nightmare. After all, you’re paying a hefty sum every month for what should be a premium service, and instead, you find yourself constantly frustrated and dissatisfied.
What a disaster!
Luckily, as I hope you’ve learned in this piece, addressing most of the causes behind this situation is fairly simple and rarely ever time-consuming. In most cases, small actions, like subscribing to a premium VPN service, and frequently clearing your cache and cookies, should do the trick.
Thank you so much for sticking with me all the way to the end. If you found this article helpful, you’ll be glad to know that we upload new content weekly. Make sure to check out all our other wonderful resources below and become a Tech Detective yourself!
I wish you all the best.
Detective Anderson is a grizzled veteran of policing the internet’s cyber-streets. After decades of experience busting illegal floppy disk rings and underground dial-up connections, Anderson has now been placed in charge of the more modern Tech Detective team.