Stuck trying to keep Zoom always on top?
This can often be challenging without proper guidance. But, don’t worry. You’ve come to the right place to get this issue solved.
If you’re a multitasker, you may find it convenient to have Zoom’s window always on top of other tabs. This is the easiest way to pay attention to your meeting while taking notes or doing something else.
You can set up Zoom to be always on top by clicking on the menu bar. However, if you can’t find the “Keep on Top” option, you’ll need to update the app and your computer, or reinstall Zoom.
Read on to leave this situation in the past!
Since 2020, video conferences have become part of our daily lives. Zoom has helped us work and stay connected.
However, I’m sure you’ll agree with me that sometimes having too many meetings can keep us from being productive (especially when the meeting could’ve been an email).
But, don’t worry. Enabling Zoom to be on top of other windows can help you multitask and forget all about this issue. To do it, you’ll need to:
Windows PC:
Mac:
Once you’ve done that, switch tabs. You should be able to see Zoom’s window while doing something else.
But, if you couldn’t find the “Keep on Top” option, you’ll need to update or reinstall Zoom.
Don’t worry, though. Keep reading to learn how to do it.
If you can’t find the “Keep on Top” option, chances are Zoom isn’t running on its latest version.
I know, installing updates might seem like a tedious thing to do, especially if you’re in a hurry. Sadly, having an outdated app could cause multiple tech issues.
You see, bugs that are preventing you from enabling Zoom on top are usually fixed by updating the app. If you haven’t installed Zoom’s latest version, the issue won’t go away.
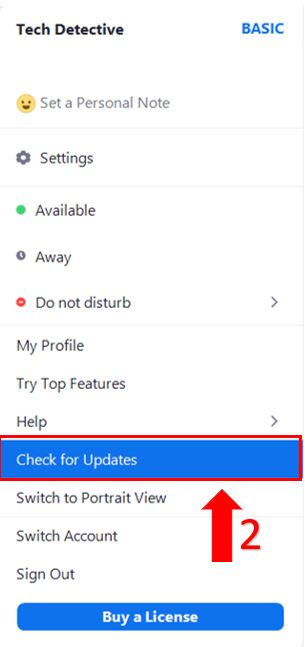
Try updating Zoom to leave this situation in the past, it won’t take you more than 3 minutes. You’ll just need to:
Tip: If you can’t leave a meeting, or you’re having trouble blurring your background, try this fix.
Once you’ve installed Zoom’s latest version, please update your system. This way, your computer will be compatible with your app, and you’ll be able to avoid multiple issues while trying to use Zoom.
Follow these steps to update your computer:
Windows PC:
Mac:
Once you’ve updated your app and device, try enabling Zoom on top again.
If you’re still stuck trying to enable Zoom on top, it’s time for us to take a more aggressive approach.
You see, sometimes the files stored in your app can become corrupted and cause multiple tech issues. Reinstalling Zoom is one of the most effective ways to get rid of these and restart them from scratch.
Follow these quick steps to reinstall the app:
Mac:
Windows PC:
Once you’ve completed the steps above, please enter zoom.us/download and install it again. Then, try enabling your meeting windows on top.
Hopefully, with the help of the 3 steps above, you’ll be able to keep Zoom always on top.
If you take anything away, remember that the quickest way to do it is by joining a meeting and clicking on the Zoom icon at the top of your screen. However, if you couldn’t find the “Keep on Top” option, updating or reinstalling the app should do the trick.
Thank you so much for taking the time to read this article. If you ever have a different problem with Zoom, check out our content. You’ll be able to find multiple fixes for all sorts of tech issues.
Have a great day!


Detective ‘Monse’ Cancino has been cracking down on tech issues for years. Starting out as a local cop, she’s quickly risen to the full rank of Tech Detective.
Cancino is our resident iPhone specialist. She’s often cracking cases related to iOS errors, streaming malfunctions, and locking up buffering bandits.