
Are you stuck trying to show lyrics on Amazon Music?
That sucks! One of the most important parts of any music streaming service is lyrics, as they’re what allow us to connect to our favorite songs and understand them better.
I can only imagine how annoying it must be for you to be paying monthly for a service you’re currently not taking full advantage of. More often than not, showing lyrics on Amazon Music is just a matter of tapping on the right places. However, there are instances where technical difficulties might be making this difficult.
But don’t worry, you’ve come to the right place for answers. Below, you’ll find a list of several simple steps you can follow to see your lyrics in case something’s wrong with the platform.
The 5 easy steps to show lyrics on Amazon Music are:
Keep reading to create a deeper connection with your songs!
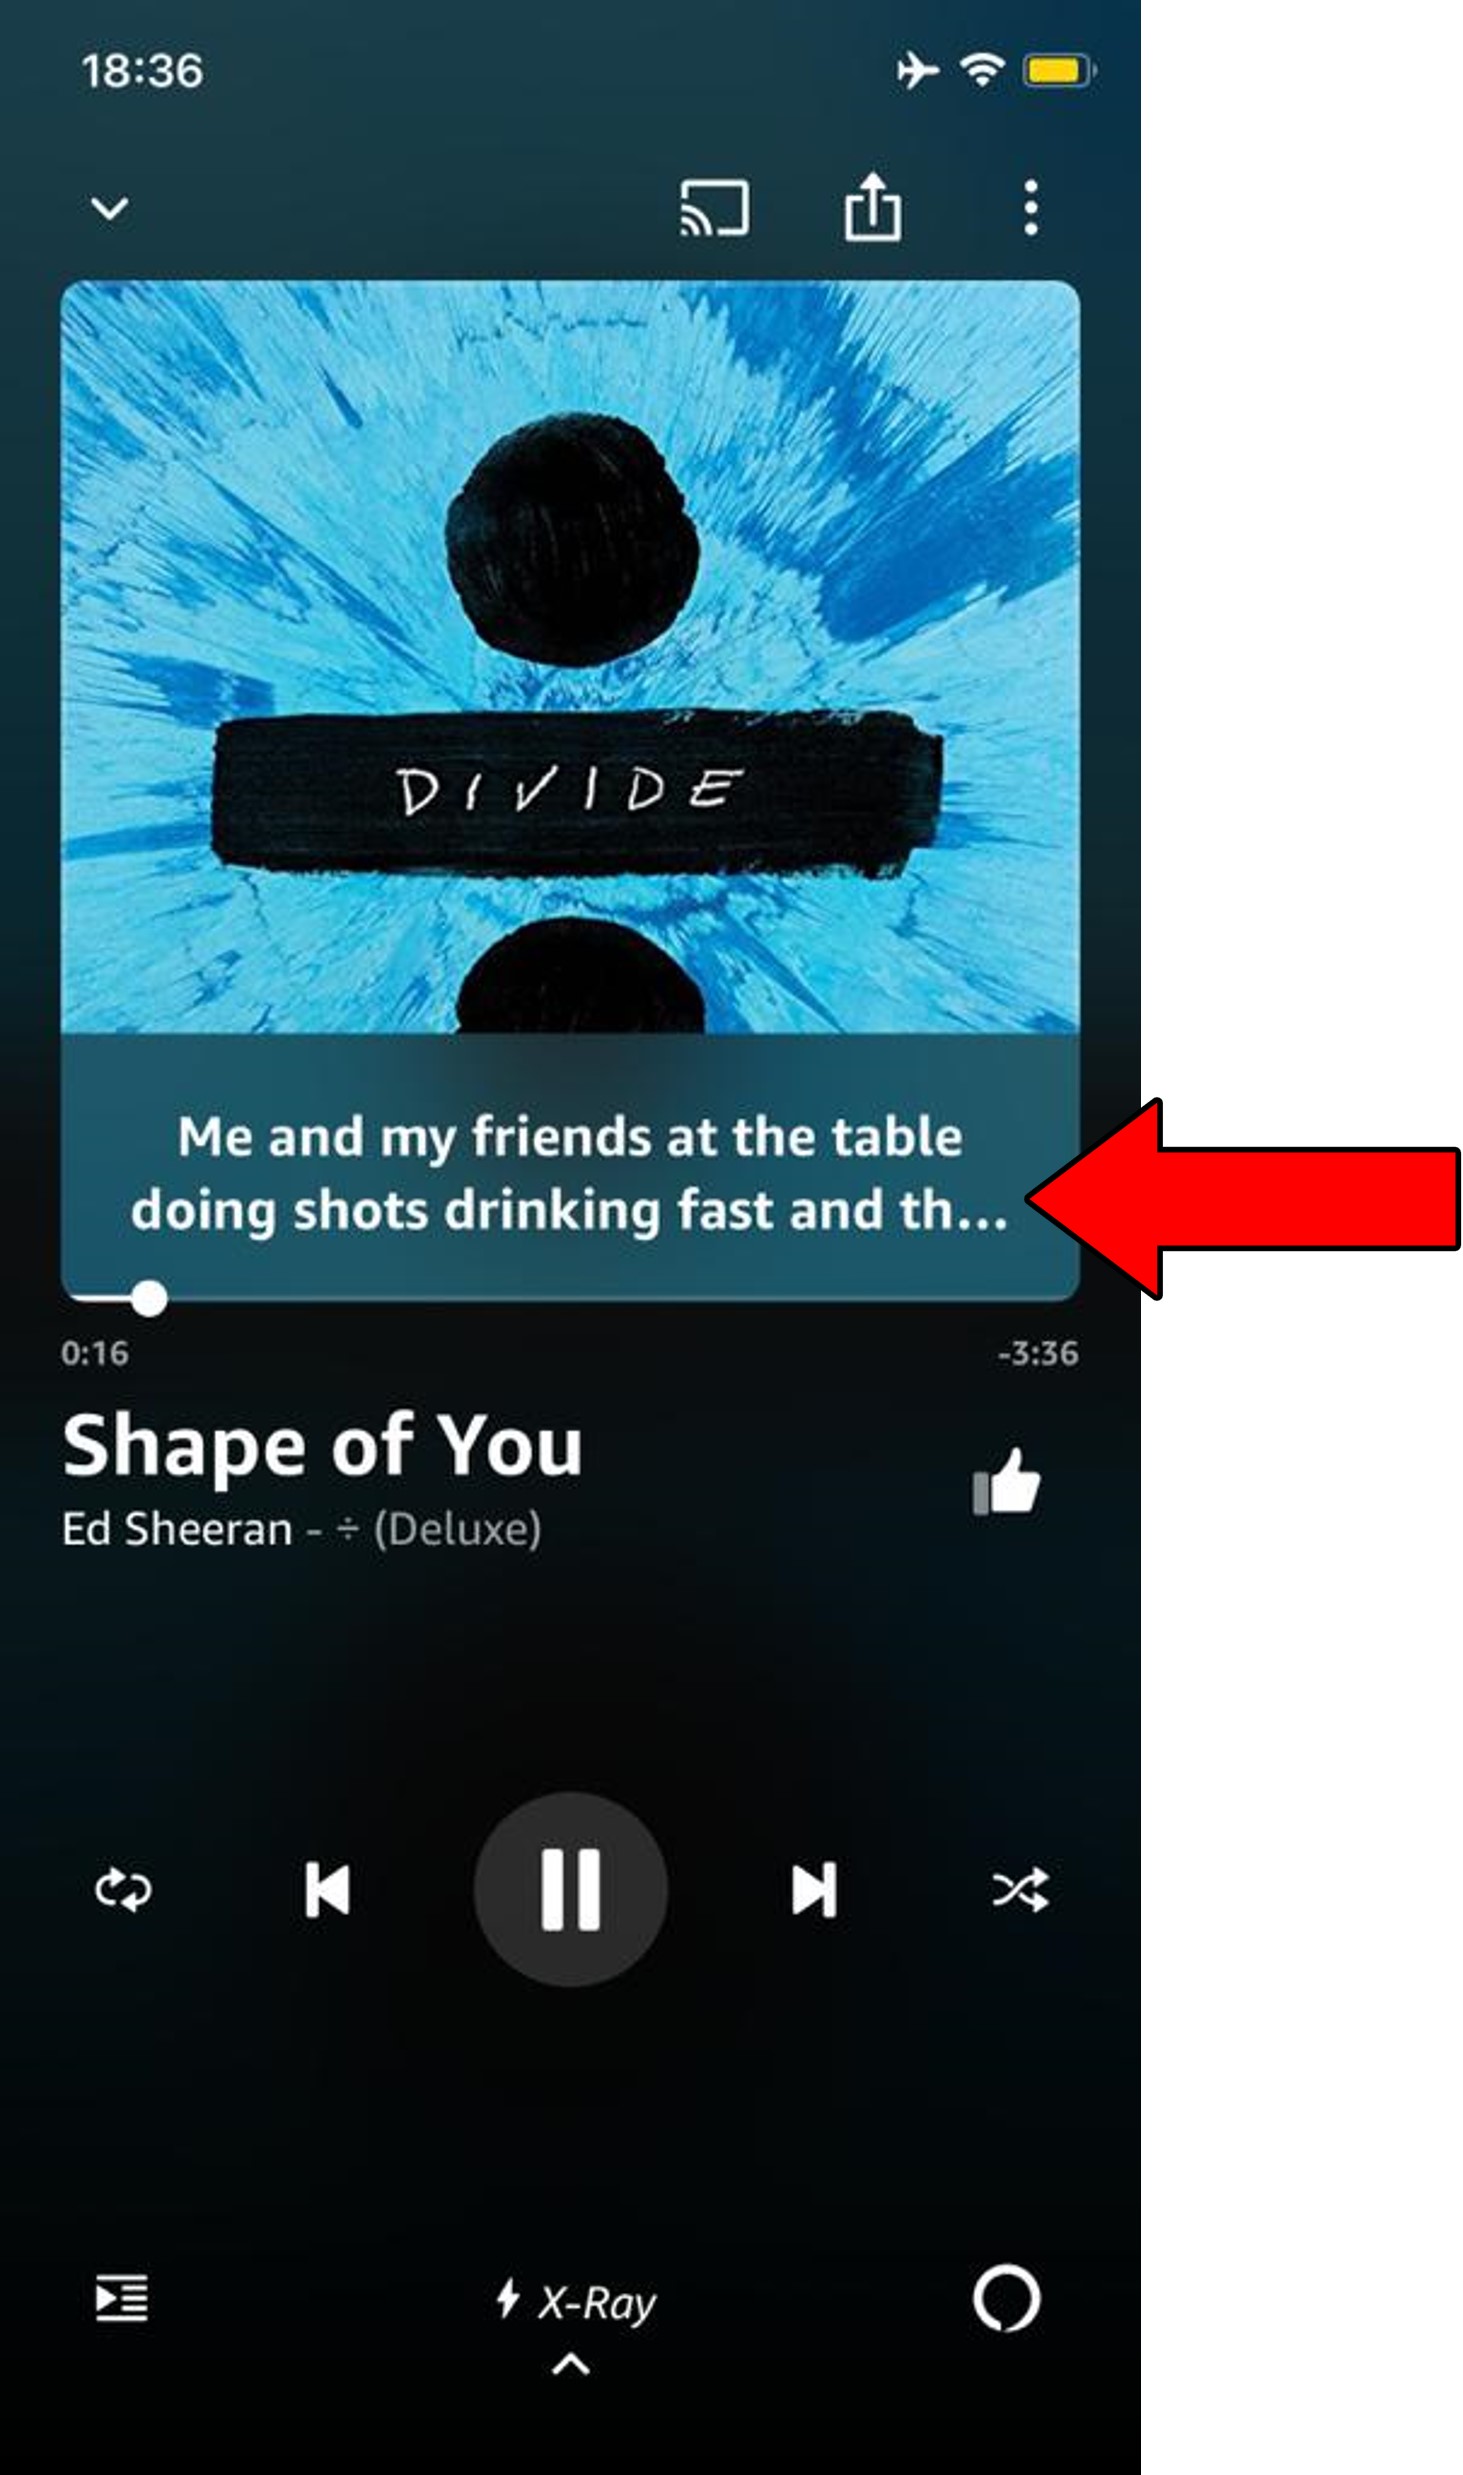
Before doing anything else, let’s try activating your lyrics normally. If nothing else is wrong with your app, this should work.
2. Once you find it, look out for a “Lyrics” sign under the title
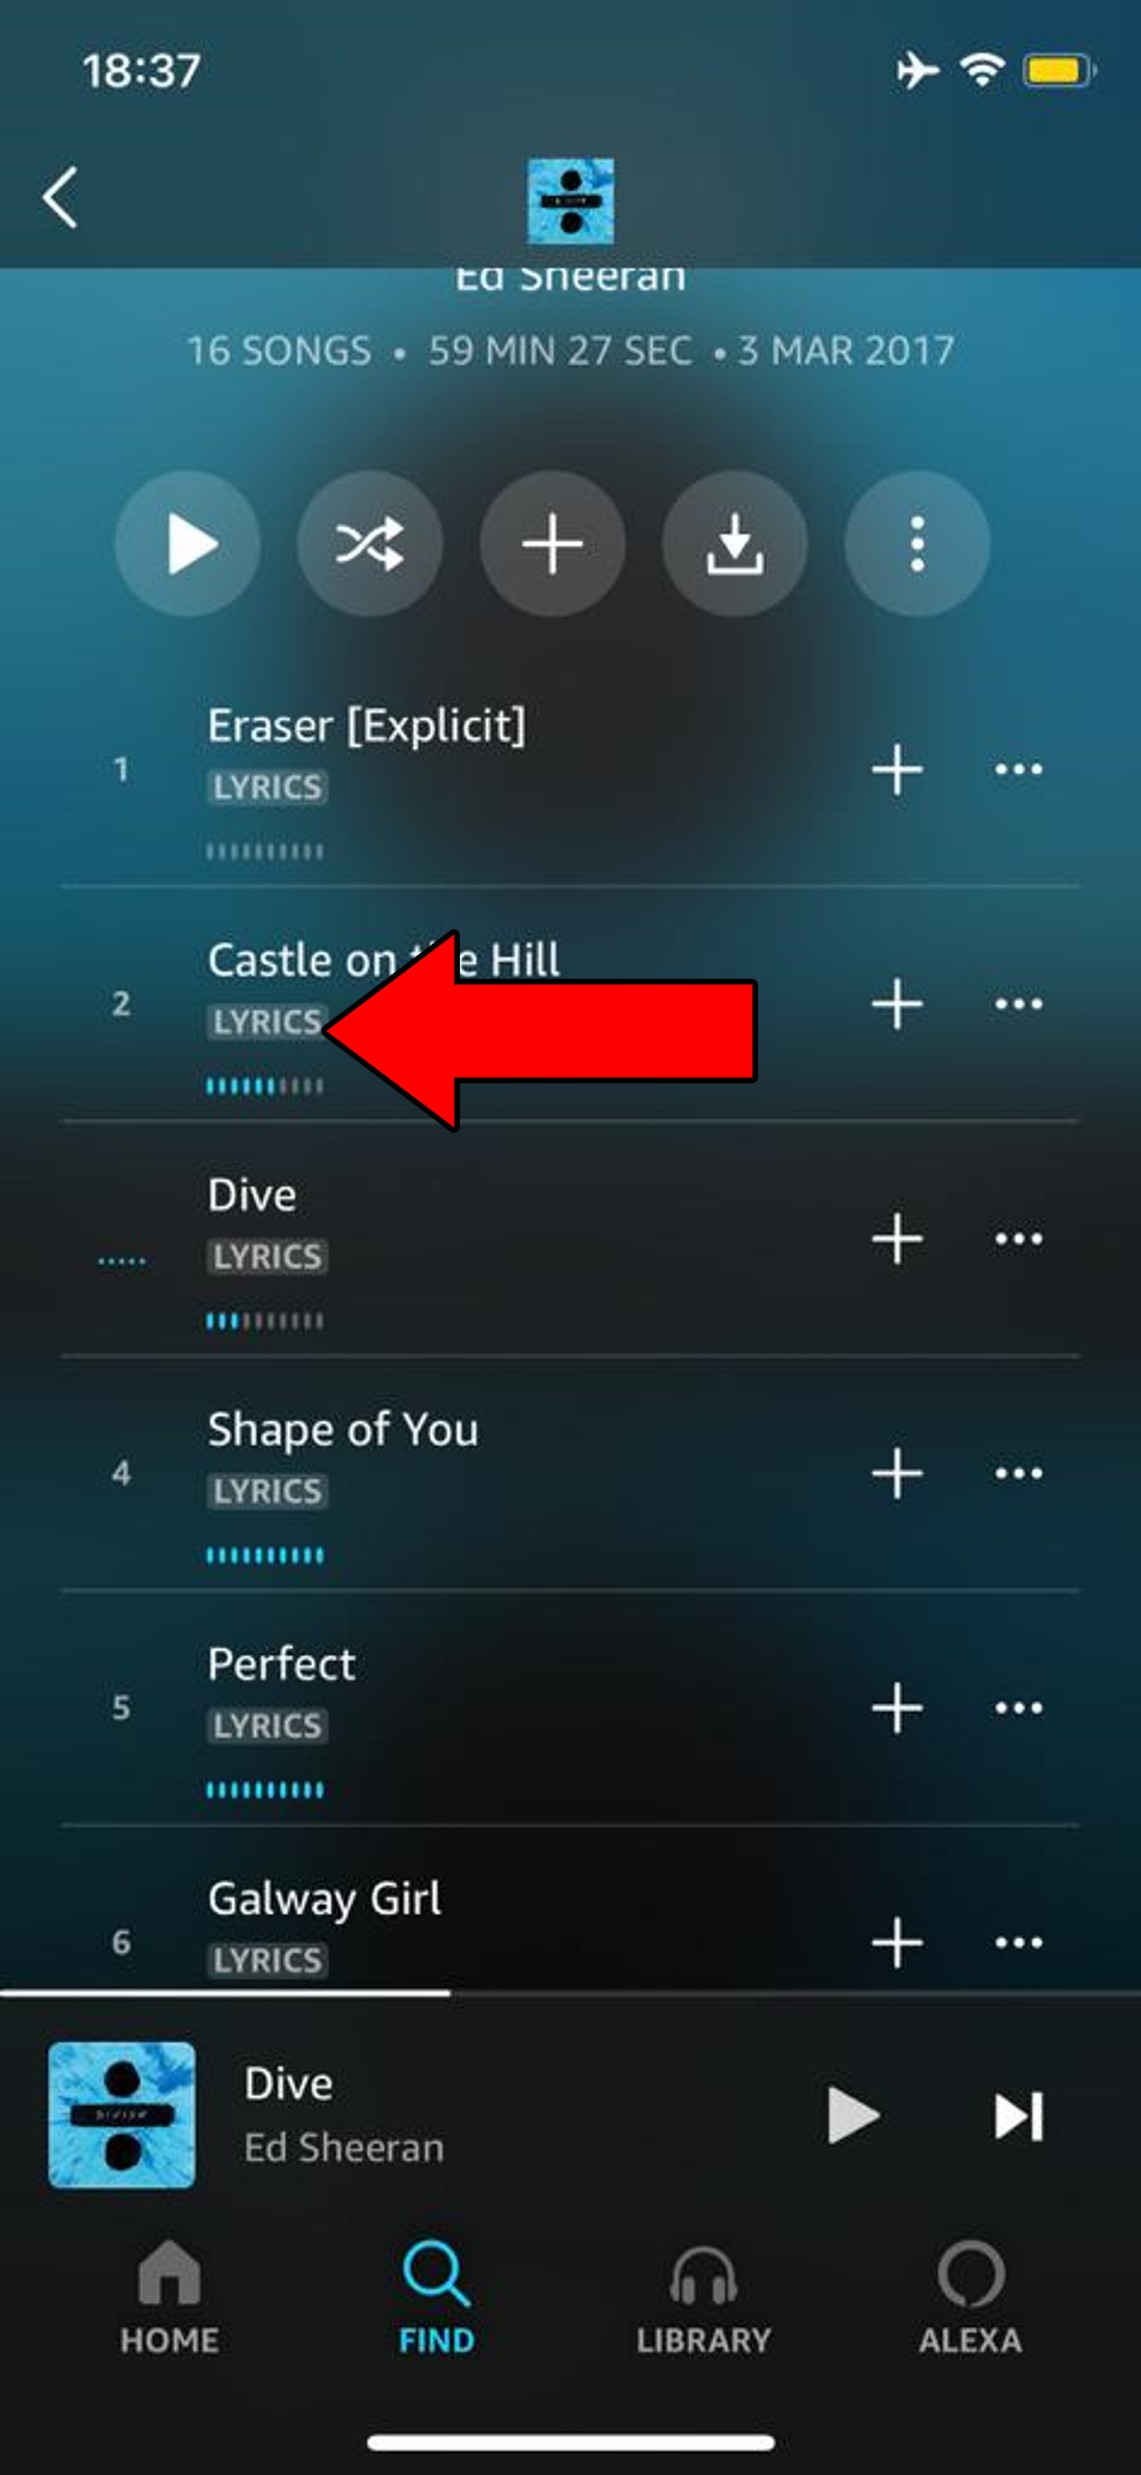
3. Play the song, you’ll find the lyrics available in the center of the screen, and you can make them larger by tapping on the window where they’re being shown
If the song you’re trying to get lyrics for doesn’t have the “Lyrics” title under it, it means they’re not available. All you can do here is resort to Google.
Now, assuming that you’re already doing this and your lyrics are not appearing, here are some reasons why, and how you can address them.
First, I’d like us to make sure the platform’s servers are ok.
Depending on how well versed you are in the tech world, this term might ring a bell, or it might be completely new to you.
If it’s the latter, that’s ok, it’s a very simple concept. The easiest way to understand servers is by looking at them as massive hard drives, with the exception that they not only store information but also back it up on the cloud. They’re also responsible for managing user traffic, preventing crashes, and giving every Amazon Music subscriber a high-quality service.
Now, this might make you think that, given their importance, modern servers must be bulletproof, right? I mean, they have to be.
Well… yes and no.
While modern servers are very resistant, things like bad hard drives, black-hat hackers, and coding bugs can greatly affect them.
When any of these things happen, you can experience issues with Amazon Music, such as low playback volumes, stuttering audio, and of course, unavailable lyrics.
Solution: I’m going to show you a groundbreaking way to monitor the real-time status of your favorite platforms’ servers.
Here’s what you have to do:
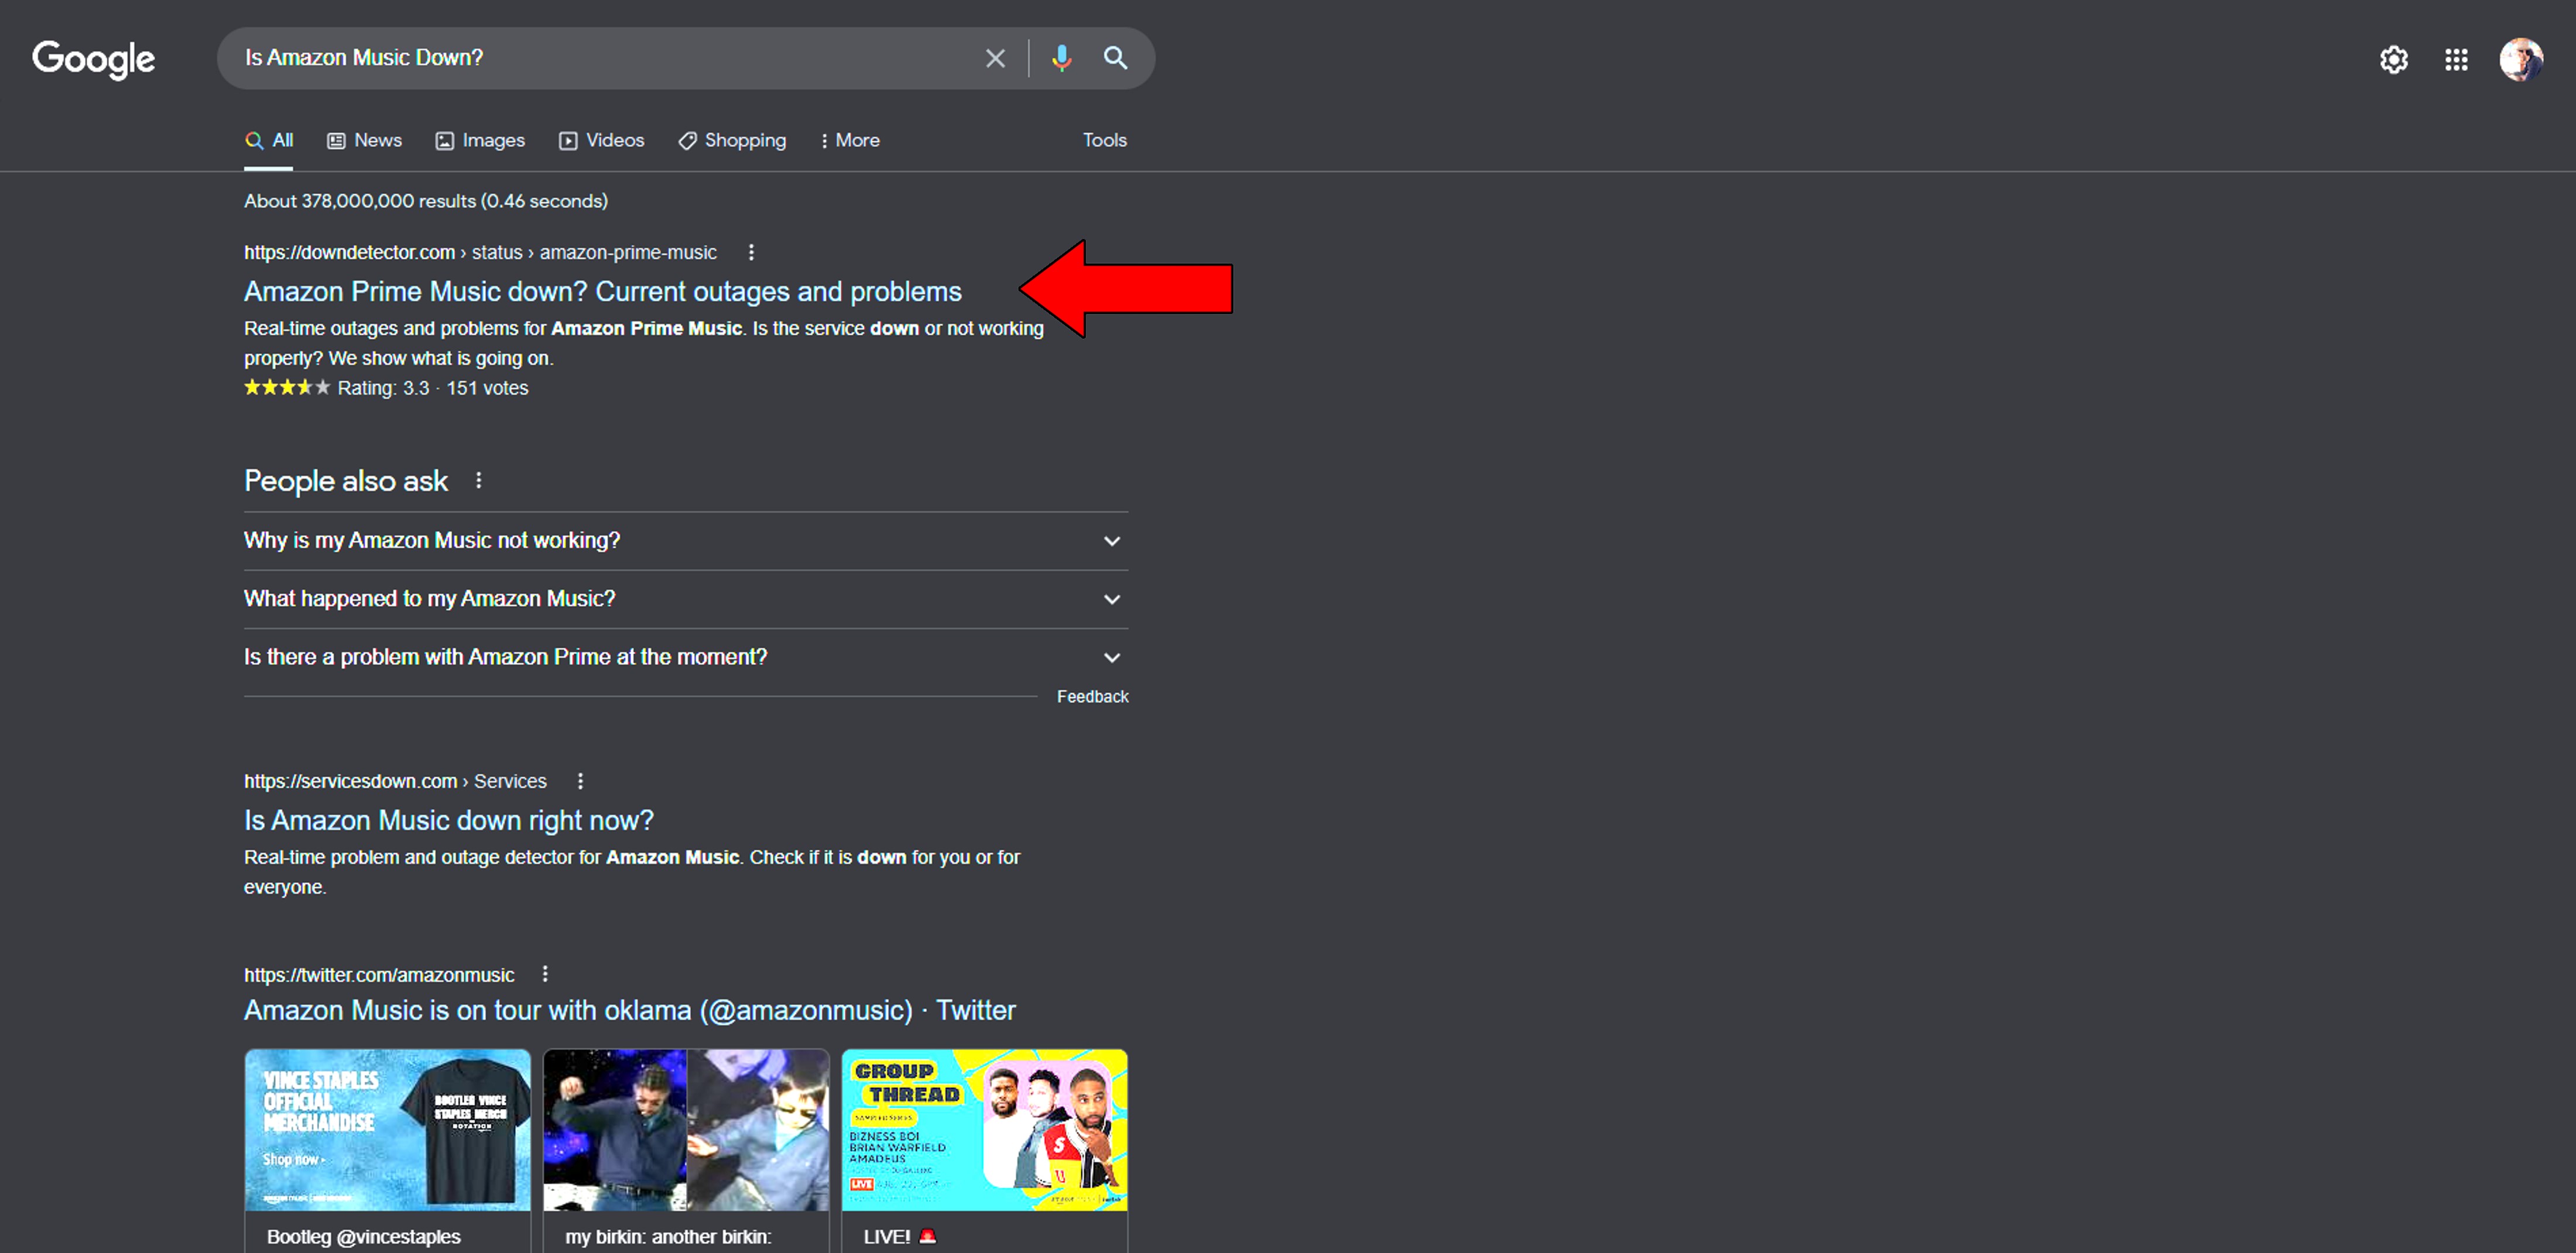
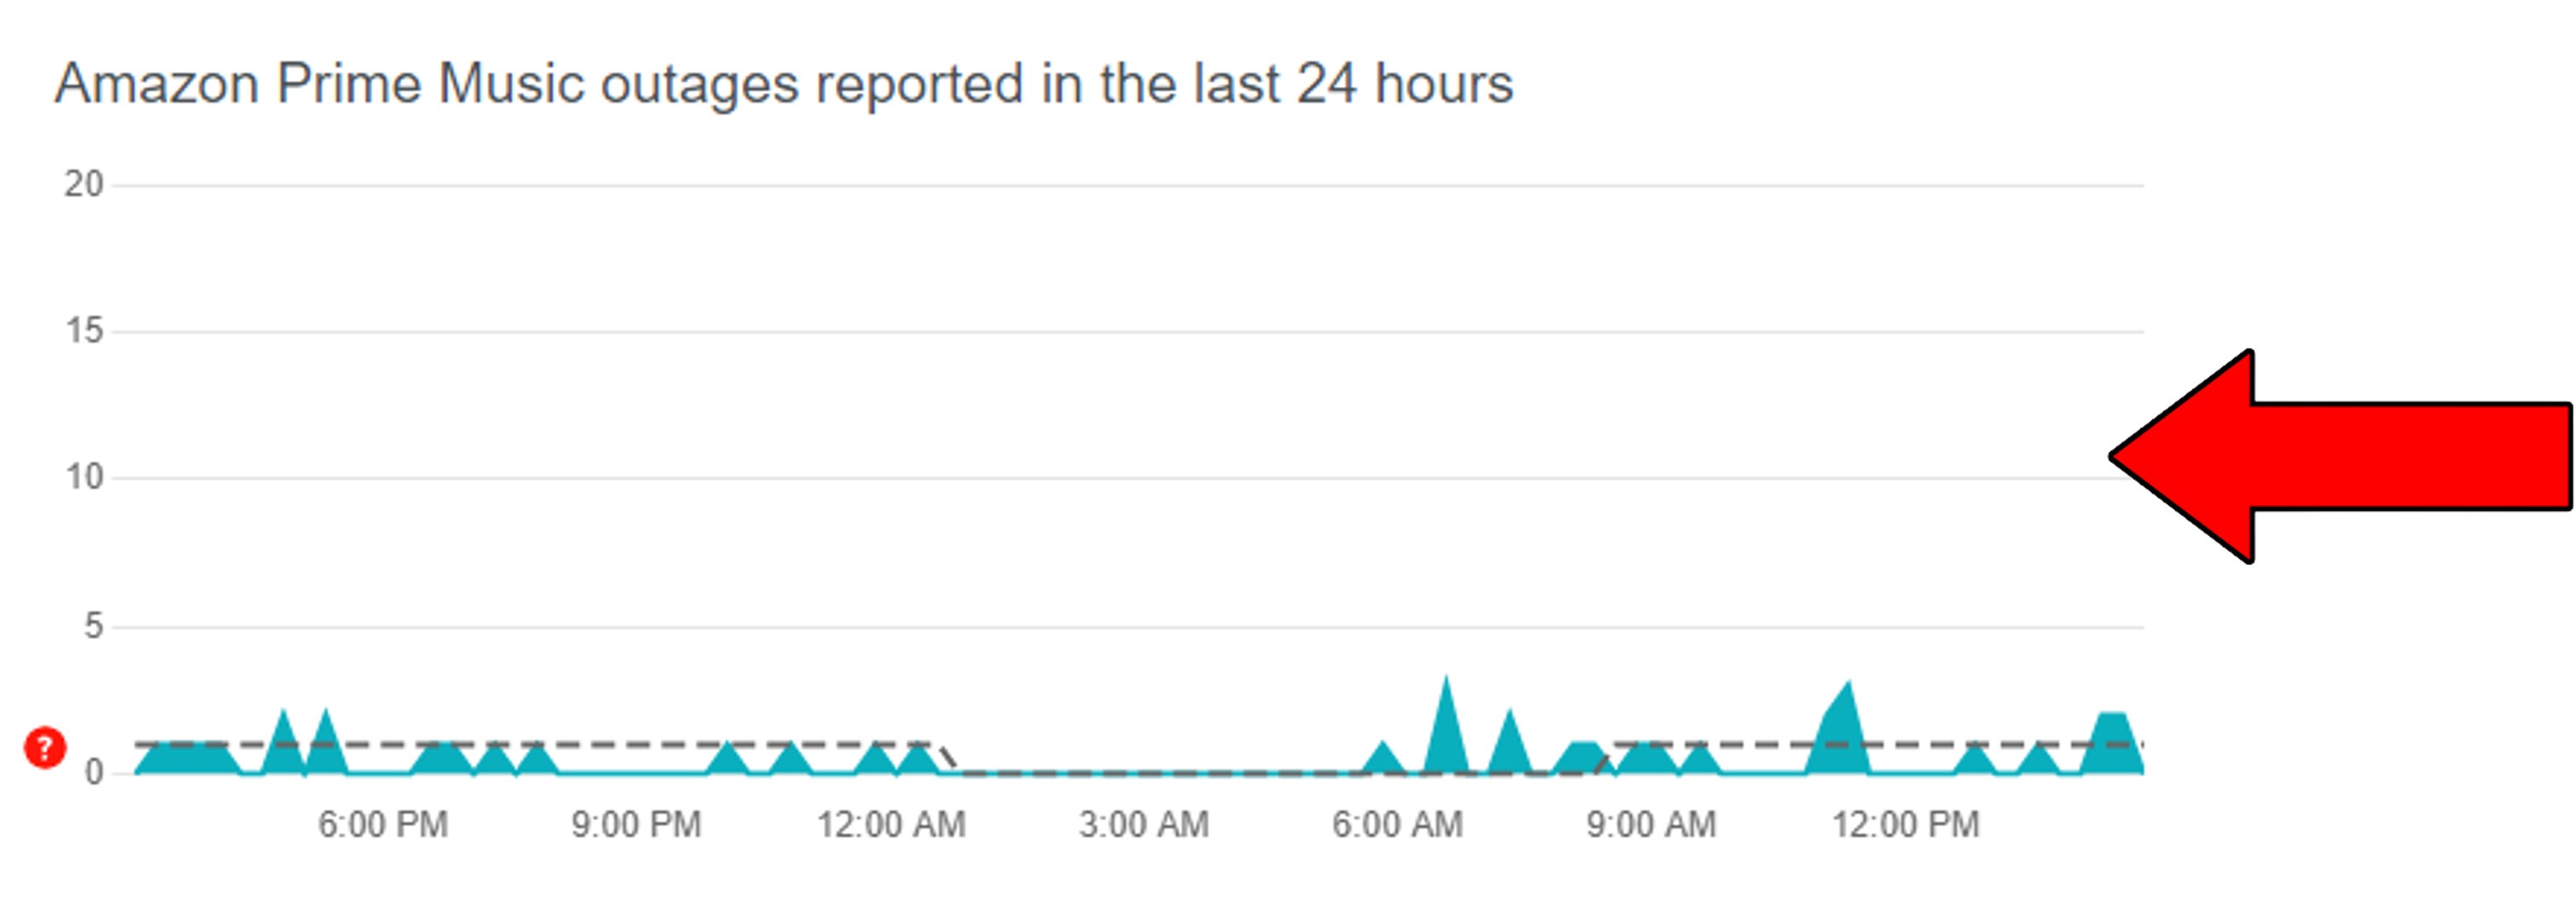
Take a close look at the graph found on the site, as it will tell you all you need to know about this situation. If you see the Rocky Mountains, then it’s almost a certainty that something’s wrong.
In that case, there’s sadly nothing you can do.
But I wouldn’t stress too much over it. Server failure is not uncommon, so most IT departments are more than prepared to fix them.
Next, I’d like us to check your internet connection.
Believe it or not, a bad connection is one of the most common reasons why even songs that should have lyrics, are not showing them. Now, you’re probably thinking that, since you’re reading this, your connection is fine, but guess again.
It’s one thing to browse the web and chat, and another completely different one to stream your favorite music on the platform. Especially at higher resolutions.
As a general rule, most streaming services (both for audio and video), need at least 5 Mbps to play your content and offer other resources like subtitles and lyrics.
If your current plan does not meet these requirements or your network is saturated, it would explain why you’re having trouble with Amazon Music showing lyrics, and experiencing other issues, like being unable to download songs.
Solution: A good starting point to fix this is estimating your needs. I usually recommend having anywhere between 15-25 Mbps per person in households to allow everyone to have a good experience.
Assuming that your plan is already fast enough, try calling your provider and see if they’re having issues. If their answer’s no, then the next thing I’d try is resetting your modem.
Here’s how you can do this:
Moving on, let’s take a look at your app’s cache. If you haven’t got the faintest clue as to what this is, that’s ok. I’m more than happy to explain it to you.
Amazon Music’s cache is where information, such as audio, video, song previews, and login credentials are stored. By keeping this data readily available, the platform can launch quicker when you tap on it.
More often than not, leaving your cache alone is actually for the best. But when it has accidentally stored a corrupted file, clearing it should be your first move.
Solution: You should be able to do this easily on any device or browser out there. To paint you a picture, here’s what this looks like on Android devices:
This process should be your go-to whenever Amazon Music or other apps are acting weird.
I know the thought of keeping your apps updated isn’t the most exciting thing in the world. But it’s one of those actions that can’t be avoided unless you want to face technical difficulties often.
Updates are really important, since, every time one is released, new features are included, as well as improvements on existing ones, and patches for bugs. Also, the appearance of the latest version of an app means the disappearance of the oldest one.
And while something would have to be terribly wrong with your devices to keep you on the oldest version, sometimes weak networks or bugs can get in the way of automatic updating. This would explain why you’re having trouble showing lyrics on Amazon Music.
In cases like that, your best bet will be to manually download and install the latest version of the platform.
Solution: This process should be very similar across all devices. To paint you a picture, here’s how this goes on iOS and Android systems:
For iOS:
For Android:
Lastly, let’s try uninstalling and reinstalling Amazon Music.
When no amount of updating or relaunching works, the next best thing you can try is wiping all traces of the app and its files from your device’s memory.
This should take care of anything that’s causing trouble, allowing Amazon Music to show you the lyrics of your favorite songs.
Solution: For this example’s purposes, I’ll show you how to do this on iOS devices, but you should be able to uninstall Amazon Music from any system capable of hosting the platform.
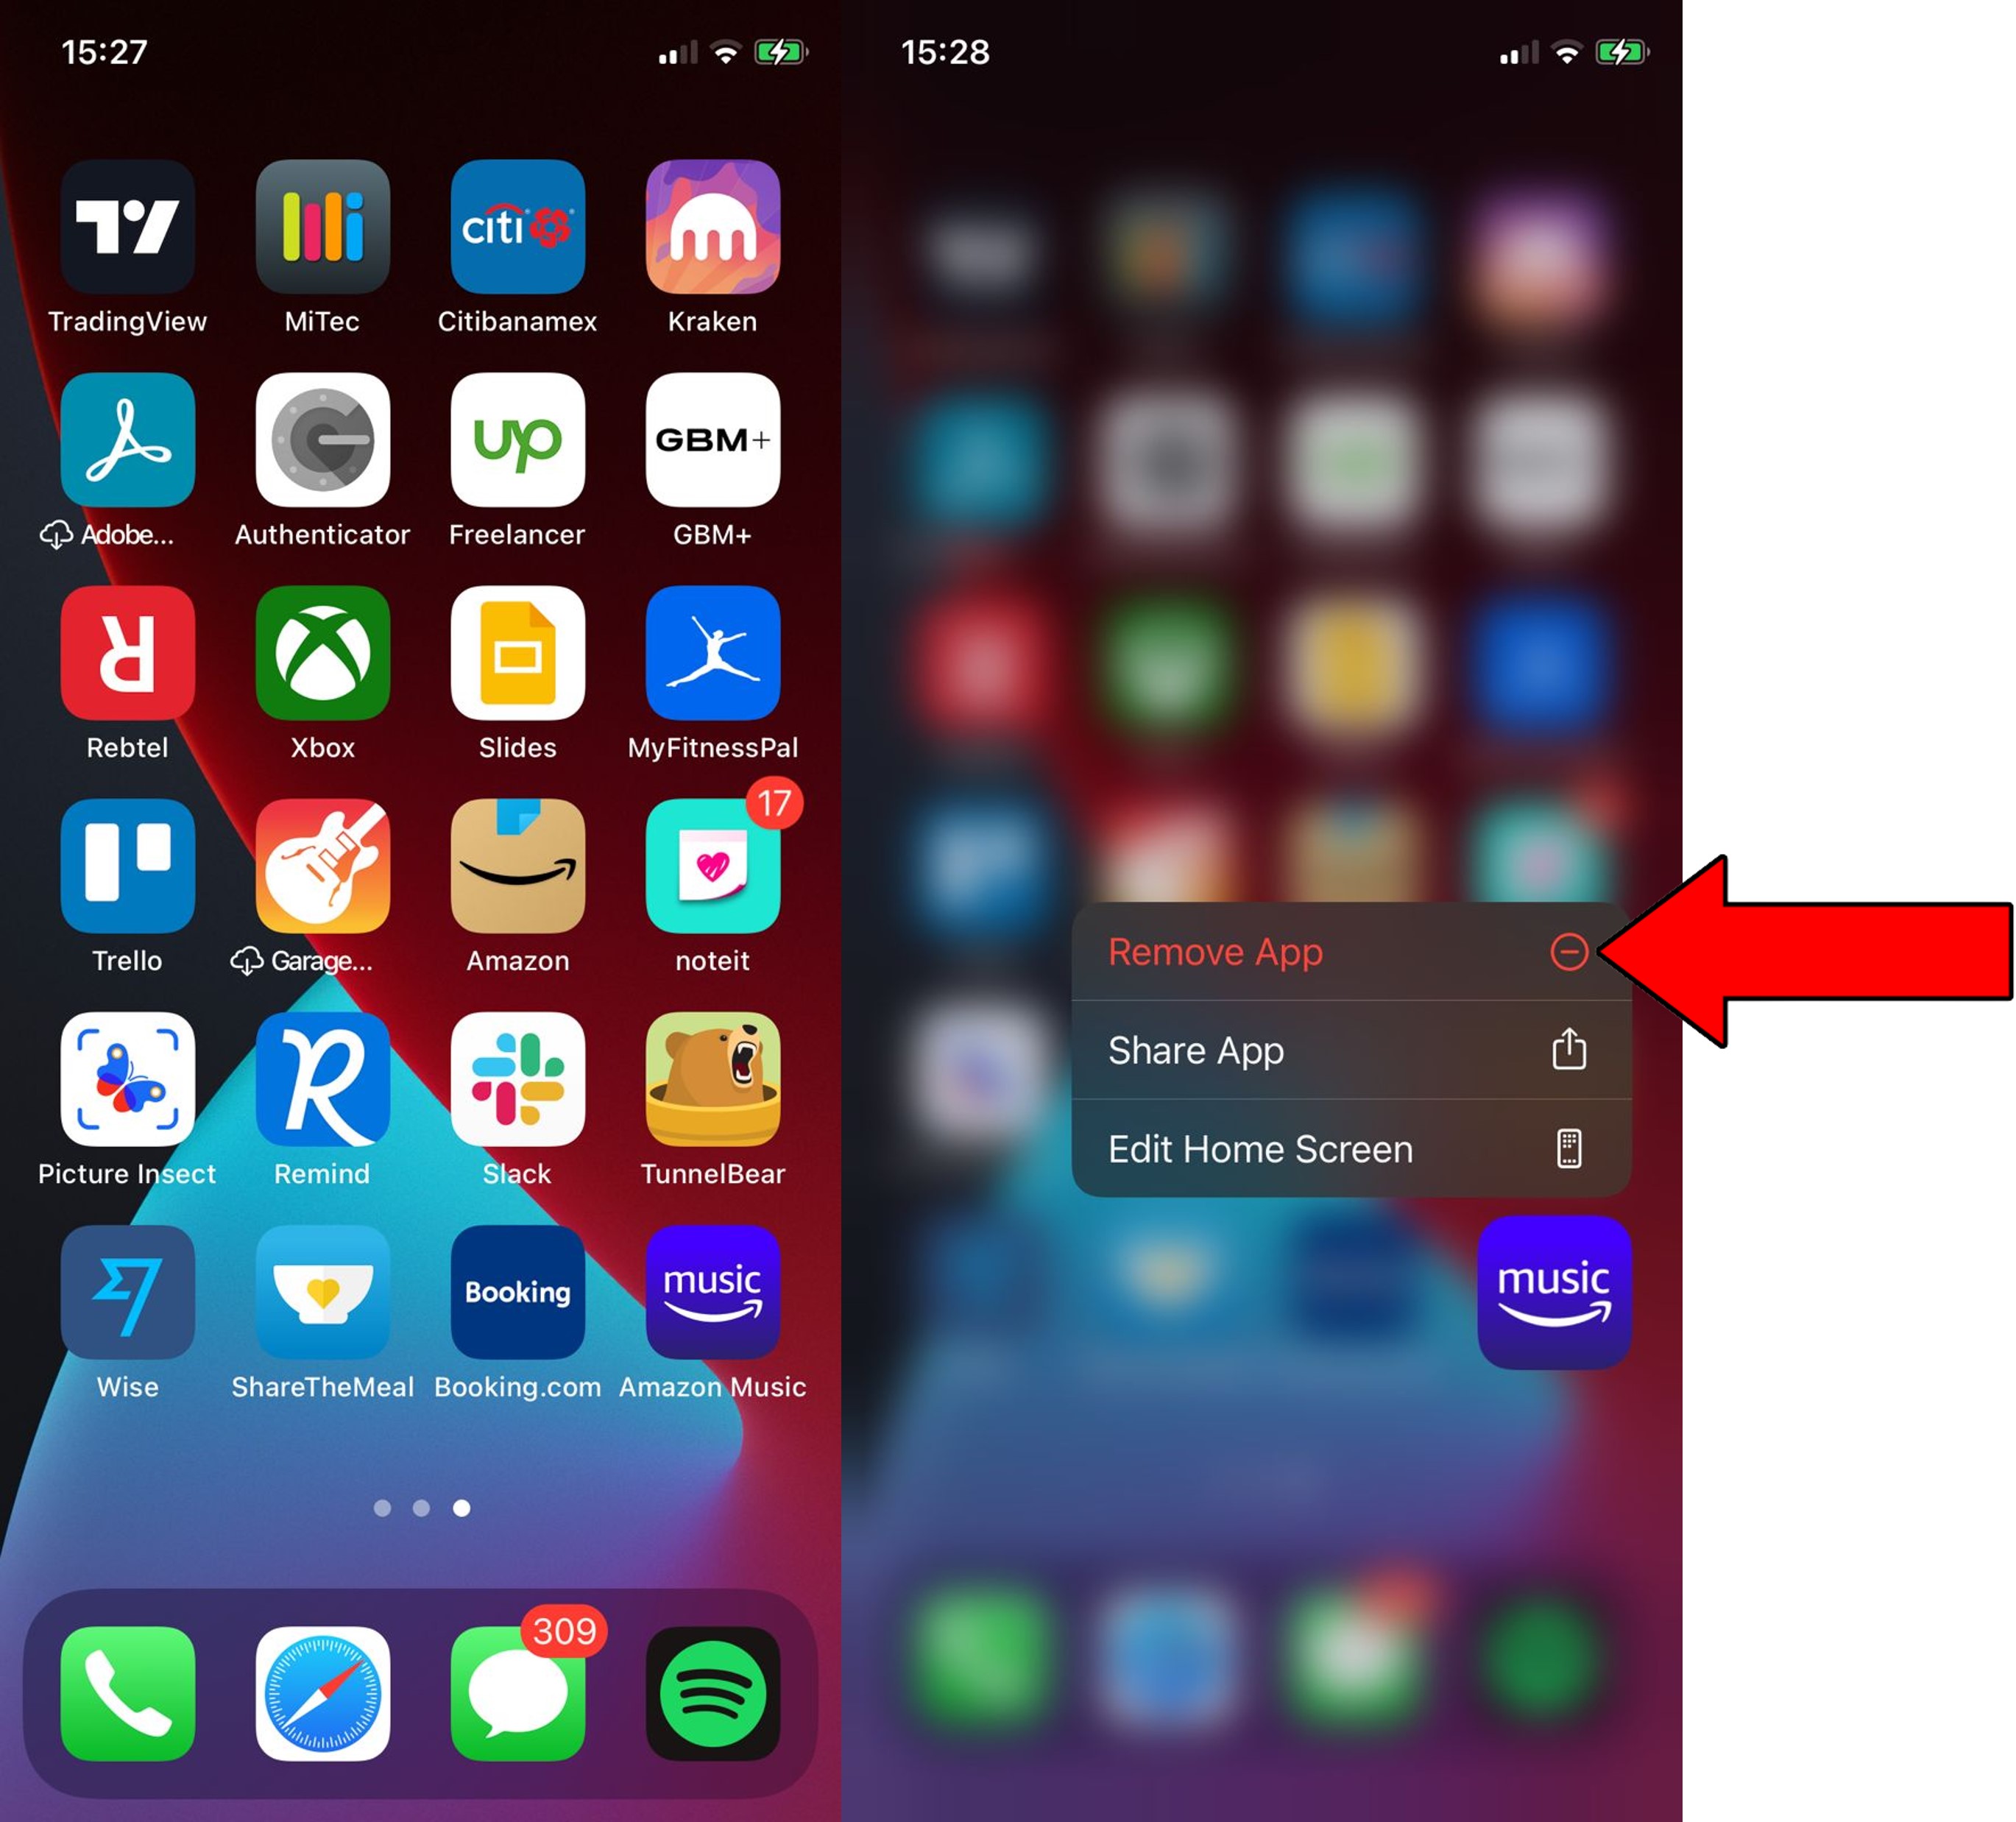
3. Confirm you want to delete it
That about sums it up!
I hope this piece was useful to you and helped you learn that most platform-related issues can be solved in simple ways. More often than not, double-checking Amazon Music’s servers, and making sure that the title you want to see lyrics for actually has them available are great starting points.
I really appreciate you taking the time to read this all the way to the end. If you found this article helpful, you’ll be very happy to learn that we upload new content every week. Why don’t you check out what we already have available below to become a Tech Detective yourself?
Have a wonderful week!


Detective ‘Gerry’ Molina is one of the most prolific detectives on our TechDetective team. He’s known for his ability to crack down on multitudes of tech crimes on behalf of you – the citizens of the internet. Molina is often the first point of contact for many cases, working to help free victims from the tyranny of tech issues.