
Stuck trying to stop Amazon Music from skipping songs?
Not being able to listen to your favorite tracks without being interrupted can be really frustrating, especially when you’re paying a monthly subscription.
Sadly, this is a known issue. Thousands of people struggle with it daily. But, the good news is that, in this article, you’ll find numerous ways to solve it.
If your Amazon Music keeps skipping songs, chances are there’s a problem with your Bluetooth connection, you have corrupted files, bugs, or an outdated app and device.
But, don’t worry. Here are 6 simple fixes to try:
Keep reading to solve the issue and get back to your jamming sessions today!
Whether you’re using a Bluetooth speaker or headphones to listen to your beloved music library, you’ll need to stay close to your device.
Why? Simple. Bluetooth was originally designed for short-distance transmission. If you’re 10 meters (ca. 33 ft) away from your device, you’ll need to get closer to it.
This way, you’ll stop your device from pairing and unpairing intermittently with your speaker or headphones, and you’ll be able to avoid different streaming issues.
You see, having Bluetooth connection issues may be the reason Amazon Music keeps skipping your songs.
Moreover, there are multiple objects that can interfere with your Bluetooth connection. Try staying away from Wi-Fi routers, microwaves, fish tanks, and large metal objects when streaming your favorite songs.
I also recommend refreshing your Bluetooth connection by going to your device’s settings, tapping on “Bluetooth”, and turning it off. Then, wait 10 seconds and turn it on again. You can also try re-pairing your device.
If you notice that Amazon Music is skipping a specific song, try deleting it and adding it again to your library.
You see, sometimes songs can contain corrupted data, which can lead to experiencing multiple issues while trying to play them.
By deleting the faulty song, you’ll be able to solve this issue. Follow these quick steps to do it:
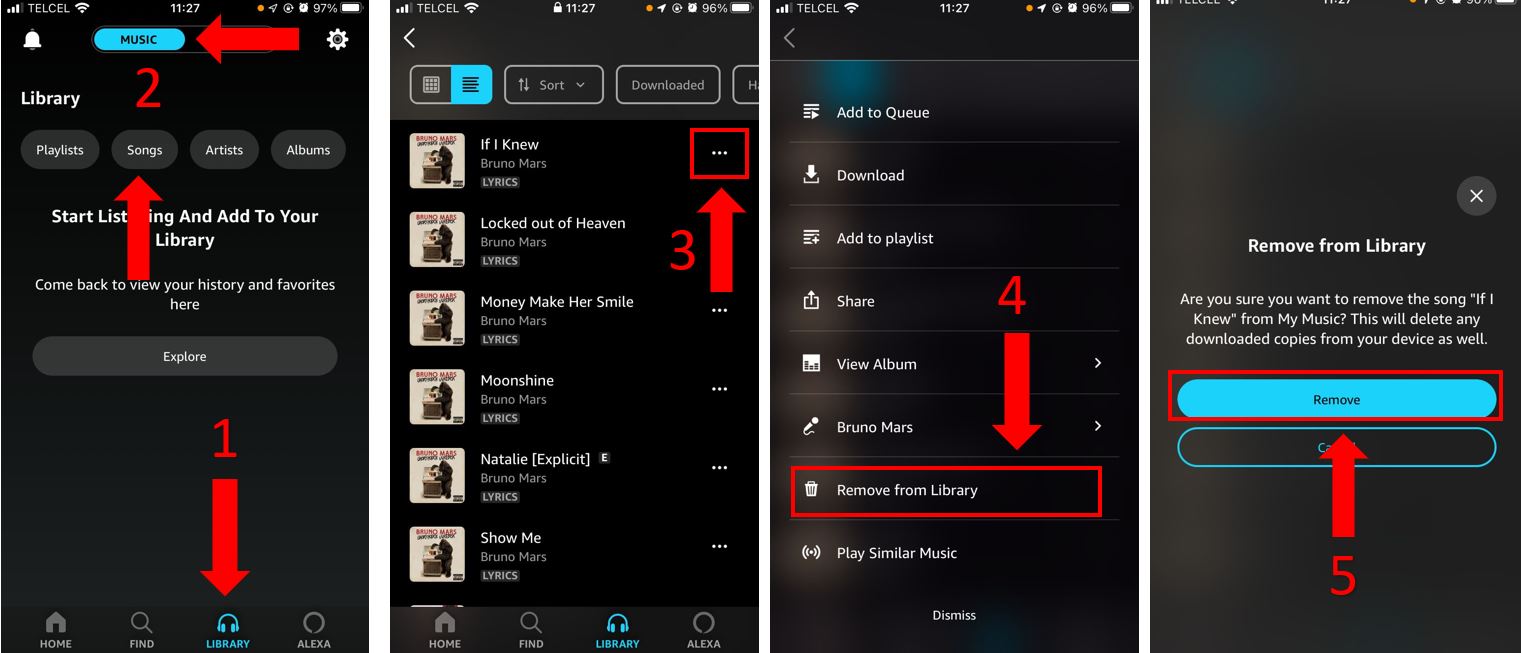
Once you’ve deleted the faulty song, try adding it again. To do it, you’ll need to:
I’m sure you’ve heard this advice before, but why does this fix seem to be some kind of magical cure for your device?
You see, by restarting your device, you’ll give it a break, fix glitches, unload your RAM, and get rid of any software issues running in the background.
As you can see, this is my go-to solution when my device or installed apps are not working as they should.
Follow this quick guide to restart your device and stop Amazon Music from skipping your songs:
Echo device:
iPhone:
Android:
This process may vary depending on your phone’s model.
Windows PC:
For Mac:
You can also restart your computer by pressing and holding the power button until it shuts off. Then, press it again to turn it back on.
Servers are in charge of hosting websites, storing files, and sending data to fulfill their customer’s requests.
Sadly, they’re not perfect. Human errors, bugs, software issues, and even power outages can cause server downtime.
If Amazon Music’s servers are down, you’ll experience multiple issues while trying to stream your beloved music collection.
To check the platform’s servers, enter servicesdown.com or downdetector.com. Then, check the graph.
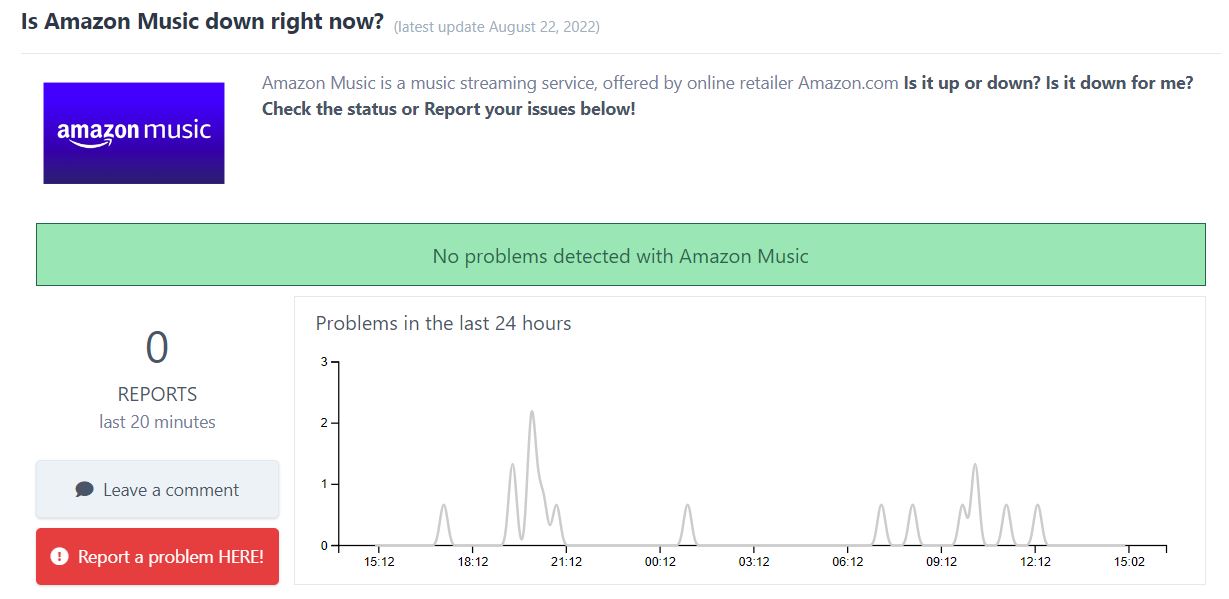
If it shows several reports (high spikes), then the app’s servers are down.
But, how can you solve this issue?
Unfortunately, the only thing you can do is wait until Amazon’s employees restore the platform’s servers. They’re the only ones who can do it.
Luckily, server downtime is usually fixed within a couple of hours.
But, if the graph didn’t show any reports, chances are you need to update Amazon Music and your device. Keep reading to learn how to do it.
Having outdated software might be the reason Amazon Music keeps skipping your favorite tracks.
You see, updates are very important since they add new security features and improvements. They fix bugs and glitches that may be preventing your device and installed apps from working as expected.
This is something you shouldn’t worry about, since most modern devices will be automatically updated. However, this is not set in stone.
If you haven’t restarted your device in a while or if you have a bad Internet connection, your device won’t be able to update apps and install its latest software version.
Thankfully, solving this issue is really quick and simple.
Follow these steps to update Amazon Music:
iPhone and iPad:
Android:
Windows PC:
Mac:
Tip: This fix can get rid of Error 206 and solve crashing issues.
To update your device:
iPhone and iPad:
Android:
Windows PC:
Mac:
Lastly, let’s try reinstalling Amazon Music.
Unfortunately, there are some bugs that won’t go away easily. When this happens, you’ll need to take a more aggressive approach.
I know how tedious having to reinstall the app can be. But, when Amazon Music keeps skipping your songs, this might be the only thing that will restart your app from scratch and solve the issue.
You can easily uninstall Amazon Music, you’ll just need to:
iPhone and iPad:
Android:
Windows PC:
Mac:
Once you’ve uninstalled the app, please make sure you’re connected to a strong Wi-Fi signal or enable your cellular data. Then, go to your device’s App Store, search for Amazon Music, and install it again.
Not being able to fully enjoy your beloved music collection because Amazon Music keeps skipping your songs can be super annoying. Streaming music should be relaxing and trouble-free.
Hopefully, with the help of the 6 fixes above, you’ll be able to get back to your jamming sessions in a blink of an eye.
Remember, sometimes the easiest and quickest way to solve the issue is by making sure you’re close to your Bluetooth devices. However, deleting the faulty song, restarting your device, and updating or reinstalling Amazon Music can also solve the issue.
Thank you so much for taking the time to read this article. If you like streaming music or movies as much as I do, don’t forget to check out our content. You’ll find numerous tips to improve your experience.
Have a wonderful day!


Detective ‘Monse’ Cancino has been cracking down on tech issues for years. Starting out as a local cop, she’s quickly risen to the full rank of Tech Detective.
Cancino is our resident iPhone specialist. She’s often cracking cases related to iOS errors, streaming malfunctions, and locking up buffering bandits.