
Does Apple Music keep asking you to verify your student credentials?
Get in line! Hundreds of students have experienced the same issue while trying to open Apple Music.
I understand how frustrating this can be, especially when you want to relax after your midterms with your beloved music collection.
But, don’t worry! In this article, you’ll learn how to easily fix this problem.
The 5 fixes to stop Apple Music from asking to verify your student credentials are:
Keep reading to get rid of the problem and start streaming your favorite songs!
If you’re reading this, you probably use UNiDAYS to verify your student credentials on Apple Music.
UNiDAYS is a fantastic app used by 13 million students. It allows them to access exclusive discounts on different apps, but sometimes understanding how it works is tricky.
Many students have complained about the fact that, once they’ve verified their credentials for the first time, they were asked to repeat the process. I know this can be frustrating, but sometimes waiting one or two days can fix this issue.
The reason for this is simple. If it’s the first time you activate your account, Apple Music may take 24 to 48 hours to verify it.
If you’ve waited and Apple Music keeps asking to verify your student credentials, you might want to keep reading.
If you’re a student, each year Apple Music will ask you to verify your student status. But sometimes even if you’ve done that, the app will continue to sign you out and ask to authenticate again.
You can normally do this directly on Apple Music; however, confirming your student status on your phone’s settings may help you get rid of being constantly asked to verify your credentials on the music app.
To do this, you’ll just have to:
iPhone, iPad, or iPod:
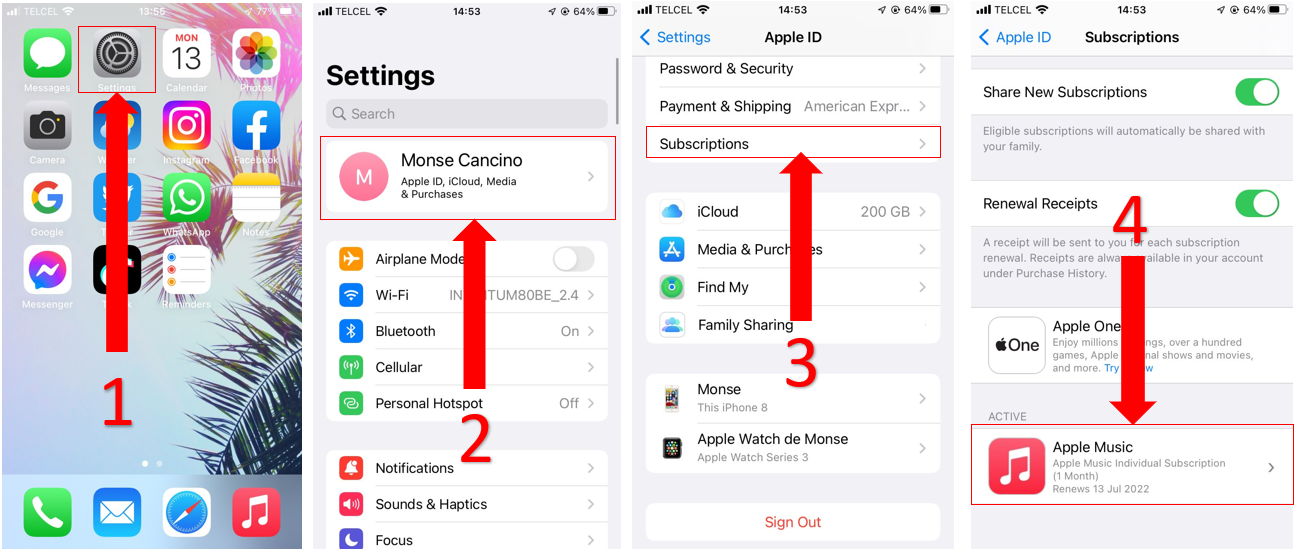
Once you’ve completed the steps above, you’ll automatically return to Apple Music.
If this didn’t do the trick, don’t worry. The following tip just might!
Apple Music is a fantastic streaming service. It allows us to share our beloved music with friends, get customizable recommendations, and discover millions of songs.
But Apple Music, just like any other platform, needs to release constant updates to fix bugs and other performance issues, such as being constantly asked to verify your student credentials.
Updating the app might stop the problem.
Normally, Apple Music will update automatically on your device; however, network issues can interrupt the process.
Luckily, you can manually update the app with these simple steps:
For Android:
iPhone, iPad, or iPod:
For this type of devices, Apple Music updates are available on every iOS new version, so you’ll have to update your software to enjoy the latest version of Apple Music.
To do it, you’ll just have to:
iTunes (computer):
Once you’ve updated Apple Music, try verifying your account one more time. Then, play your music library to see if the problem went away.
If the fixes above didn’t solve the issue, try clearing your cache.
Many people get confused with the term “cache”, and I don’t blame them. Its meaning is far from obvious.
But, don’t worry, understanding it is easier than it sounds. Cache is where apps store information, such as fonts, images, videos, etc.
This eliminates the need to re-download the same information every time you relaunch an app, which reduces loading times and improves your overall experience.
Your apps’ cache is great, but clearing it every once in a while might get rid of glitches, bugs and other elements that may be causing Apple Music issues, such as being constantly asked to verify your student status.
There are several ways to do this, but the easiest one is by following this quick guide.
If you’re using Apple Music on your computer:
If you have a Windows PC, you can also try clearing the cache directly from your computer files. You’ll just have to:
For iPhone, iPad, or iPod:
Clearing the cache for these devices is really easy. You’ll just need to:
For Android phones:
Tip: After clearing your cache, I recommend closing any apps you’re no longer using. This way, you’ll take some load off your RAM, which can get rid of any other performance issues.
If none of the fixes above helped to get rid of the problem, try this easy tip.
Apple Music might’ve encountered some issue while performing background processes.
This is why uninstalling and reinstalling the app again may give it a fresh restart to begin recognizing your student credentials and stop it from asking you to authenticate again.
Although you won’t be losing any songs from your music library by reinstalling the app, I recommend always syncing them to iCloud before completing this section.
You can easily re-install Apple Music by following these instructions:
For Windows PC:
iPhone:
Android:
Please note that these steps will remove your downloaded music. But, don’t worry though, you can easily download it again.
School can be really stressful, and sometimes music seems the only thing that can help us relax. Believe me, we’ve all been there.
Not being able to listen to your favorite artists because Apple Music keeps asking you to verify your student credentials can be really upsetting.
Hopefully, with the help of the fixes above, you’ll be able to enjoy all the perks of your student membership.
Remember, waiting until your account is verified, confirming your student status directly from Settings, or reinstalling Apple Music, may solve the issue.
I really appreciate everyone who reads our content. We’re passionate about bringing quick solutions to everyday problems. If you liked this article, please make sure to check out our other related content below.


Detective ‘Monse’ Cancino has been cracking down on tech issues for years. Starting out as a local cop, she’s quickly risen to the full rank of Tech Detective.
Cancino is our resident iPhone specialist. She’s often cracking cases related to iOS errors, streaming malfunctions, and locking up buffering bandits.