
Are you trying to stop Netflix from auto playing the next episode?
Don’t worry, doing this might be challenging without proper guidance. In fact, thousands of people are struggling with the same issue.
But, the good news is that if you have a spare five minutes and aren’t afraid to roll up your sleeves, then you’ve come to the right place to get this problem fixed.
If Netflix is auto playing the next episode, you’ll need to disable the autoplay feature and refresh your device to save the updated settings.
Read on to learn more about this!
Netflix has become the most popular streaming platform because of its exclusive content.
Unfortunately, no matter how famous the app is, some of its features have caused controversy among subscribers.
You see, hundreds of people have complained about not being able to stop Netflix from auto playing the next episode.
If that’s your case, don’t worry. I’m here to help.
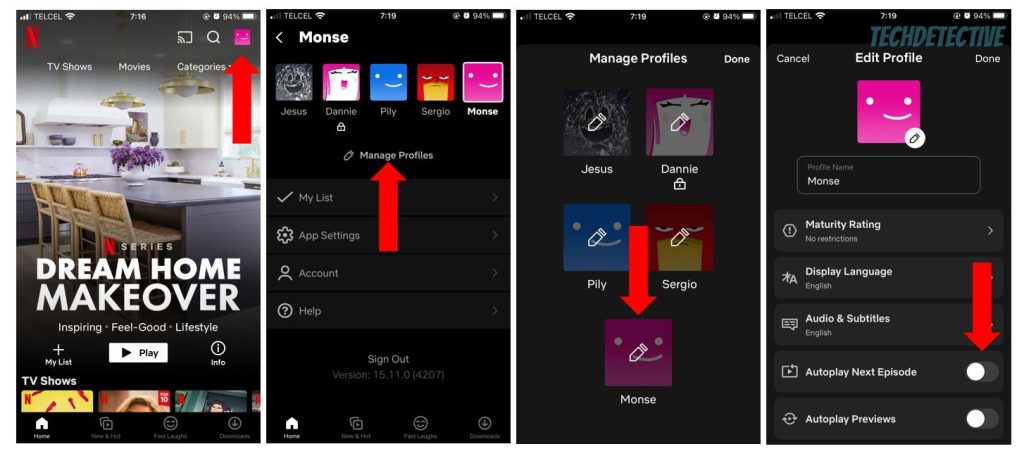
Follow these instructions to disable the autoplay feature:
Web-version:
Mobile app (iOS version and Android devices):
The changes made to your playback settings on your computer and on the mobile app will be automatically applied to every other device that uses the same account.
Once you’ve completed the steps above, you’ll need to refresh your device to save the updated settings.
Read on to learn how to do it.
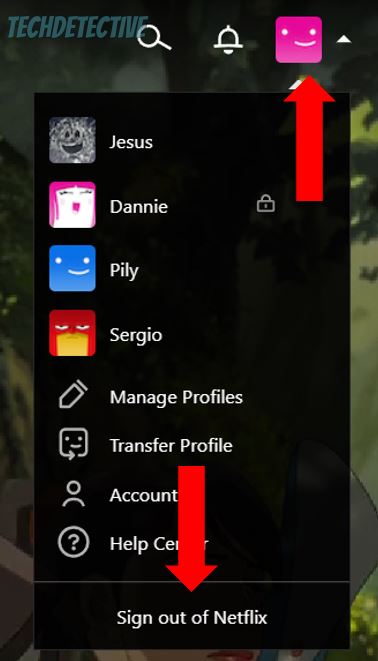
Now, it’s time for us to switch profiles or sign out of your account to make sure the changes you made to the playback settings are saved.
Here’s how to do it:
Web-version:
Mobile app:
Then, go back to your profile or sign back into your Netflix account to see if the changes made to the playback settings were saved.
If they were not, you’ll need to relaunch the app. This quick action will shut down every background process and restart it from scratch.
To do it, you’ll need to:
Windows PC:
iOS devices (mobile app):
Android devices (mobile app):
Once you’ve closed the Netflix app, please relaunch it and try streaming any TV show or movie.
If Netflix is still auto playing the next episode, chances are the changes you made were not saved because your app is outdated.
I know, life can get pretty hectic, and installing updates is not on our list of priorities.
But, if you haven’t updated Netflix in a while, you won’t be able to get rid of the troublesome code that was keeping you from disabling the autoplay feature.
Don’t worry, though. Manually updating the app is really quick and simple, you’ll just need to:
iOS devices:
Android devices:
If you’re using a browser to stream content, don’t forget to check if it’s running on its latest version. If it’s not, you’ll need to update it.
Then, please update your device. This way, you’ll ensure that the Netflix app is compatible with your software version and avoid multiple performance issues.
Once you’ve completed the steps above, please go back to the playback settings to make sure the autoplay feature is turned off.
You should be able to save the changes without further trouble.
That about covers it! I hope that this article has helped you stop Netflix from auto playing the next episode.
If you take anything away, please remember that the easiest way to do it is by tweaking your playback settings.
Then, don’t forget to refresh your device to pick up the changes. You can easily do this by relaunching the app, signing out and back into your account, and updating the app or browser.
Thank you so much for taking the time to read this article. If you’re like me and love streaming movies as much as I do, please check out our related content below Here at Tech Detective, we love solving all sorts of tech issues to improve your experience.
Have a great day!


Detective ‘Monse’ Cancino has been cracking down on tech issues for years. Starting out as a local cop, she’s quickly risen to the full rank of Tech Detective.
Cancino is our resident iPhone specialist. She’s often cracking cases related to iOS errors, streaming malfunctions, and locking up buffering bandits.