
Are you stuck trying to figure out why Amazon Music can’t find or access your SD card?
You’re not alone! Every single day, many of the platform’s subscribers find themselves in this situation and are left very confused.
I can only imagine how annoying it must be to have this happen to you. Especially if you bought a new SD card specifically to store your favorite songs.
But don’t worry, I’m here to help you put an end to this situation. Below, you’ll find a list including several simple fixes to this issue.
The 6 known fixes that will help Amazon Music find and access your SD card are:
Read on to make full use of your storage units!
The first thing I’d like us to try is restarting your device.
Sometimes, even if your card is inserted properly and everything is working normally, your apps might have a hard time detecting it. This is especially likely if you inserted it while the device is on, as some processes need to be stopped completely to accurately read a new card.
By restarting your device, you’ll be giving it a chance to reload its resources and boot up with the card already inside. This should dramatically increase the storage unit’s chances of being detected successfully.
Next, let’s check both the status and quality of your SD card.
I wouldn’t blame you for thinking that any card you get should do, since, after all, they’re all storage units, right?
Well… not quite.
Yes, all SD cards can store information, and if you buy the right size and model, they should all fit into your phone. However, just like hard drives and other storage devices, these have different read/write speeds.
And believe it or not, build quality matters too! You’re much more likely to have Amazon Music be unable to find or access your SD card when the manufacturer has cut corners in production. Now, this is not to say that cheap, slow cards can’t do the job.
There are budget-friendly, quality options out there that should work great, but you need to look closely.
As for speed, you might be able to get away with using a slower model. But the chances of having trouble both inside and outside the platform are much greater.
Solution: Research, research, research. Although I’ll always try to provide you with the most useful information I can find, nothing beats due diligence and word of mouth.
Try asking friends/family about what SD cards they use, or talk to a professional at a store before buying one. Telling them precisely what you want to do with the card can help them pick the right one for you.
Moving on, let’s try relaunching Amazon Music.
I know this sounds very simple, but it’s one of the most effective solutions when you face these kinds of problems.
You see, every time we use a device or an app, there are thousands of invisible background processes running at the same time. It’s thanks to them that we can enjoy near-perfect experiences on most platforms.
So, when they fail or crash, everything else goes out the window.
The most common culprits of background process crashes are coding bugs and corrupted files, and the best way to get rid of them is by closing and relaunching the platform.
This process works for other platforms and devices as well, so if you’re ever having technical difficulties elsewhere, try this first!
Keeping your apps fully updated is one of the best ways to prevent facing technical difficulties while using them.
Why? Simple.
Every update released to the market includes new features, improvements on existing ones, and several fixes to problematic files and bugs. Moreover, the birth of a new version of an app means the demise of the oldest one. In other words, staying outdated will eventually leave you stuck with an unsupported app.
This is not a general rule, but it is a common practice in the tech industry.
Now, normally you don’t have to worry about this, as most apps and devices are configured to update themselves automatically. Whenever a new version is available, your devices will either install it in the background or prompt you with a notification, asking for your permission to proceed.
Either way, you should be covered. But as you can imagine, there’s always room for error.
Sometimes, a weak network, a bug, or a corrupted file can get in the way of automatic updating and keep newer versions of this platform from being installed. This could explain why Amazon Music can’t find or access your SD card, as well as other issues, like being unable to download your favorite songs.
In cases like these, manually updating your Amazon Music app should do the trick.
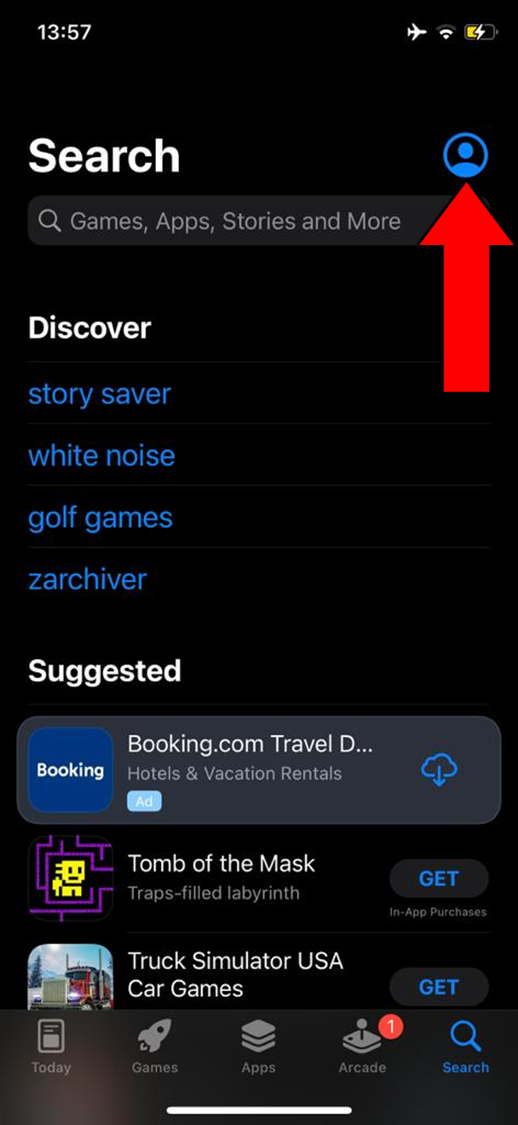
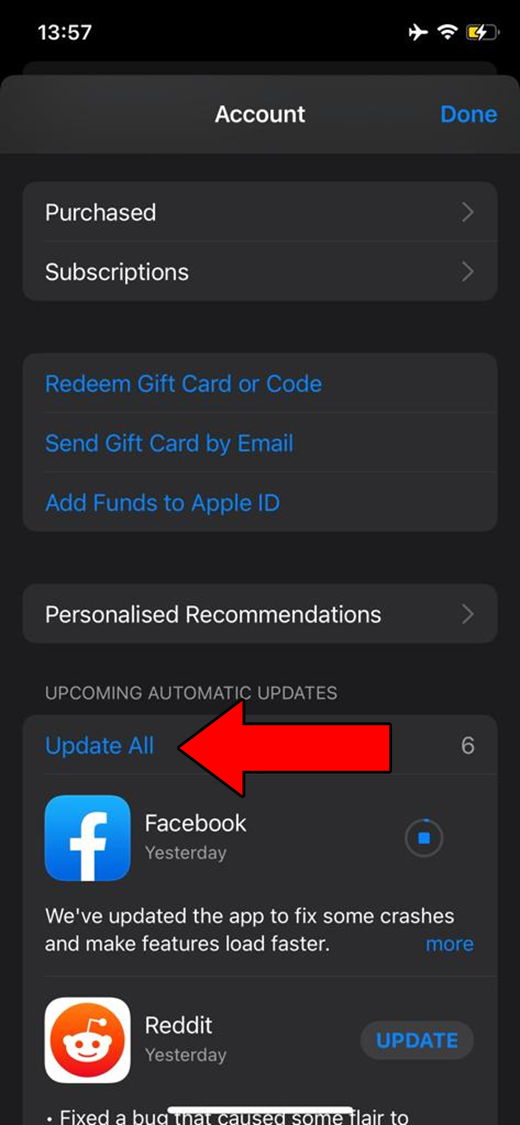
Solution: Here’s how to go about this on iOS and Android devices:
For iOS:
For Android:
As I said before, if at any point you’re asked for permission to continue, simply agree and wait.
If updating didn’t work, there might be something a little more serious going on.
Certain files and corrupted bugs are more deep-rooted than they seem, which means that they won’t go down without a fight. In cases like these, wiping all traces of this platform and its files from your devices might be just what the doctor ordered.
A lot of people avoid doing this out of fear that they’ll lose their playlists and all their user configurations, but this is not the case. All this data is backed up in the cloud, and it should still be there once you reinstall Amazon Music.
Uninstalling and reinstalling the platform should fix the current situation, as well as other issues, such as being unable to add songs to your playlists.
Solution: You should be able to uninstall the platform from any device that can host it. The specifics might vary from system to system, but the broad strokes should be very similar across all of them. Here’s how this goes on iOS to paint you a picture:
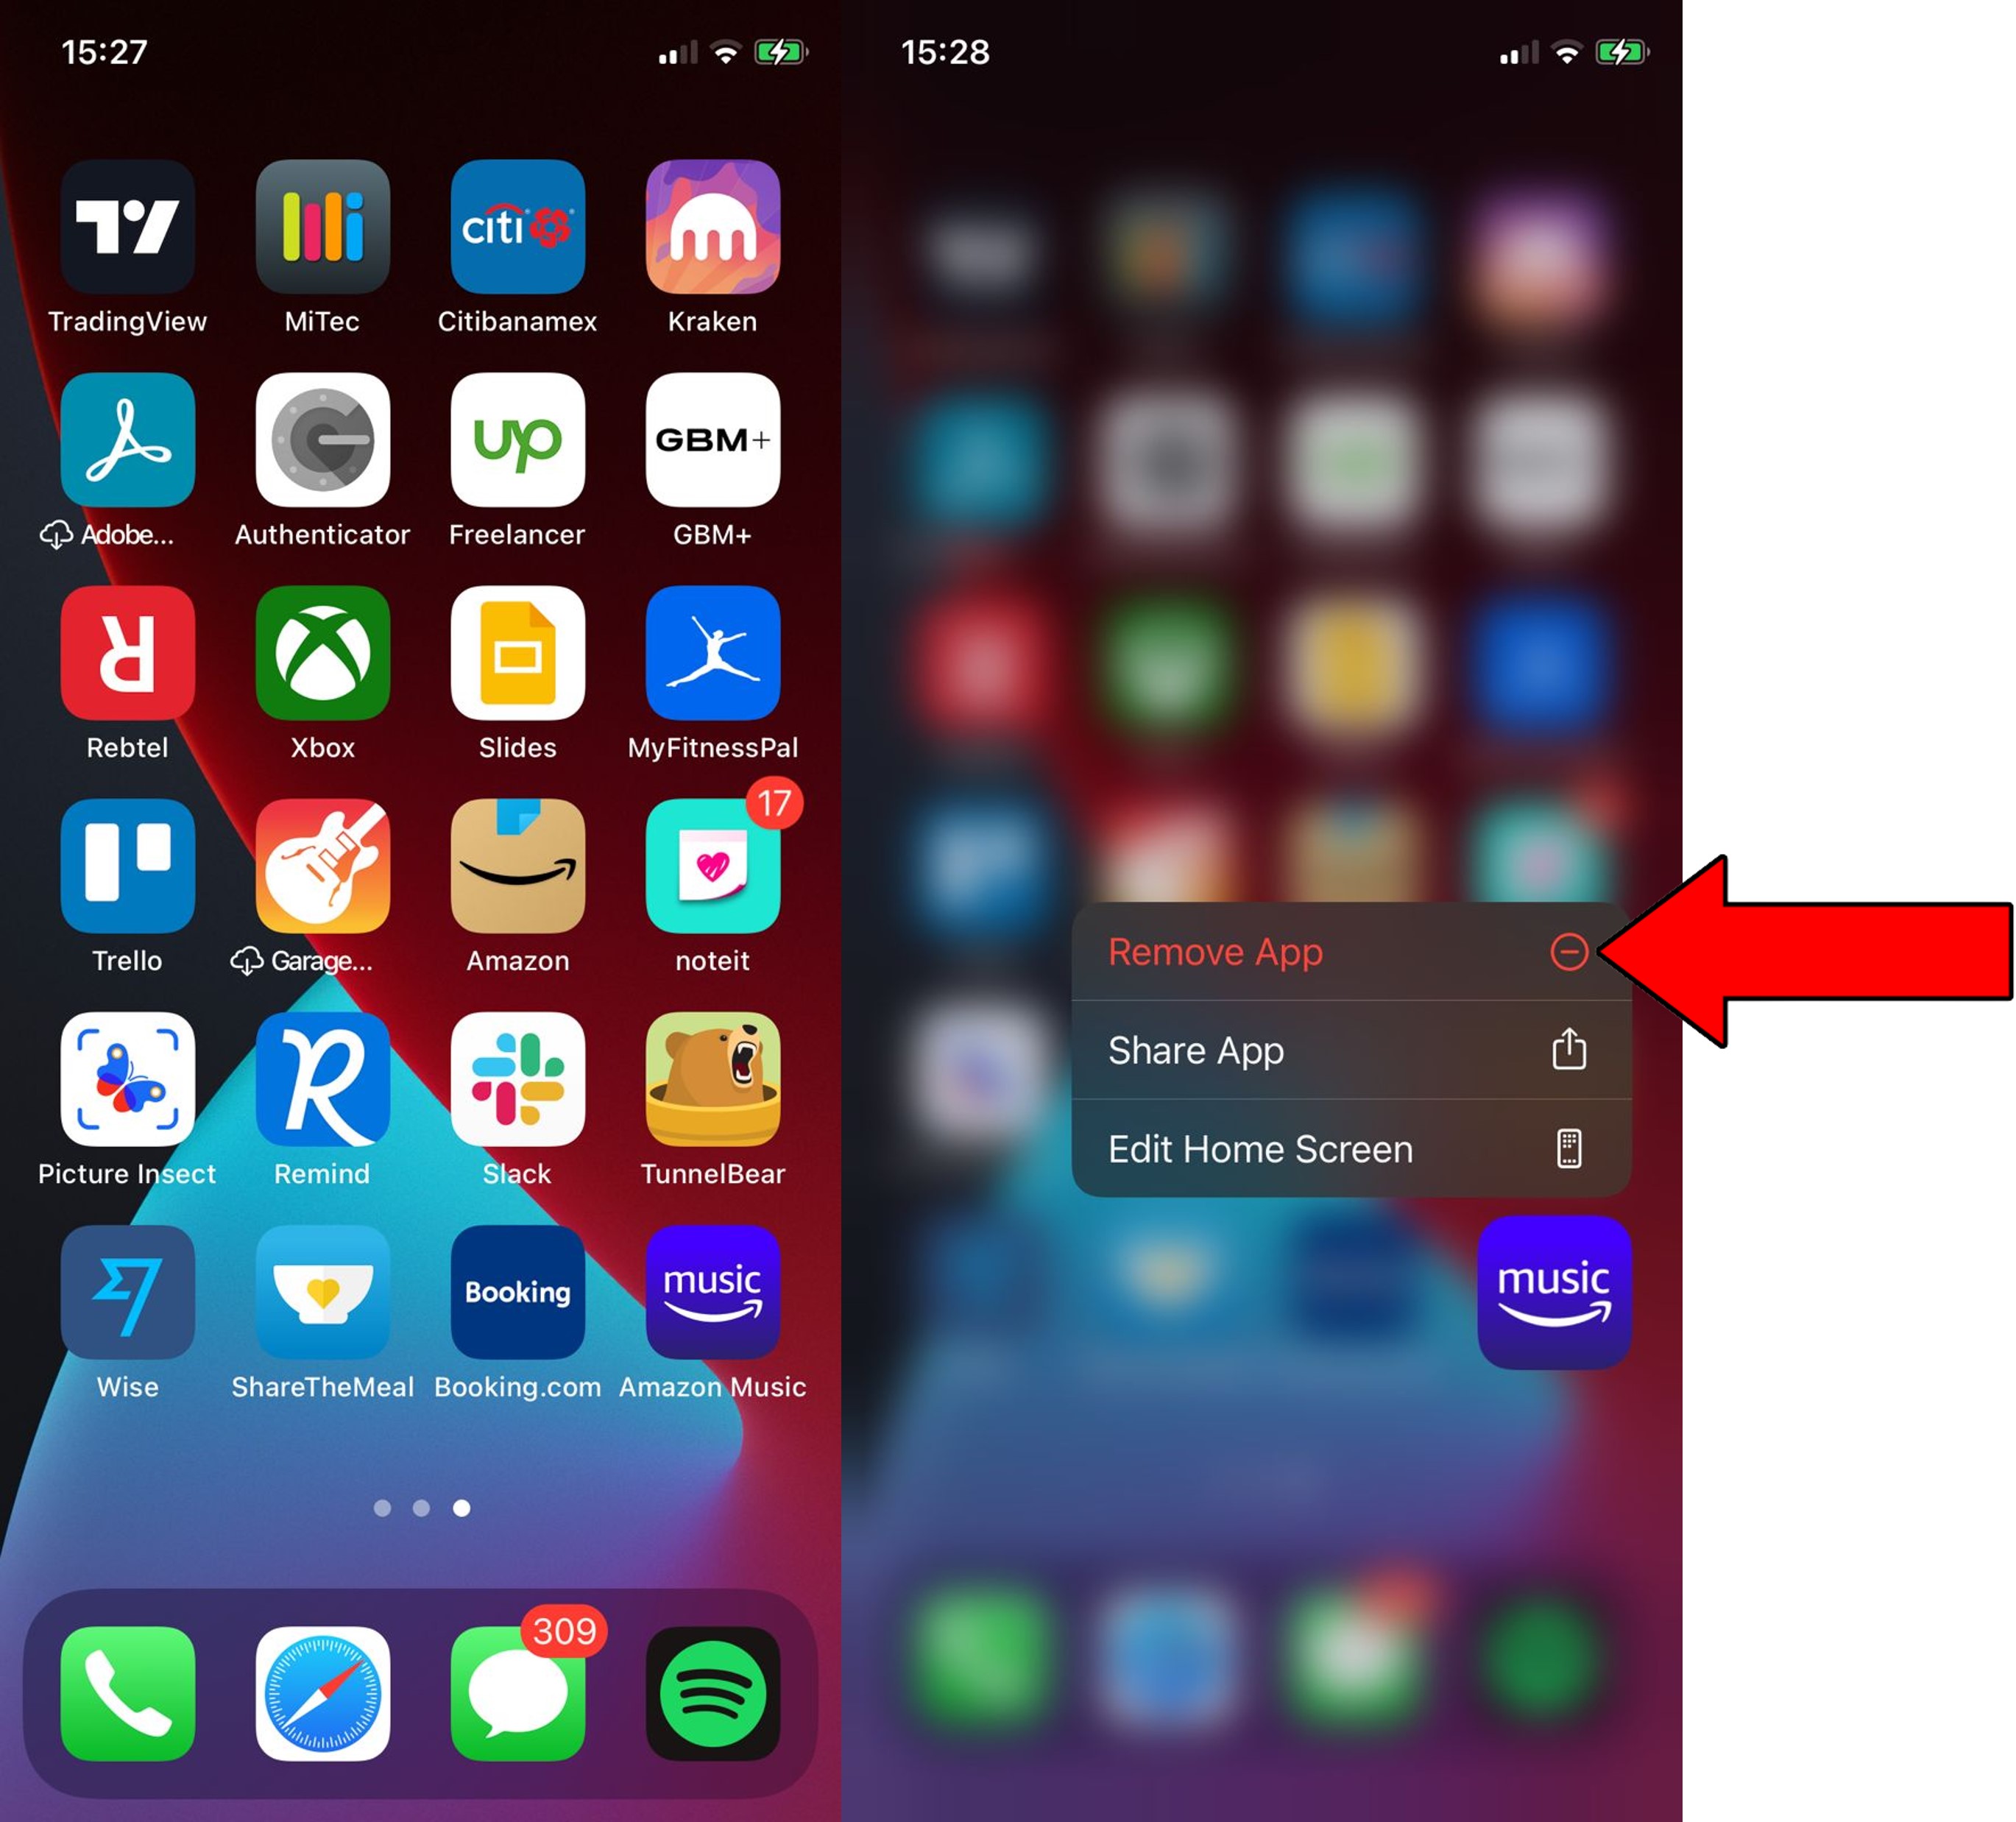
3. Confirm you want to delete it
Lastly, let’s make sure your device is not being too strict with the storage unit’s permissions.
With so many online threats these days, most manufacturers go to great lengths to minimize users’ risk of having their information stolen, or their files deleted. Since most Malware is downloaded, the most logical way to safeguard people’s data is by configuring SD cards to only accept certain files.
This countermeasure has probably kept you safe more often than you’ve noticed. But sometimes, it might also be the reason Amazon Music can’t find or access your SD card.
Now, this doesn’t mean you’re stuck in this terrible situation. In cases like these, all you have to do is enable a couple of advanced options, and make sure you’ve selected your SD card as a download destination.
Solution: Here’s how you can do this on Android devices. It’s a very quick and easy process:
That about covers it!
I bet the idea of addressing your own tech problems was intimidating when you first got here, but look at you now! I bet you didn’t think it would be so quick and easy.
Remember, although you should always look at an issue from several angles, making sure your apps are fully updated, and reinstalling them if necessary are always great starting points.
I really appreciate you reading all the way through to the end. If this article was valuable to you, it’ll make you really happy to know that there are new pieces to learn from every week. While we work on our latest release, why not become a Tech Detective yourself by checking out our other resources below?
Best of luck to you.


Detective ‘Gerry’ Molina is one of the most prolific detectives on our TechDetective team. He’s known for his ability to crack down on multitudes of tech crimes on behalf of you – the citizens of the internet. Molina is often the first point of contact for many cases, working to help free victims from the tyranny of tech issues.