
Are you confused about why Waze says there’s no GPS, and it’s showing your approximate location?
You’re not the only one! In fact, this is an issue that, at one point or another affects all Wazers while they’re happily navigating to their destinations.
I know having this happen is no fun, especially when you’re running against the clock or trying to beat traffic and get to an important business meeting.
But don’t worry, you came here for answers, and you won’t leave without them. Below, you’ll find a list of 6 easy fixes that can help you solve this issue for good.
When Waze says there’s no GPS, and it’s only showing your approximate location, you can try enabling your device’s location services, checking your data plan, or changing your data & time configurations. If that fails, you can also try updating the platform/your devices, or clearing the app’s cache.
Read on to get Waze’s eyes back on you!
Let’s start off by covering one of the most common culprits behind this situation – an accidental modification of your settings.
As you can imagine, for Waze to work normally, your location services and permissions must be enabled, so the platform can know where you are. When you first launched Waze, you might have been asked whether you wanted Waze to be able to know this information, and you either selected “Always”, or “While the app is in use”.
Either choice works fine, as more often than not, this should allow Waze to always know your location. The problem is that sometimes when you do a software update or uninstall the platform, location permissions might be accidentally disabled.
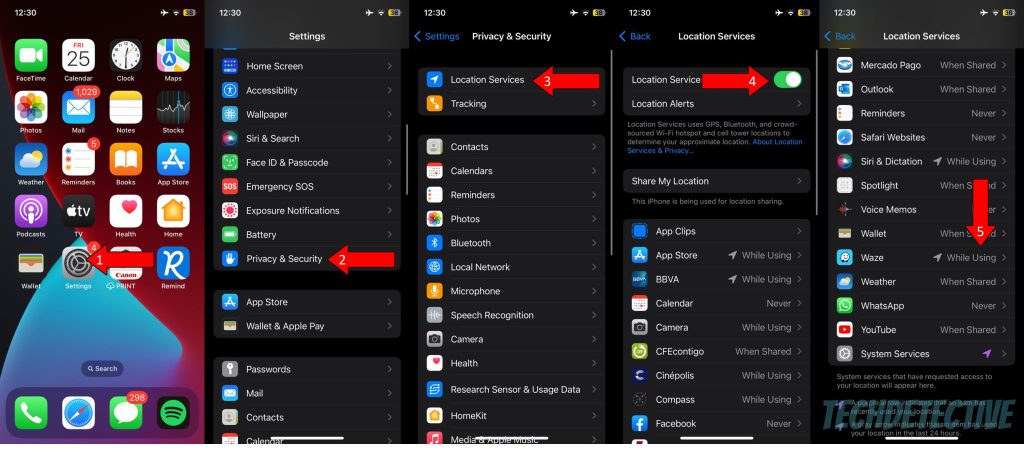
Solution: Luckily, fixing this is super easy, all you have to do is follow the simple steps below:
For iOS:
Next, let’s try something that might seem obvious, but a lot of people tend to miss. Unless you have an unlimited data plan (if so, lucky you), chances are you’ve used up your monthly budget several times. This is not only annoying but quite inconvenient while you’re trying to navigate.
Waze can sometimes trick us into thinking that the source of an issue lies in the wrong place due to how the platform communicates it. Since the app says that there’s no GPS available, naturally the first things you’ll want to check are your location services and permissions, when in reality the culprit might not be there.
Occasionally, the cause of this situation will be an unavailable internet connection, which can easily present itself when you’ve run out of data for the month.
If you suspect this to be what’s happening, try browsing the web with your mobile data. Assuming that nothing’s loading, you’ll want to top up your Megabytes to keep using Waze.
Yet another reason why Waze says there’s no GPS and is only showing your approximate location, is that your date & time settings are set incorrectly. I know it might seem counterintuitive to think that this configuration would have anything to do with your navigation experience, but it is what it is.
Apparently, Waze’s positioning system relies heavily on your current date and time, as it helps it pinpoint your country and time zone, which go hand in hand with latitudes and longitudes.
Now, normally, this should be set up to be obtained automatically, but sometimes, a bug, an update, or a simple system failure can cause your device to toggle this option off and be out of sync.
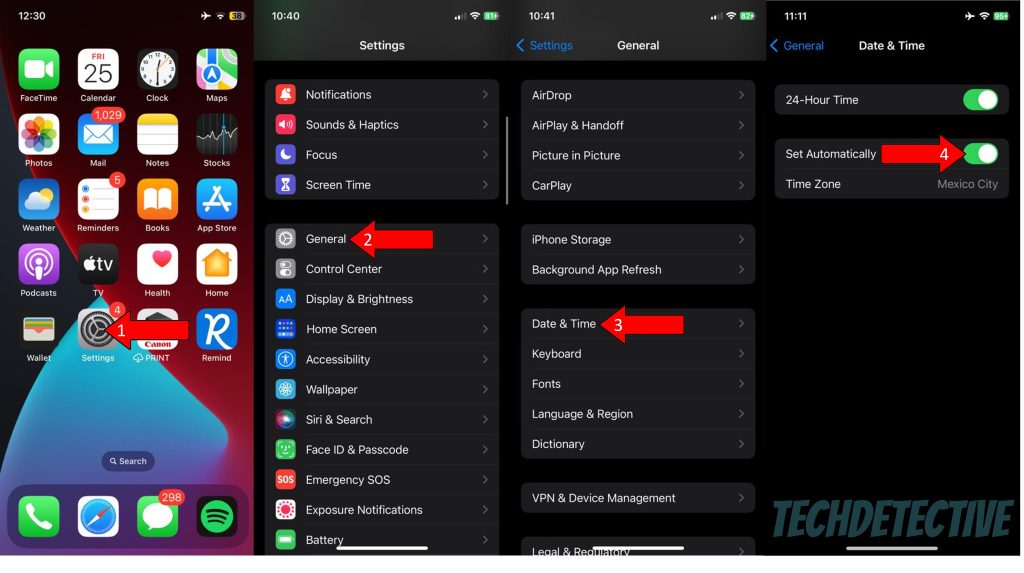
Solution: If you suspect this to be the case, here’s how to reactivate automatic date & time settings:
For iOS:
For Android:
You might find this hard to believe, but another common reason why Waze is saying there’s no GPS and is only showing your approximate location is an outdated app. And there are actually sound reasons behind this.
You see, in most cases, apps come packed with new and improved features, as well as patches for bugs and several optimized settings. Moreover, although not set in stone, it is common for companies in the Tech industry to stop supporting older app versions when newer ones are released.
Accidentally navigating with an outdated Waze app could explain why this is happening, and other issues, such as a scoreboard that’s not working.
Now, usually, this isn’t something you have to worry about, as the automatic updating feature on your devices should check for updates constantly. However, sometimes a weak network, a corrupted file, or a coding bug can get in the way.
In such a case, you’ll want to manually look for available updates and install them if found.
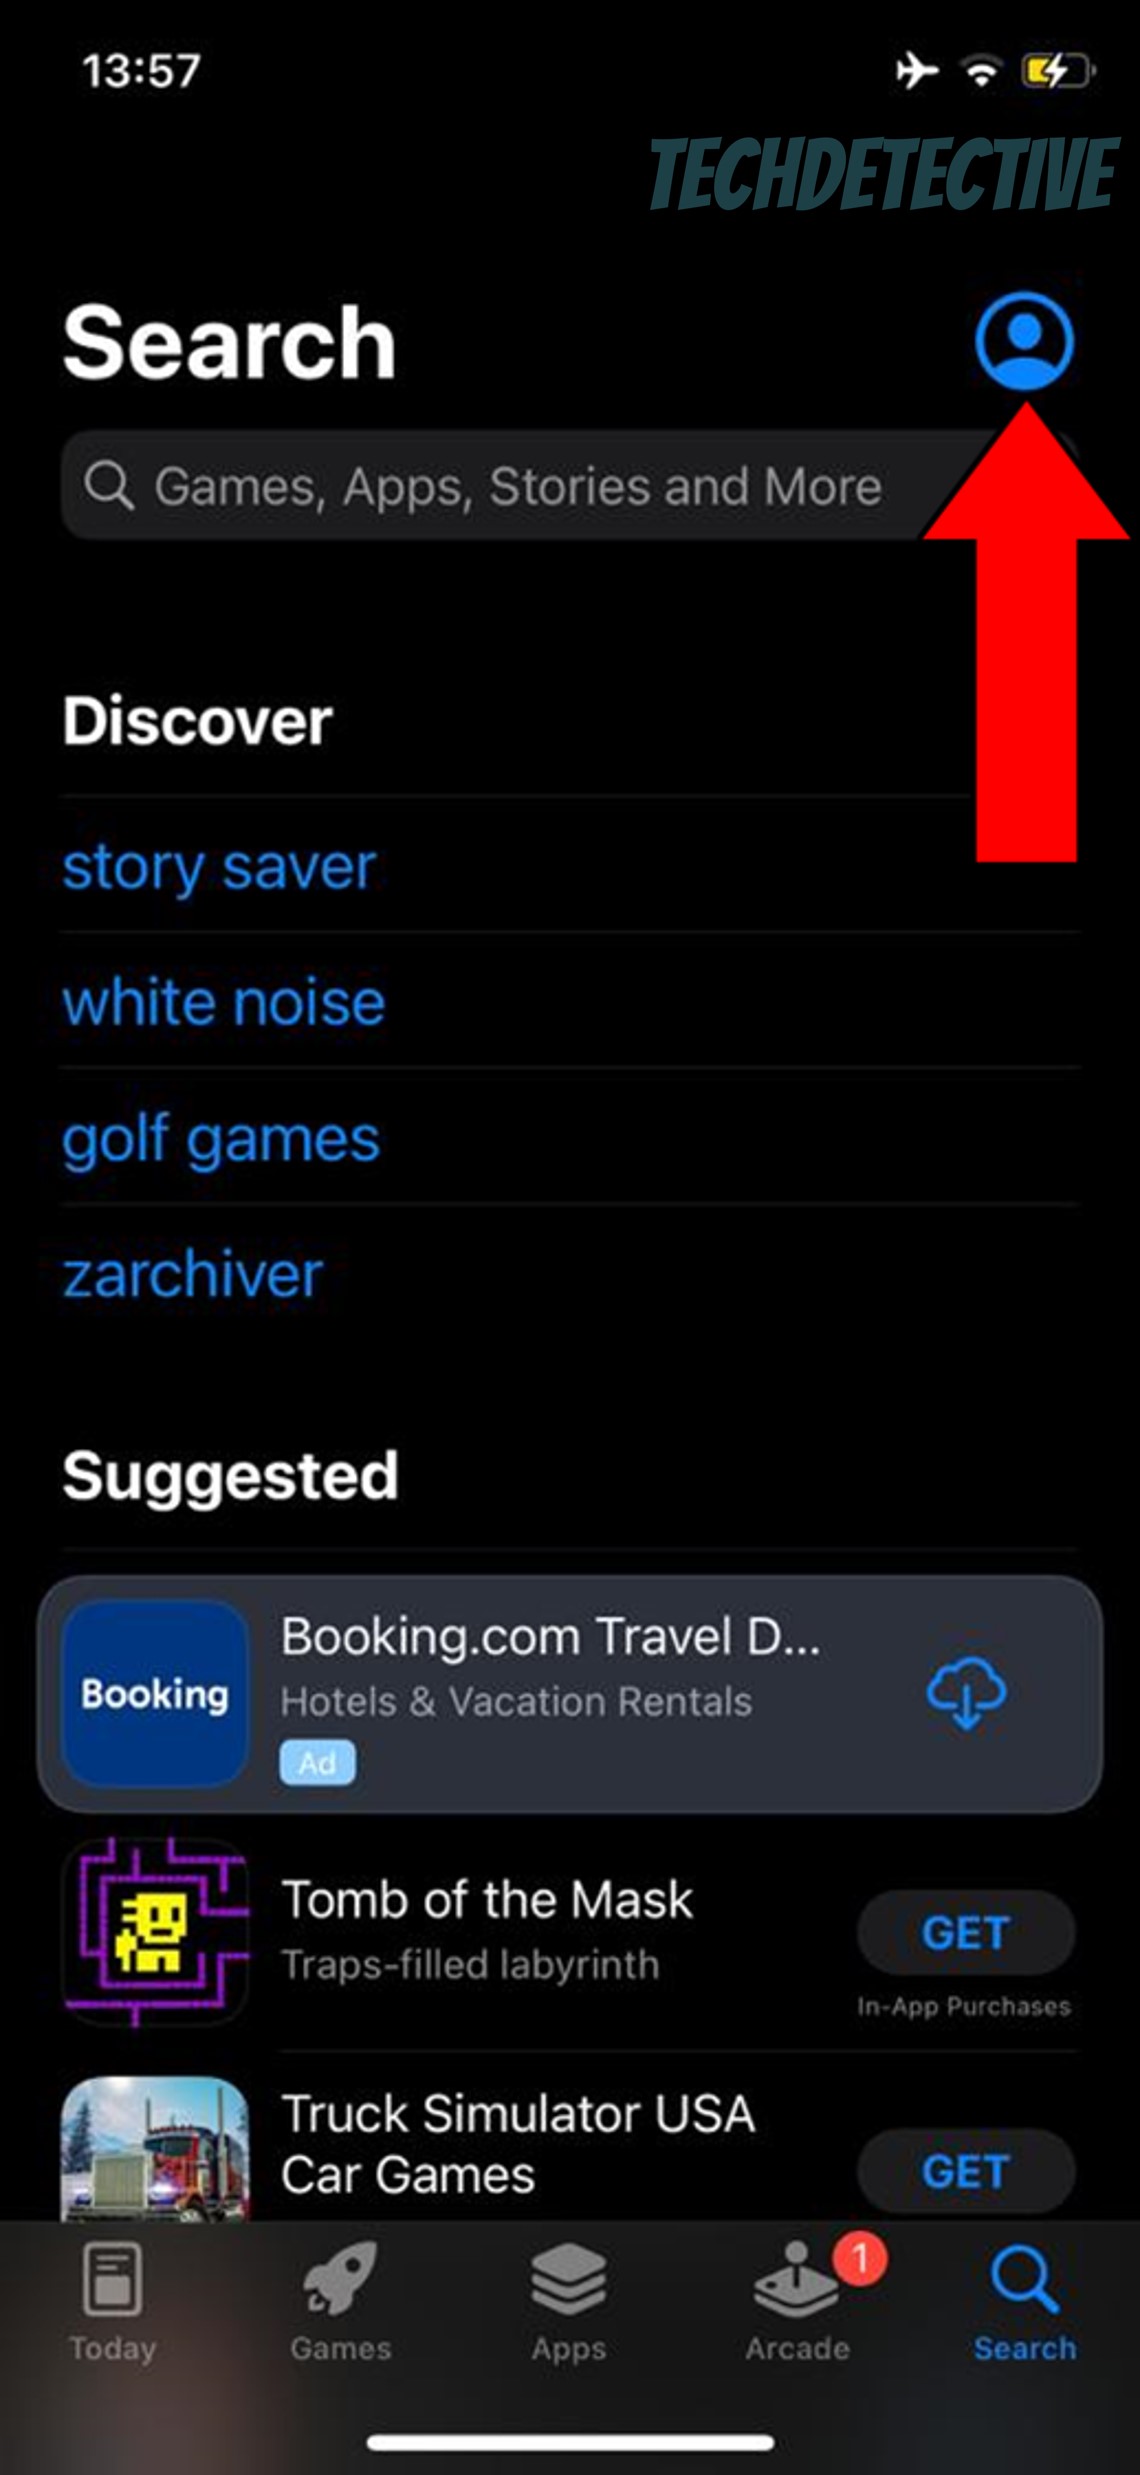
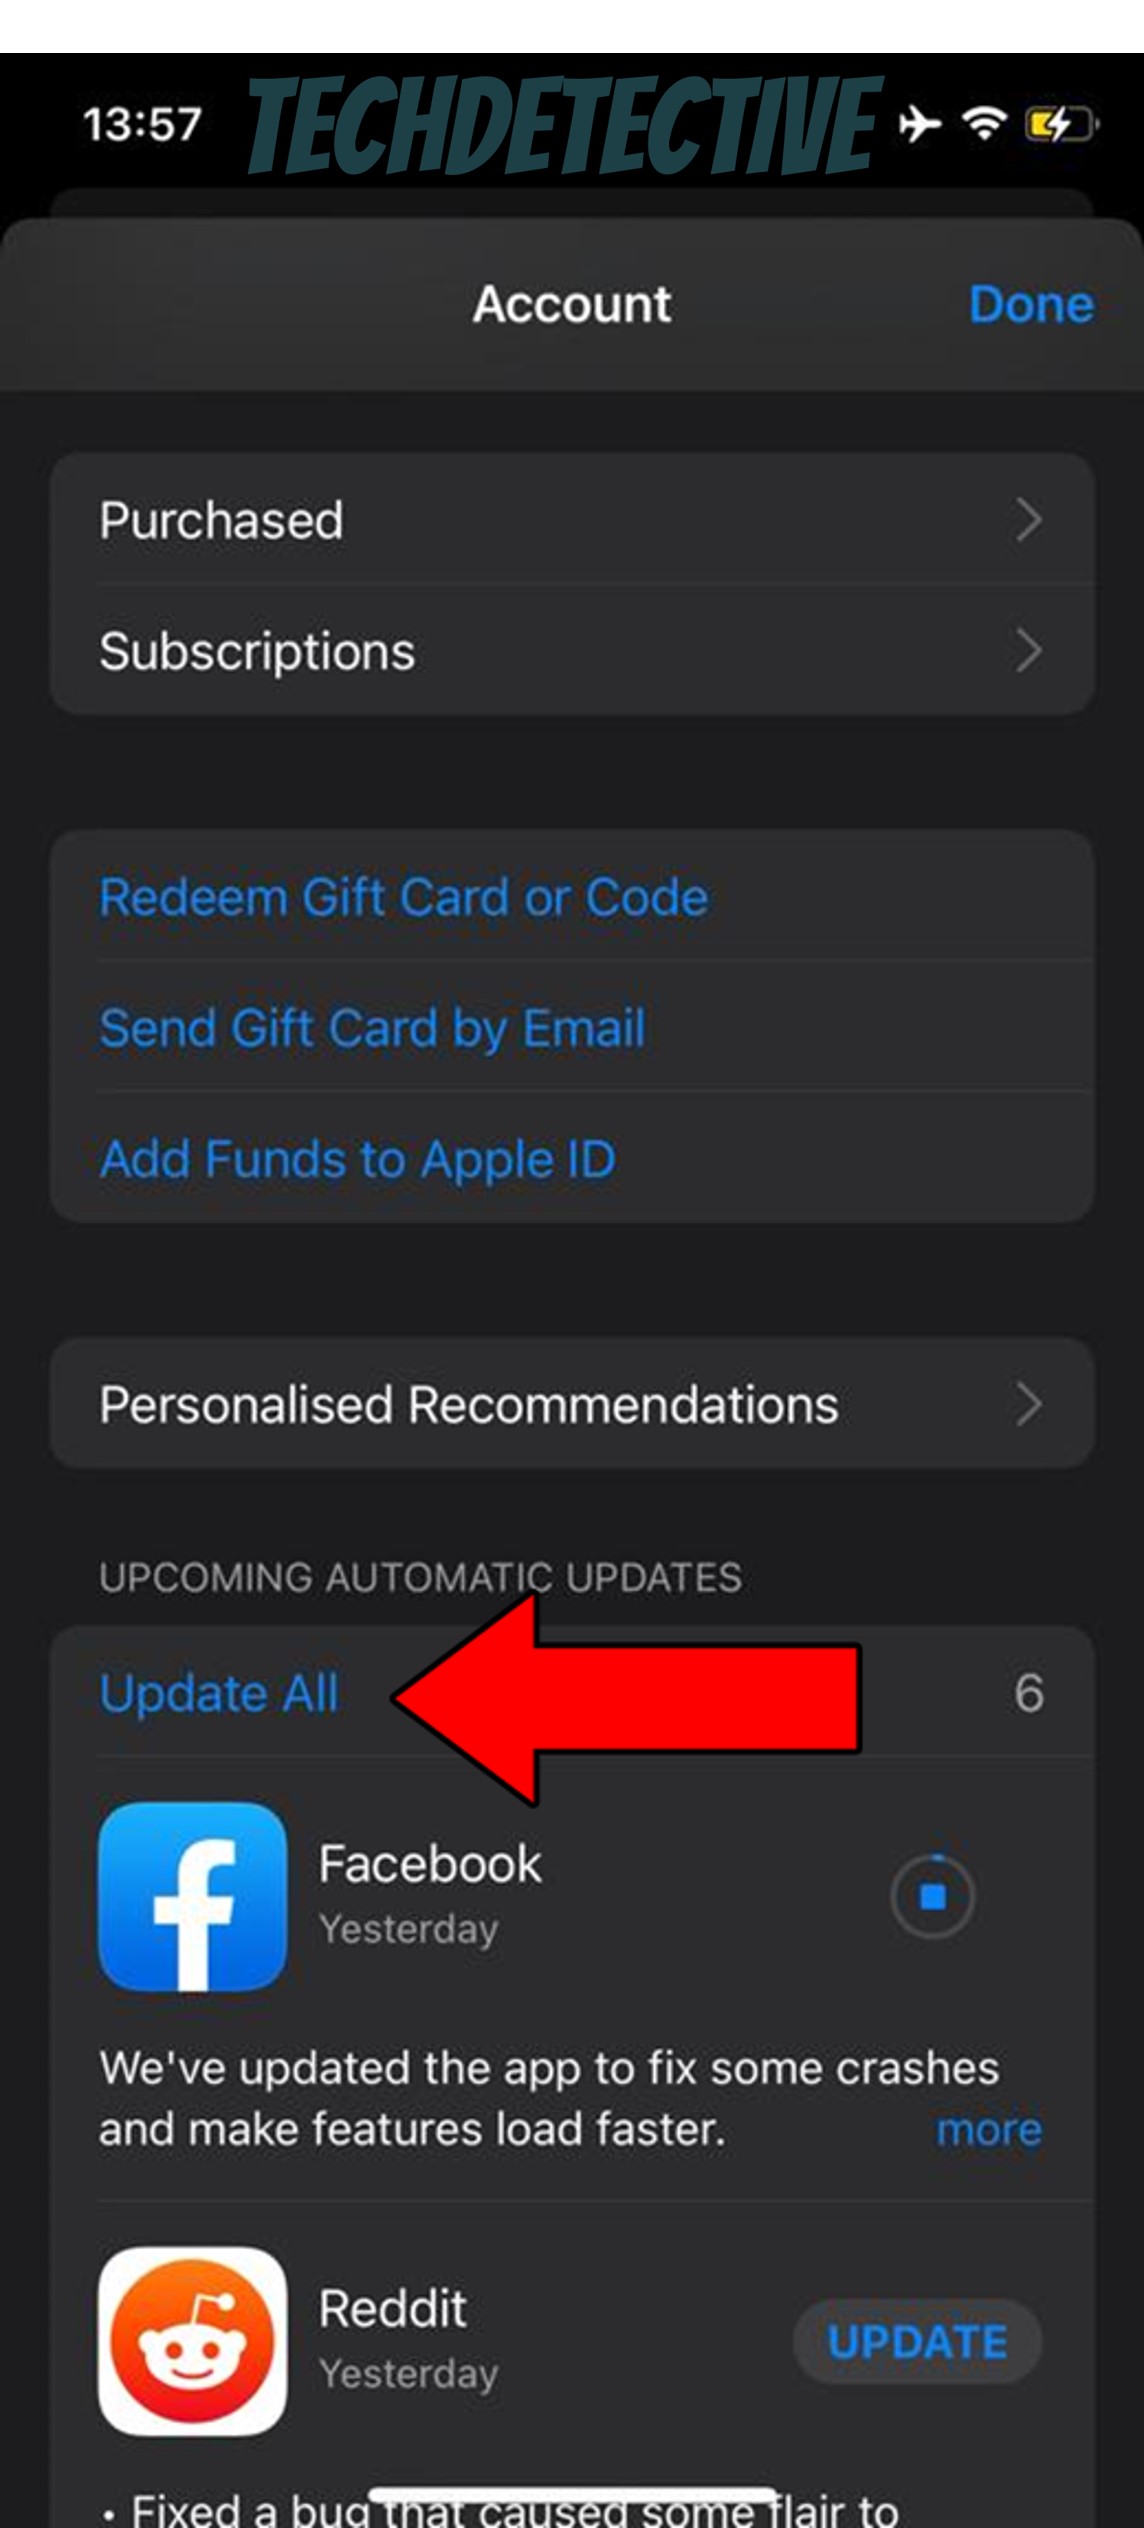
Solution: Not sure how to do it? That’s ok! Here are some simple steps you can follow:
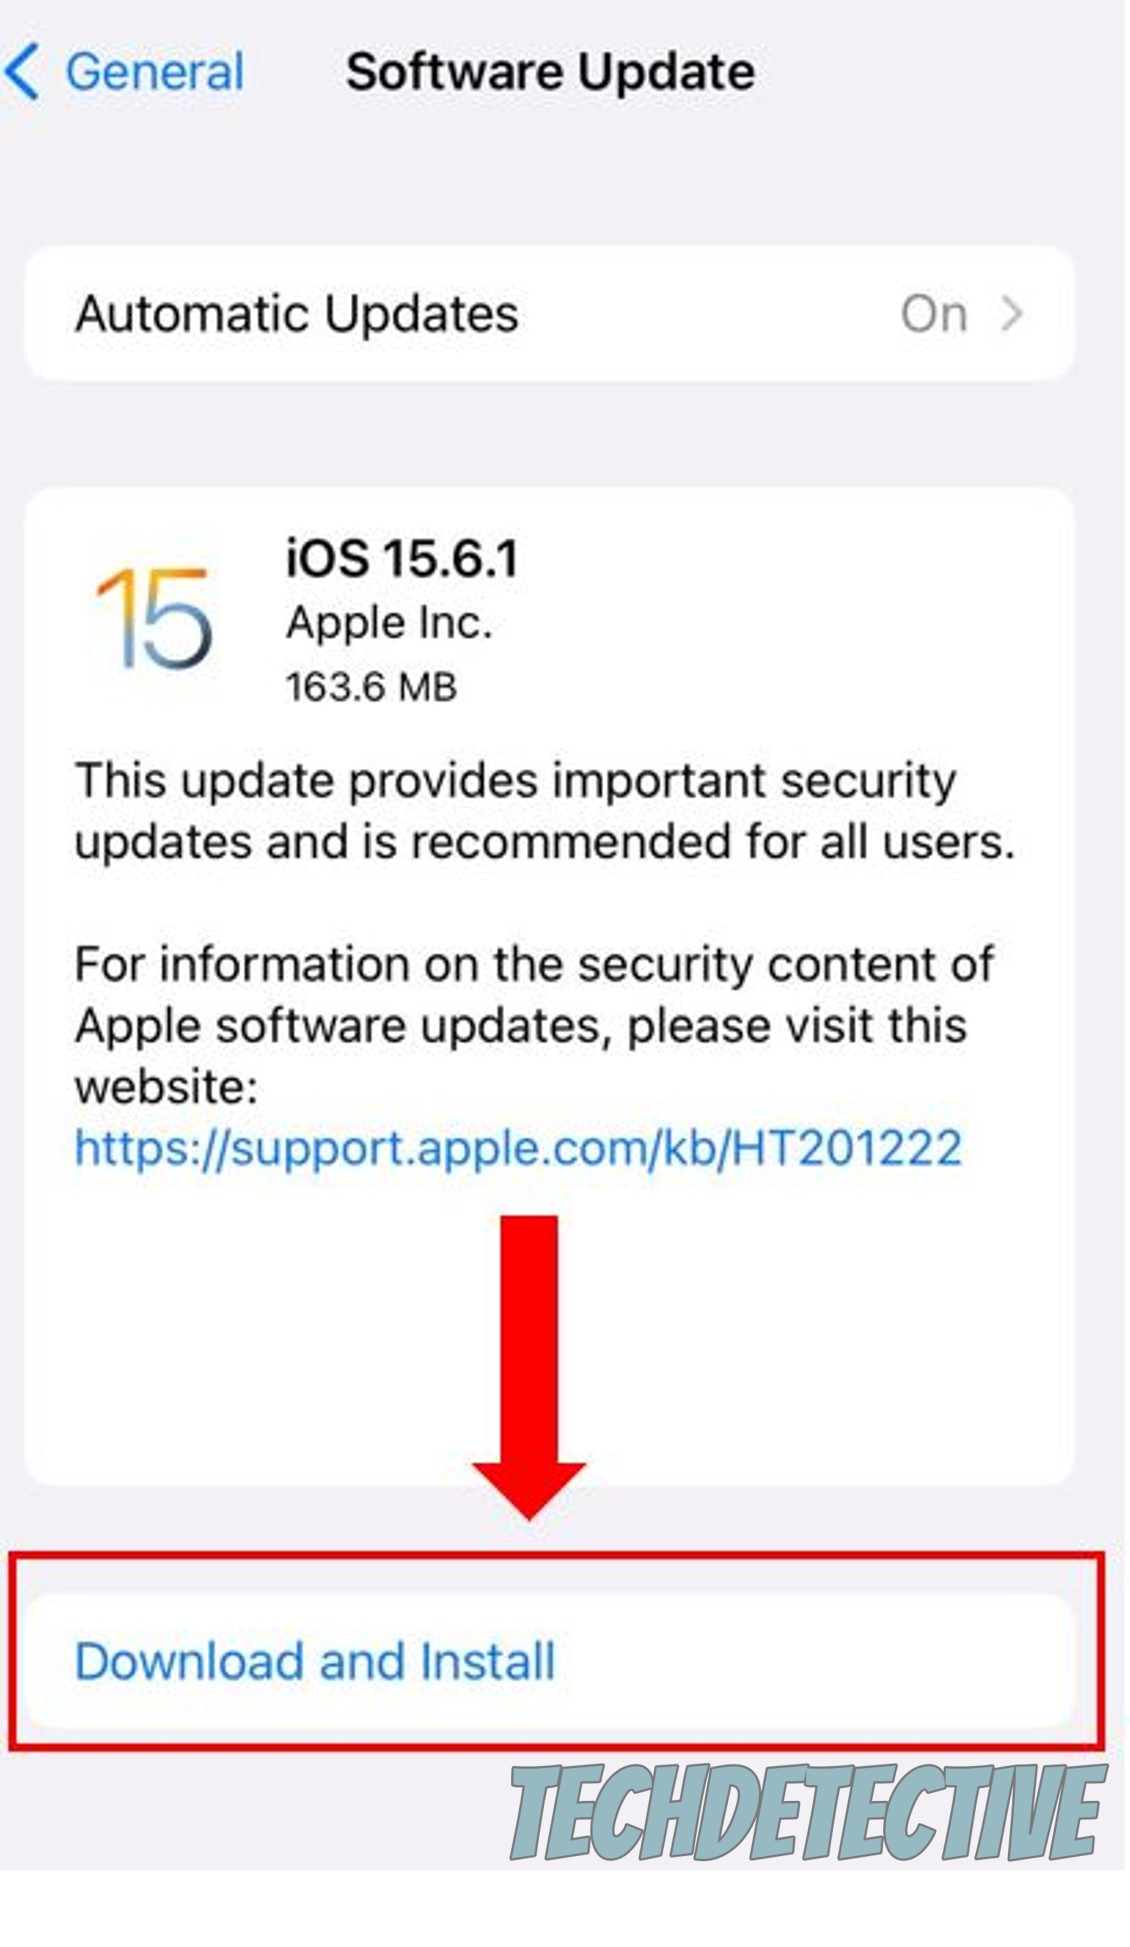
For iOS:
For Android:
Now that we’ve covered the importance of keeping everything updated, let me tell you that your devices are not the exception. Granted, while updating your Waze app will greatly improve your situation, you’ll only see the full benefits of this if your devices are also running like clockwork.
More often than not, app and device operating system developers work hand in hand, and as such, their products are optimized to work with each other.
If you suspect your device’s automatic updating feature is not working as it should, try checking for software updates manually.
Solution: Both Android and iOS have very friendly software updating processes. In fact, this should take you less than 5-10 minutes depending on the download size:
For Android:
If outdated software was to blame, now that you’ve updated both the platform and your devices, Waze should no longer say there’s no GPS and your exact location should be calculated effortlessly.
Lastly, let’s make sure Waze’s cache is not acting up.
If you’re already familiar with this concept, feel free to move on to the solution, but if you’re a newcomer to the Tech world, please read on, as this definitely interests you.
I won’t bore you with all the technical details, so let me boil it down to the basics. In short, an app’s cache is where your favorite platforms store essential information. In there, you can find login credentials, user preferences, and in GPS navigation platforms like Waze, routes, and street names.
The purpose of keeping this data stored on your devices is to save time. By not having to reload all its resources every time it’s launched, Waze can get you navigating quicker.
And while this all sounds great, sometimes leaving your cache alone is not as convenient. Occasionally, a corrupted file can get accidentally stored within it. This could explain why Waze says there’s no GPS and is only showing your approximate location, as well as other issues, such as constant crashing.
Solution: In that scenario, you’ll want to clear Waze’s cache. Yes, you’ll have to be a little patient the next time you launch the platform, but if that fixes the problem, it’s definitely worth it!
Here’s how you can clear your cache:
For Android:
Clearing an app’s cache on iOS is also possible, but the process is a little more complex. Instead, I’d recommend uninstalling the app and reinstalling it. This should clear the cache and solve most of the issues you’re having.
That about covers it!
When Waze is saying there’s no GPS, and it’s only showing your approximate location, navigating with the platform can get very annoying and get you lost quickly.
Luckily, I hope this piece has helped you see that, in most cases, addressing the root of this issue is very easy. More often than not, simple actions, like checking automatic date & time is enabled, and clearing Waze’s cache, should do the trick.
Thank you so much for sticking with me all the way to the end. If this article was helpful to you, it’ll make you glad to know that there’s new content to learn from every week. While we put the finishing touches to our latest work, why not check out our other resources below to become a Tech Detective yourself?
I wish you nothing but the best!


Detective ‘Gerry’ Molina is one of the most prolific detectives on our TechDetective team. He’s known for his ability to crack down on multitudes of tech crimes on behalf of you – the citizens of the internet. Molina is often the first point of contact for many cases, working to help free victims from the tyranny of tech issues.