Is Microsoft Teams not closing, and it’s driving you crazy?
I’m not surprised! If I had a dollar for every time I’ve heard someone complain about having this issue, I’d probably be on a yacht with Jeff Bezos.
I know how annoying it can be to have this happen, as the platform consumes resources that you might need elsewhere after apparently closing it.
But don’t worry, you’ve come to the right place for answers. Below, you’ll find a list of many simple steps you can follow to solve this problem for good.
The 5 simple steps to take when Microsoft Teams is not closing are:
Keep reading to regain control!
The first thing I’d like you to try is to disable a particular setting that might be preventing Teams from closing properly. Whenever developers include features in their products, they do so with the best intentions, but sometimes they can create problems for users.
There’s an option within Teams that allows the platform to keep running in the background after you’ve closed it. This allows for constant communication with your coworkers and ensures that you never miss an email, call, or notification.
And while it’s mostly beneficial, you might not want it activated at all times.
Solution: To disable this feature, please follow these steps:

4. On the new window, stay on the “General” tab, and uncheck “On close, keep the application running”
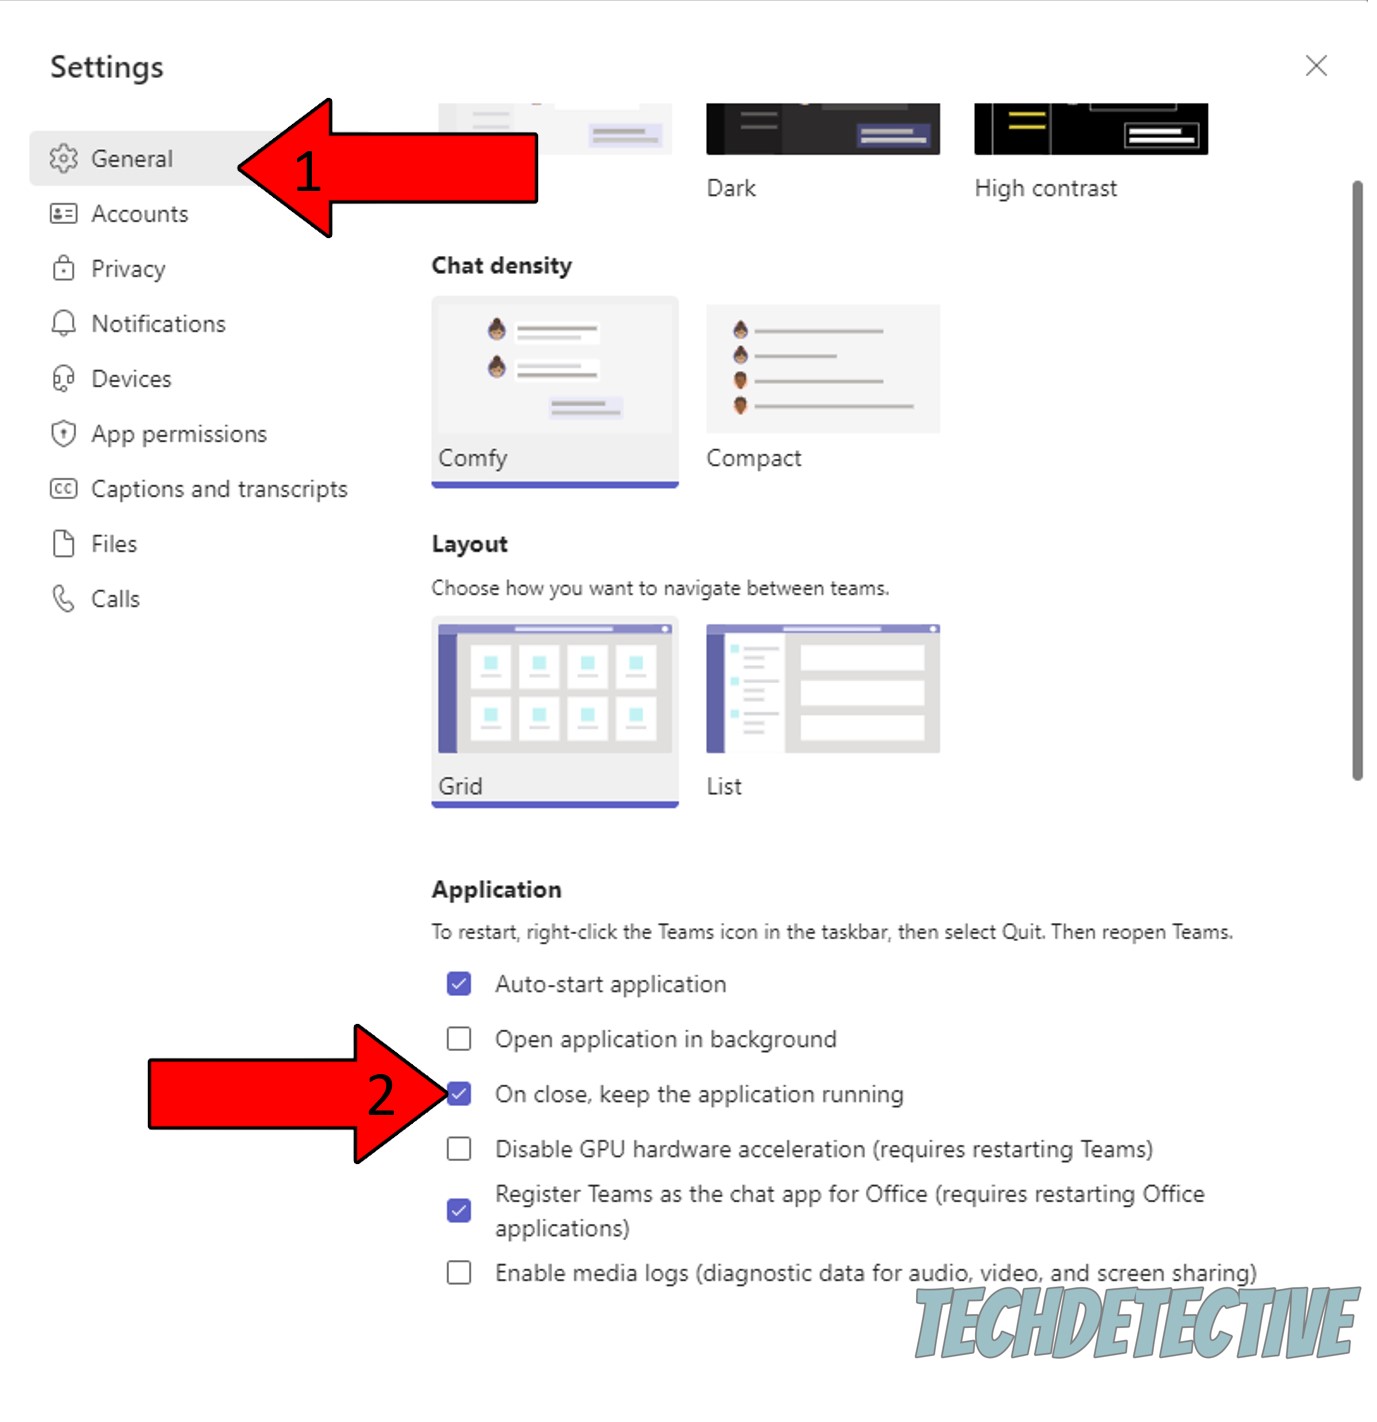
That’s it! Disabling that option should shut down Microsoft Teams fully when you want to close it.
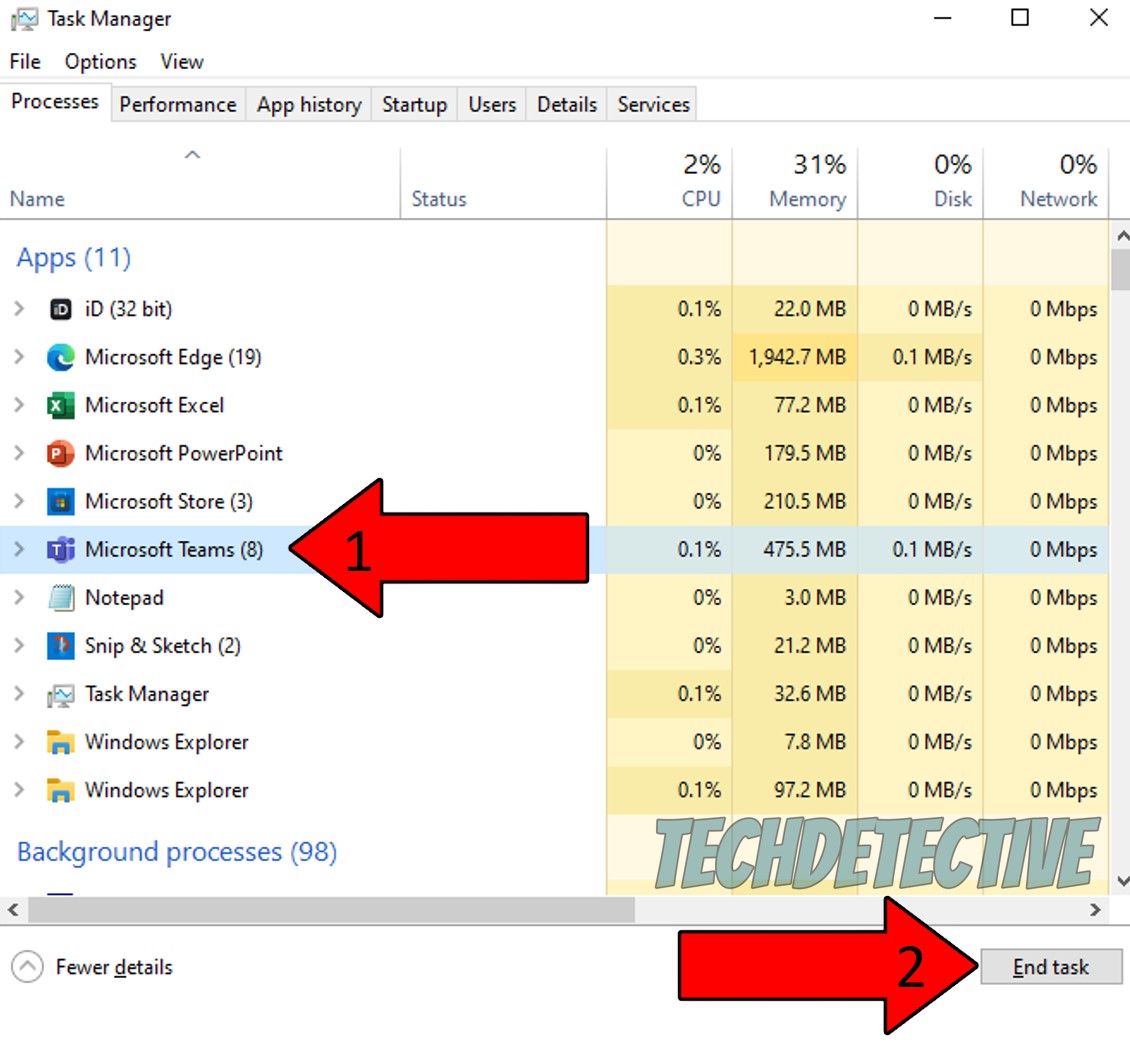
Assuming that you’ve already unchecked the boxes mentioned above, and you’re still having this issue, chances are there’s something preventing the platform from working normally. We’ll look into some causes for this below, but for now, I’d like you to try shutting Microsoft Teams down from the Task Manager on Windows.
This tool is of great help whenever you have a program crash, as it force-stops any processes and leaves the troublemaker in question with no option but to shut itself down. This is what I like to call a universal fix, so it should work with any other platform out there.
Solution:

3. On the new window, find Microsoft Teams, select it, and then click on “End Task”, located in the lower-right corner of the Task Manager
If nothing has worked so far, there might be a bug or a corrupted file preventing Teams from running normally. This can cause the platform to accidentally ignore your command to shut down after being closed, and other issues, such as having the platform be stuck in “out of office” status, or a missing dial pad.
Now, before I tell you how to solve this, it’s important to clarify what an app’s cache is. After all, what would be of troubleshooting without a little technical knowledge?
An app’s cache, is, in a nutshell, a virtual place where essential files are stored. In it, you’ll find audio, video, preset configurations, login credentials, and several other things. By keeping this data handy, the platform can load quicker when launched, which can save your workday precious minutes.
More often than not leaving your cache alone is for the best. But if it has accidentally stored a corrupted file, things can quickly get hairy and could explain why Microsoft Teams is not closing.
Solution: In such cases, your best bet will be to clear it. Here’s how to do it on several devices:
Windows PC:
Mac:
Next, let’s try updating your app. I know being constantly on the lookout for new releases is not the most exciting thing in the world, but it’s very important to avoid issues down the line.
Why? Simple.
First, every update includes new features, improvements on existing ones, and patches for several bugs. And second, when a new version of an app is released, the oldest one stops being supported, as it’s expensive for companies to store more than a couple at a time on their servers.
Now, you shouldn’t normally have to worry about this, as there’s automatic updating. But sometimes, a weak network, a bad file, or even a download interruption can get in the way, and could easily explain why Microsoft Teams is not closing.
In such a case, you’ll have to manually download and install the latest version of the platform to your devices.
Solution: PCs are normally not an issue here, as they’ve got a reputation for keeping everything updated, even when the time is not right. I bet you have more than one story about a time when you had an important presentation and your device started updating at the worst possible moment, right?
Exactly… I think you’re covered.
Mobile devices, on the other hand, are not so reliable in this area, so here’s how to manually update Microsoft Teams (and any other app) in iOS and Android systems:


For Android:
Finally, let’s try addressing the issue from the source.
Sometimes, corrupted files or bugs responsible for platform problems can be too deep-rooted and can’t be fixed with a simple update or clearing your cache. In cases like these, your best bet is to wipe all traces of the app from your devices’ memory.
By doing this, you’ll be giving Teams a chance to patch up anything that might have been wrong and reload its processes from scratch once you re-download it.
A lot of people tend to put this off out of fear of losing their files and conversations, but don’t worry. These are usually backed up in the cloud, so they should be waiting for you once you recover the app. Just make sure to ask your IT admin about this first, as your company might not have backups enabled.
Solution: Assuming they tell you it’s safe to uninstall, here’s how to do it:
Windows PC:

Mac:
That about covers it!
I know how annoying it can be to have Microsoft Teams not closing when you tell it to. But, I hope this piece has helped you learn that addressing this and other technical difficulties is much simpler than it seems.
More often than not, a corrupted file or a pending update are to blame, so make sure to cross those possibilities out as a starting point.
Thank you so much for sticking with me all the way to the end. If this article proved to be valuable to you, it’ll make you glad to learn that we upload new content every week. In the meantime, why not become a Tech Detective yourself by checking out our other wonderful resources below?
Best of luck to you.


Detective ‘Gerry’ Molina is one of the most prolific detectives on our TechDetective team. He’s known for his ability to crack down on multitudes of tech crimes on behalf of you – the citizens of the internet. Molina is often the first point of contact for many cases, working to help free victims from the tyranny of tech issues.